The goal of this extension was to develop a REST Api framework for TYPO3 that was simple to integrate, but as scalable and
configurable as possible. Using Annotations to accomplish this, seemed
obvious and intuitive to us (and others).
It should offer simple, comprehensible solutions for the three big challenges during the implementation:
user-authentication, file-upload (including automatic FAL conversion)
and localization.
We wanted to offer the possibility to route requests to Controller-methods - offering a
standardized scheme, but also allowing custom route configurations,
that includes parsing of custom request parameter.
We wanted to offer a good documentation with as many examples as possible. So you (and we) can copy and
paste - no matter if you are a front- or backend-developer. And no matter if this is the first time you are building
an Api in TYPO3 - or if you're an expert.
We've invested a lot of time in creating functional and editable examples on CodePen and also integrated a
miniature "Postman" in the backend-module so you can test your endpoints without having to leave the
TYPO3 environment.
Quick Walkthrough
Overview of the installation and backend features of the extension.
What does this extension do?
This extension makes implementing your own Rest Api with TYPO3 as a backend simple.
It takes care of all of the "dirty work" like parsing the JSON requests, moving uploaded files to their destination, converting JSON-data to
Models and Models, ObjectStorages, SysFileRefences etc. back to a JSON for the Reponse.
It supports all standard HTTP Request Methods like GET, POST - and even can handle PUT, DELETE and PATCH including
file-uploads, which is usually a headache when working with PHP and TYPO3.
The backend module offers a test bed similar to Postman to compose
requests without having to use an additional tool. This saves you time and keeps development and testing centralized in your project!
Comments and annotations above the methods of your endpoints are automatically parsed and converted to a beautiful
documentation in the backend module. Development and documentation stay centralized!
|
But WHY THE HELL in TYPO3?
Why not Symfony, Laravel, Node, Meteor or any other sophisticated solution?
Well, because TYPO3 does not only have one of the best architectures out there – it is the only solution that comes with beautiful
code AND a beautiful Content-Management-System like the TYPO3 backend. And on-top, it is one of the most secure CMS available.
Many other solutions only offer one of the two: Either you have a great architecture with Routing, File-Abstraction and solid request-handling -
but the moment you also need to have pages with editable content-elements, things tend to get extremely cumbersome.
Or you have content-based CMS (Joomla, WordPress) with an architecture that makes the implementation feel as if you were
gluing a shelf to the wall because you're missing the right screws.
With TYPO3 and a Restful Api integrated directly in one and the same system, many things become possible that would require a lot
of work in other environments and systems: You can have a website, that has "normal" content pages that can be comfortably edited in the
backend.
The backend offers everything you've been dreaming of: A nice page tree, modular content-elements, plugins, referencing of
content - to name a few. Aside of the static content there can also be dynamic content that is stored in "lists" like news-articles, a directory of movies
or books.
And to round it all off, the same installation and website can offer a Restful Service making it possible for external services like
apps or single page application to connected to the website and retrieve the data.
With Version 11 LTS and PHP 8+ TYPO3 has not only gained in speed. It has accelerated to light speed.
Supports all common request types (GET, POST, DELETE, PUT, PATCH)
Shipped with an endpoint for full frontend-user authentication
Multiple authentication methods: JSON Web Tokens (JWT), fe-user-Cookies and HTTP-Authorization (Basic Auth)
Possibility to retrieve hidden records in the Frontend (like a backend user)
Full support for creating, adding and removing FileReferences from the frontend application
Supports multipart/form-data requests to send file-uploads in combination with JSON-payloads
Supports CORS for accessing the endpoint from cross-origins and while developing in localhost environments
Automatic conversion of JSON-data to Models and vice-versa
⊛ Developing features:
Many, many examples. And even many more.
Highly customizable and configurable
Automatic and custom routing to endpoints
Fastest possible integration, set up your implementation in 5 minutes
Optional Caching-layer with one line of code
A "kick-starter" feature for creating your own extension with one click
⊛ Backend module:
Automatic listing of all registered endpoints
Automatic documentation of your endpoints from comments and annotations
Test bed to send requests with parameters and file-uploads from backend
Limitations
Limitations and demarcations:
We have completely focussed on the JSON-format. We currently see no need to support XML or other formats. But let's discuss!
We are not strictly following all principles of a RESTful Api. One of them says a "things should be stateless". To a certain
extend this contradicts the login mechanisms of TYPO3 which relies on sessions that are stored on the server. We like the concept
of TYPO3 Frontend Users and the idea of having sessions. Sessions that you can store data in. So we have implemented them as one
of the ways to authenticate.
We are mixing some things here, which are strictly separated from each other in other extensions. One of them is:
URLs are not strictly mapped to a certain Model, Storage or Entity. This way, nnrestapi can be used very versatile - even
if your only intention is to map a URL-route to a method like the extension YAML Routes
does.
Dependencies
Sorry, we've sneaked something in.
This extension depends on EXT:nnhelpers which takes care of
most of the hardcore conversions: from JSON to Model, Array to FAL, FAL-Uploads and other strenuous things...
If you look at the examples or source codes and see a line of code starting with \nn\t3 then this is what
we are talking about. nnhelpers is basically just a wrapper for many methods and functions that TYPO3 offers
and that have been hard to find or have changed from version to version. Using nnhelpers in our extensions
has made it possible for our company to develop and update extensions faster.
Sorry for "sneaking this in" when you install nnrestapi... but it saved us many, many hours of lifetime.
Contribute
Contributions are essential to keep open-source projects alive.
We are thankful for any improvement and contribution you make to this extension.
Contribution workflow
Please always first create an issue at Bitbucket before starting a change.
Get the latest version from git
Fork the git repository and create a pull request with your change.
We hope that you see the time and work we invested in creating this extension.
We hope you have noticed, we have tried to create the best documentation for a TYPO3 RestApi out there.
We hope you value to have so many examples, snippets and recipes that you can copy + paste.
| But most of all:
We hope this extension will save you many hours of work time (and lifetime) while developing your own project.
This is why...
We hope you will donate € 1,– (yes, just ONE fckn Euro!) for every project you have based on this extension.
We won't be checking this. And we will not be pushing that.
| It's just one click. And it's up to you.
But image, what difference it could make, if you just said "thank you" this way, because...
Damn. That was a lot of begging. We should really start learning hypnosis instead.
What is a RESTful Api?
Tip
If you are not new to the topic, skip this. It's going to bore you ;)
A simplified explanation
If you are new to the topic or you are wondering, what a REST Api ("Representational State Transfer") is all about and why it is
hyped, let's put it in a few simple words. This is no explanation, that a "real" programmer would accept. But therefore it will be easy to understand ;)
And yes, ok, we admit, we're writing this to get Google more interested in this text ;)
Roundtrips? Old-school.
If you've been working with TYPO3 for a while, you've probably been thinking in terms of "content-pages" and "page reloads":
You have your backend. The backend has many pages. And in the frontend, clicking on a menu will navigate to the requested page.
With every page you visit, there is a "roundtrip". The screen goes blank for a moment. The backend renders the templates and
responds with everything needed to display the page in the frontend: The complete markup (HTML-code),
the styles (CSS) and a little bit of JavaScript-magic to make things more interesting and interactive.
These solutions "feel" a lot more like real, native apps and offer a great User Experience (UX). A good SPA or PWA might also dynamically load
content from a backend, but most of the time it doesn't feel like a page reload. The data is loaded and persisted "in the background" without
the screen going blank and then successively being re-rendered. I bet, you wouldn't believe that an Desktop-App like Slack
or Figma are based on web-technology!
If you look at one of the SPAs in depth, you'll notice a different concept and architecture. Most of the SPAs are not fetching HTML and CSS
from the backend (the way everybody did it in the last century with jQuery.load()). They actually have most of the markup and styles of all
pages and the complete application loaded on the first page load.
The rendering of the markup and the communication with the backend is solved using JavaScript.
Let's talk JSON
JavaScript does just about everything in a Single Page Application or Progressive Web App. It's the engine and brain of the frontend. And because
it takes care of dynamically creating and rendering the markup, there is no real need to load bits and chunks of markup from the backend.
Instead, JavaScript will load raw data-Objects and then "convert" the data to something visible and readable for the user.
The communication between JavaScript and the backend is based on the JSON-format (at least in most applications).
Nobody, who has ever touched a JSON wants to see XML again for the rest of his life.
So here is a JSON:
{"title":"Nice title", "text":"And this is the text!"}
Copied!
Looks pretty straight forward, right? The JavaScript in the frontend application says: "GET me that data" and the backend delivers the
above string. From there, it's only a one liner to convert the string to a "normal" JavaScript Object:
let data = JSON.parse('{"title":"Nice title", "text":"And this is the text!"}');
console.log( data.title );
Copied!
| What about sending data back to the server, for example, if you wanted to change the title and save it in the database?
Let's modify the title and send it back:
data.title = 'A new title';
fetch('https://www.mysite.com/path/to/my/api', {
    method: 'POST',
    body: JSON.stringify(data)
});
Copied!
That's what makes working with JSON so great. Data (Objects) from the request are ready-to-use in your script without any hassle.
And modifying them and getting them back to the server is fun.
GETting and PUTting things
Things start to get fascinating, if you imagine your JSON-object was like a real "object" in a shelf.
Like every book, every object has its own place in the shelf. The place is defined by the endpoint (or URL).
(Behind the scenes, most of the time, the "shelf" just a simple database with rows and columns.
The shelf-number would correspond to the uid of the entry)
To now check, which object is in the first shelf, we will send a request to the API and GET the content from
shelf number 1. To do this all we need to know, is the "unique place" the object has in the shelf.
And this is nothing other than the URL!
The URL identifies a unique and clear "position" of an object (you could also say "entity") on the server.
https://www.mywebsite.com/api/shelf/1
Copied!
Fine. We got a data-row. Maybe the data contains the title and description of a book.
Now we modify the title and want to put the book back on the shelf. So, again, we tell the api:
"Listen, here is the book. I modified the title. Could you put it back in shelf number 1?"
We want to put it back in shelf number 1... so the URL we call should be:
https://www.mywebsite.com/api/shelf/1
Copied!
But wait... that is the same URL? Right. So how can the backend know what we want to do?
With the first request we want to GET the book and with the second one we want to PUT the book back on the shelf.
But that can't work, if it is the same URL, right?
The request-type makes the difference!
Most "frontenders" coming from jQuery or the classic HTML-pages will now think: Simple. I would just
use different URLs: One for reading the data, one for writing it. Or they would use URL-parameters
like ?action=update to make a difference between the two requests.
I bet, up until now, you have probably only worked with GET- or POST-requests.
A GET-requests is the thing you can "read" in the URL like https://www.mywebsite.com/path/to.php?target=somewhere).
And you probably know POST-requests from HTML-forms. The POST-body (the form-data) is sent "invisible" to the server
after submitting the form.
One of the main ideas with a REST Api, is to use the HTTP-Request-Type to make clear, what you want to do.
The idea is: You will be sending a request to the same URL, but using different request types.
// get the data
GET https://www.mywebsite.com/api/shelf/1// write the data
POST https://www.mywebsite.com/api/shelf/1
Copied!
The nice thing: There are request types for just about anything you want to do.
Some great minds came up with the following definition:
GET will retrieve an existing entry
POST will create a new entry
PUT will replace an existing entry (all fields are updated)
PATCH will update certain fields of an existing entry
DELETE will delete an existing entry
It is pretty much up to you, which request type you use to achieve what. And people occasionally get confused about the exact difference between PUT and PATCH.
But things get easier to understand later, if you stick with the standards.
Where to go from here?
This TYPO3 extension is not only a good starting point to get things "up and running" in a few minutes – it also offers a nice module in
the backend for testing your endpoints. And it comes with many examples and step-by-step tutorials about the front- and backend-implementation.
We hope you have fun using nnrestapi - feel free to contact us if you find a bug or have ideas on how to improve the extension.
Installation
High speed walk-through: Installation
| For people, who know their way around TYPO3 – no words needed, only enough coffee :)
You can find the scripts for the YAML-configuration and .htaccess below.
Step-by-step instruction
Install the extension
| Press the Retrieve/Update button and search for the extension key nnrestapi.
Then import the extension from the repository.
OR
Search for the current version in the TYPO3 Extension Repository (TER).
Download the t3x or zip version. Upload the file afterwards in the Extension Manager and activate it.
OR
Install the extension using composer on the command-line:
composer require nng/nnrestapi
Copied!
Make sure the database-tables were created
In the TYPO3 backend, switch to the "Maintenance" module and click on "Analyze Database Structure".
Create the database-tables for nnrestapi, if necessary.
For more information, read here.
Include the TypoScript Templates on your Root-page
Make sure, the static TypoScript configuration for "RestApi Configuration (nnrestapi)" was included on your root-page.
To do so, follow the standard instructions on how to include TypoScript from extensions.
Include the YAML-Configuration
Search for your site-configuration YAML, which is usually located either under typo3conf/sites/{name}/config.yaml
or under config/sites/{name}/config.yaml.
Include these two lines at the end of the configuration.
They take care of the basic Routing to the Api – another words:
That all requests sent to /api/... find their way to your classes and methods.
Modify the .htaccess
This step might not be necessary - it depends a lot on your hosting environment and PHP-settings.
In most of our installations these two lines were necessary – otherwise we had problems with the
frontend user-session / authorization.
Then head on to the Quickstart section to write your first own endpoint in less than 5 minutes!
Screenshots
Backend module with testbed
While creating your own RestApi you don't need to use external tools like Postman.
All registered endpoints automatically get listed in the backend module. By clicking
on the compose-icon you can create your custom request in the backend including
Frontend-User authentication and file-uploading.
Search and filter endpoints
Search for registered endpoints in the backend and hide the default endpoints
that come with the nnrestapi-extension.
Automatic documentation
Use Markdown in your method annotations to automatically create the
documentation. This saves a lot of time and keeps code and
documentation at one place.
FrontendUser Authentication
The nnrestapi extensions ships with a Authentication-layer for logging in frontend-users
and setting Json Web Tokens (JWT). This allows development from localhost-environments which
connect to a external development-server without CORS-problems.
You can test the login / logout from the testbed in the backend module:
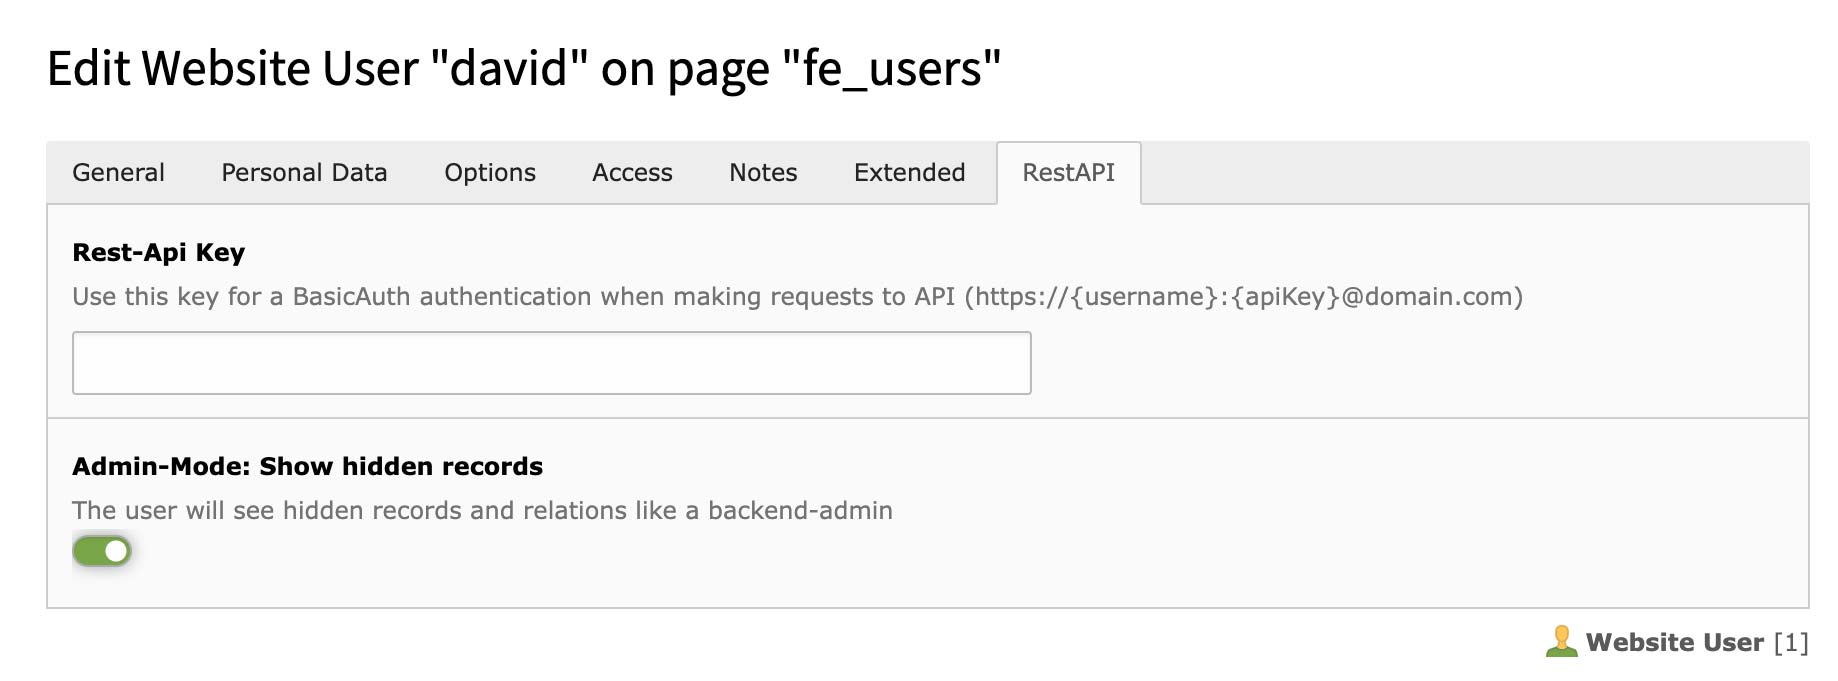
FrontendUser Configuration
Set an API-key for frontend users to authenticate using HTTP basic auth. Alternatively you
can use JSON Web Tokens (JWT) or cookies.
Setting the checkbox "admin mode" will allow the frontend user to retrieve hidden records with
relations. This would usually only be able for backend users.
Extension Configuration
Define API-keys for global users (no frontend-user necessary) that can authenticate using HTTP basic auth.
Set a session lifetime for your users - or create API-sessions that never expire.
Logging
Requests and errors can be logged in the backend and simply be replayed for debugging errors.
The log module offers many options for filtering, sorting and viewing the log entries.
Logging Configuration
Configure logging of API requests and errors in the Extension Manager. Enable request logging
for debugging, set up error logging for production monitoring, and control privacy settings
like IP anonymization.
CodePens to go wild on
We've tried to give you as many practical examples for the frontend and backend as possible.
Most of the examples are also on CodePen for you to copy, test and modify.
Walkthrough
Overview of the installation and backend features of the extension.
Quick Start
Up and running in 5 minutes
Install the nnrestapi extension
Follow the instructions under Installation to install the nnrestapi extension.
Create an own extension
To implement your own endpoints, you will need to create a new extension - or use one of your existing extensions.
Define the dependencies to the nnrestapi extension in your extension.
This is important, so TYPO3 loads your extension after the nnrestapi extension.
This goes in the ext_emconf.php of your extension:
In case your installation is running in composer-mode, this must be added to the composer.json of your extension.
{
   ...
   "require": {
      "nng/nnrestapi": "^1.1"
   },
}
Copied!
Create your first endpoint
Create a file located at Classes/Api/Demo.php in your extension with this code.
Important: Note that the comments with @Api\Endpoint() and @Api\Access() are not just comments!
They actually register your class as an Endpoint and define, who is allowed to access your method.
Click on the "clear cache" icon in the backend. This will make sure, that nnrestapi rebuilds the cache file and includes
your classes and endpoints.
We had a focus on performance and caching, so get used to having to do this whenever you add new endpoints or make changes
to the @Api-annotations of a method.
Call your endpoint
Enter the URL https://www.yourdomain.com/api/demo/example to see the result!
Routing & Requests
The request type makes the difference!
A typical project setup will have of a frontend application that requests something
and a backend that retrieves this data from the database and returns
it to the frontend application.
Many Single Page Applications (SPA) and Progressive Web Apps (PWA) nowadays are
programmed in JavaScript and use the JSON format to communicate between the frontend
and backend. Typically, the frontend app will want to do a number of things:
Get data for an existing entry from the backend
Create or insert a new entry, e.g. add a new item to the to-do or shopping list
Update an existing entry
and finally delete an item from the database
The idea behind a RESTful Api is to define endpoints (URLs) that the frontend application can
communicate with to get the job done. But instead of defining separate URLs for every
operation needed (/api/get/entry, /api/save/entry, /api/delete/entry) or passing
an action as request parameter (?action=save) it uses HTTP Request types to make clear,
if an entry should be retrieved, inserted, updated or deleted.
Same URL - different actions!
Most of the time you even have the same URL for every operation - but depending on the
type of request and the request-body passed, different operations are executed:
Method
URL
Request body / payload
typical operation
GET
/api/example/1
(none)
Get entry with uid [1] from database
PUT
/api/example/1
{"title":"Update!", "text":"nice"}
Update full entry with uid [1] in database
PATCH
/api/example/1
{"text":"fine"}
Update parts of entry with uid [1] in database
DELETE
/api/example/1
(none)
Delete entry with uid [1] in database
POST
/api/example
{"title":"New!", "text":"someone"}
Insert a new entry in database
Hint
In many cases, the backend will not make a difference between a PUT and PATCH request.
Both are intended to update existing data. But if you are interested in the details, you
can find a good explanation on this page.
Route a request to endpoints
The whole deal is about getting a certain HTTP Request Type "connected" to a Controller and method of your
Api that will then take care of the rest: Retrieving, updating, inserting or deleting data.
Make sure, that you have defined a dependency of your own extension to nnrestapi - otherwise your
extension might be loaded before the RestApi Extension which would lead to an Error.
Preparing a class to be used as an TYPO3 RestAPI Endpoint
To make sure that the TYPO3 RestApi "knows" it can route a request to your class and method, you need to register
the class.
There are two alternative ways this can be done:
On a per-class base using the @Api\Endpoint() Annotation – or
globally for a complete namespace using \nn\rest::Endpoint()->register() in
the ext_localconf.php of your extension.
You should decide using one of both, depending on your individual architecture.
Alternative 1: Registering an Endpoint using Annotations
Simply add the @Api\Endpoint() Annotation to the comment block above your class. The nnrestapi will automatically
parse the DocComment and register your endpoint.
In your ext_localconf.php you can let nnrestapi automatically register all endpoints in a certain namespace.
Example: If all of your Endpoints are in the namespace My\Extension\Api\* then you could have them all automatically
registered by adding this code to your ext_localconf.php.
// Register path to my endpoints
\nn\rest::Endpoint()->register([
    'namespace' => 'My\Extension\Api'
]);
Copied!
By registering a global namespace for all your endpoints you can now dismiss the @Api\Endpoint() Annotation
in the DocComment of your class:
<?phpnamespaceMy\Extension\Api;
useNng\Nnrestapi\AnnotationsasApi;
useNng\Nnrestapi\Api\AbstractApi;
/**
* Nothing needed here :)
*/classExampleextendsAbstractApi{
// Your methods
}
Copied!
Attention
Getting an 404 - Endpoint not found?
If you are not able to connect to your Endpoint, here is a checklist of things you should try:
Check your Endpoint registration. Make sure you are using one of the methods described
in this chapter
Clear the cache. Not only by clicking on the "red thunderbolt", but also by using the function
"Flush TYPO3 and PHP Cache" in the backend-module "Admin -> Maintainance"
Rebuild the PHP Autoload Information. In a non-composer-installation, this can in the
backend-module "Admin -> Maintainance". In a composer based installation this is done
on the command line with composer dumpautoload.
Check, if your extension has a composer.json in the root folder. Since TYPO3 v11 it is
mandatory to register the path to your classes with a composer.json. Grab one from an
other extension or the nnrestapi Kickstarter.
Check, if your extension has a Service.yaml. Since TYPO3 v12 you will probably also need
a Configuration/Service.yaml that registers the Classes. Again, steal it from an other
extension or the nnrestapi Kickstarter.
Routing by method-name
The class- and method-name are the key!
The nnrestapi has a standardized way to route a request to a controller and method.
Only exception: If an integer (number) was passed as {methodName} (like in the second line of the example above), the request will be routed to the index-method of your class.
In this case, the parts of the URL will be interpreted like this:
Let's have a look at the individual URL parts in detail:
https://www.mywebsite.com/api/article/all
Every URL is prefixed with api as the first part of the path. This is the default setting for
every Api. It can be changed in the configuration YAML.
In TYPO3 this is important, so the RouteEnhancer can kick in.
https://www.mywebsite.com/api/article/all
| the second part of the URL is the lowercase class name of your controller.
Example: The URL /api/article/ will be routed to your class Article {}.
https://www.mywebsite.com/api/article/all
| if the third part is a string, it will look for a method in your class with that name that is prefixed with the Request Type and suffixed by the word Action.
Example: If you are sending a GET Request to /api/article/all, the method Article->getAllAction()
will be called.
https://www.mywebsite.com/api/article/1
| if the third part is an integer, it will look for the indexAction in your class, prefixed by the Request method.
Example: Sending a POST request to /api/article/1 would call the
method Article->postIndexAction(). The 1 will automatically be passed as uid in
the request arguments.
Examples
The following table illustrates the basic principles:
Method
URL Example
...will route by default to:
GET
/api/article/1
My\Extension\Api\Article->getIndexAction()
GET
/api/article/all
My\Extension\Api\Article->getAllAction()
GET
/api/article/page/1
My\Extension\Api\Article->getPageAction()
PUT
/api/article/1
My\Extension\Api\Article->putIndexAction()
PATCH
/api/article/1
My\Extension\Api\Article->patchIndexAction()
DELETE
/api/article/1
My\Extension\Api\Article->deleteIndexAction()
POST
/api/article
My\Extension\Api\Article->postIndexAction()
POST
/api/article/image
My\Extension\Api\Article->postImageAction()
POST
/api/article/image/1/2/3
My\Extension\Api\Article->postImageAction()
Hint
If you want to use custom routes that don't follow this standard pattern, you can always define
them with the @Api\Route() annotation in the comment of your method.
When using custom routing, the method name is irrelevant and does not have to follow the pattern
{request_method}{Classname}Action.
The above method customRoutingTest() would be executed when sending a GET Request to
https://www.mysite.com/api/test/route
Copied!
Want to find out more?
Please refer to the @Api\Route section of this documentation for more details and examples.
Variables
Accessing Request variables in your endpoint
When a request is forwarded to your endpoint, nnrestapi automatically injects an
instance of Nng\Nnrestapi\Mvc\Request. This is basically a simple wrapper for the
standard TYPO3 TYPO3\CMS\Extbase\Mvc\Request, pimped with a couple of features
needed specifically for accessing the Request-body (the parsed JSON), the files passed
in the multipart-formdata etc.
Hint
Make sure your endpoints' class extends the Nng\Nnrestapi\Api\AbstractApi, otherwise
you will not have access to all properties and methods mentioned in this section.
To make things intuitive for anybody who is familiar with the TYPO3 ActionControllers,
you can access the Nng\Nnrestapi\Mvc\Request in the class property $this->request.
This section gives you an overview of common variables you might want to access while
evaluating the request and composing the response.
All the following examples are placed inside your endpoints' method.
Request arguments
Use $this->request->getArguments() to access the Request variables.
Data-rows from fe_groups, if the current request was made by an authenticated frontend-user. An array of all groups that the current user belongs to, including subgroups.
Returns true if the feUser has the checkbox "RestApi Admin" set in the fe_user-entry. This will grant additional privileges like retrieving hidden records as if the fe_user was a backend-user.
$this->request->getRemoteAddr()
Returns the IP-address of the request. Uses TYPO3's NormalizedParams which handles reverse proxy scenarios based on TYPO3 system configuration.
Inside of your endpoint you can use the EXT:nnhelpers methods to add them to a new or existing model:
// append all new files to a Model:
$files = $this->request->getUploadedSysFiles();
\nn\t3::Fal()->attach( $myModel, 'files', $files );

// append one file to a model:
\nn\t3::Fal()->attach( $myModel, 'files', $files['file-0'] )

// attach (replace) them in a Model:
\nn\t3::Fal()->setInModel( $myModel, 'files', $files )
If you are using the standard routing, the endpoint to handle the request will automatically
be determined by the methodname. (see Routing by method-name for details). That means, that all
of the of the following GET requests would be routed to the Example->getNewsAction()
method:
Remember, that you can always use Dependeny Injection to automatically pass request-
variables from $this->request->getArguments() in to your method. This is very useful when
you have implemented Routing by custom Routes and defined variables for your Route:
Your Api can return almost anything. The nnrestapi extension will take care
of converting your return value to a JSON, no matter if you pass a simple array, a Domain Model
or an ObjectStorage.
If no other response header or status code is specified, the nnrestapi will create all headers
for a 200 OK HTTP Response. It will also automatically send the correct CORS and Credential-headers
like Access-Control-Allow-Credentials etc.
Check this section to see all default headers generated and find out how
to remove or add custom headers to the response.
In the result the model will be automatically converted to a JSON-object. Even relations
like SysFileReferences or other models and objects get converted.
You can see in the example above, that FileReferences are automatically converted to an object containing
title, publicUrl and several more properties from the original sys_file_reference and sys_file.
If you only need the path to the image or file, you can set flattenFileReferences = 1 in the TypoScript
settings, e.g.
If you return an ObjectStorage, e.g. with multiple Domain Models - or SysFileReferences,
the ObjectStorage will automatically be converted to an array:
Here are a few examples using the EXT:nnhelpers which can make life a lot easier
when fetching data from the database.
/**
* Get list of all static countries from the database
*
* @Api\Access("public")
* @return array
*/publicfunctiongetCountriesAction(){
$countries = \nn\t3::Environment()->getCountries();
return $countries;
}
Copied!
Example: Return TypoScript-Setup
/**
* Get TypoScript settings for given plugin
*
* @Api\Access("public")
* @return array
*/publicfunctiongetSettingsAction(){
$settings = \nn\t3::Settings()->get('myextname');
return $settings;
}
Copied!
Example: Returning MANY rows of data
Sometimes – especially when retrieving many Object from a database table, the standard DataMapper of
TYPO3 can be extremely slow. If there is no need to fetch relations, but simple get the raw data array
from the database, this recipe will speed things up:
/**
* the fastest way to get massive amount of data from database and return it as JSON
*
* @Api\Access("public")
* @return array
*/publicfunctiongetBiglistAction(){
$rows = \nn\t3::Db()->findAll('tx_myext_domain_model_example');
return $rows;
}
Copied!
Tip
If you are looking for a way to remove certain fields / properties from the resulting JSON,
then @ApiDistiller() is your friend.
You can write a custom distiller, that cleans up the resulting JSON – or define the Distiller on a
per-Model-base using TypoScript.
Error Responses
Responding with an Error
The nnrestapi has a few shortcuts built in to respond with error codes, if the request parameters were
invalid or the requested data could not be retrieved.
Have a look at the class Nng\Nnrestapi\Mvc\Response to see all available options.
Here we are checking for a model. If it can't be found, we return a 404 NOT FOUND error:
<?phpnamespaceMy\Extension\Api;
useNng\Nnrestapi\AnnotationsasApi;
useNng\Nnrestapi\Api\AbstractApi;
/**
* @Api\Endpoint()
*/classTestextendsAbstractApi{
/**
* Call via GET-request with an uid: https://www.mywebsite.com/api/test/1
*
* @Api\Access("public")
* @return array
*/publicfunctiongetIndexAction( $uid = null ){
$entry = $this->entryRepository->findByUid( $uid );
if (!$entry) {
return$this->response->notFound('Model with uid [' . $uid . '] was not found.');
}
return $entry;
}
}
Copied!
If you open the URL https://www.mywebsite.com/api/test/1 in your browser and pass the uid
of an entry that does not exist, you will see the following JSON response. It will be sent with
a 404 NOT FOUND header:
{"status":404, "error":"Model with uid [1] was not found."}
Copied!
Responding by throwing an Error
An alternative way to respond with an Error is by throwing an Nng\Nnrestapi\Error\ApiError.
This allows adding a custom error code, e.g. for better evaluating and displaying / localizing
the error in your frontend application.
To immediatly throw the ApiError and abort further processing, you can use the \nn\rest::Error()-Helper:
The last example above will send a 403 Unauthorized header and a JSON with the message and
custom error code:
{"status":403, "error":"Not your district, bro.", "code":123567}
Copied!
Full example
<?phpnamespaceMy\Extension\Api;
useNng\Nnrestapi\AnnotationsasApi;
useNng\Nnrestapi\Api\AbstractApi;
/**
* @Api\Endpoint()
*/classTestextendsAbstractApi{
/**
* Call via GET-request with an uid: https://www.mywebsite.com/api/test
*
* @Api\Access("public")
* @return array
*/publicfunctiongetIndexAction(){
if ($this->someCheckFailed()) {
\nn\rest::Error( 'the check failed', 403, 612523 );
}
return ['everything'=>'fine'];
}
}
Copied!
Overview of error codes
shortcut
code
description
$this->response->success([...], 'OK')
200
OK - sent, if no other option was called
$this->response->noContent('message')
204
Empty response
$this->response->unauthorized('message')
403
Unauthorized (not logged in)
$this->response->forbidden('message')
403
Alias to unauthorized
$this->response->notFound('message')
404
Not found
$this->response->invalid('message')
422
Invalid request parameters
$this->response->error($code, 'message')
any
Custom response
Headers and CORS
Warning
The default configuration of the nnrestapi is very "open": It allows cross-domain requests (CORS)
and cookies. This is great for developing from a localhost environment or testing your API with
tools like Postman or CodePen.
In a production environment, you should change these settings and make them more secure. Never
allow access to your Api from domains that you don't know and trust! The same applies to accepting
cross-domain cookies!
Settings HTTP headers of your TYPO3 RestApi response
When creating the response, the nnrestapi sends a list of headers to make things as "compatible" as
possible during development. By default, it also enables cross-domain-requests (CORS) and the setting of
cross-domain-cookies.
Changing a default header value
If you would like to change a default header value sent by the nnrestapi, simply set the new value
in your TypoScript setup using the existing key:
The endpoint may be accessed from any domain. Makes life
easier during development, because you can test from a
localhost or CodePen environment.
Under the hood, nnrestapi is actually responding with the
exact HTTP_ORIGIN so Access-Control-Allow-Credentials
can be set to true and Cookies can be shared across domains
Normally, cookies are not sent when making requests from a
foreign domain or localhost environment. By sending true
here in combination with using the withCredentials option
in the JavaScript frontend application, Cookies can be shared
across domains.
This is useful to allow authenticating the TYPO3 Frontend User
using the standard fe_typo_user-cookie.
You should consider changing this to false in a production
environment, if the only application accessing the API is
running under the same domain or you are not authenticating
using cookies.
Access-Control-Allow-Methods
GET, POST, PUT, PATCH, DELETE, HEAD, OPTIONS
Before the "real" request is sent to the server, the frontend
might send a preflight request to
make sure, the request method for the real request is allowed
With this header, our endpoint is saying: All request methods
are allowed, so go on and send the actual request.
We are telling the browser / app not to cache the results.
This will increase the number of requests to your server.
Consider changing this value - or at least using
@ApiCache() wherever you can.
Pragma
no-cache
Same intention here as described under Cache-Control
Settings HTTP headers from within your Endpoint
Inside of your endpoint you can add, modify or remove headers from the response.
Here are examples:
public getExampleAction()
{
// add a single header to the response$this->response->addHeader( 'Some-Header', 'the-header-value' );
// add multiple headers to the response$this->response->addHeader([
'Some-Header' => 'value 1',
'Another-Header' => 'value 2',
]);
// remove a header by passing an empty string or null$this->response->addHeader( 'Some-Header', '' );
return ['hello' => 'everybody'];
}
Copied!
Settings HTTP Cache-Control (max-age) headers
The cache is disabled by sending the default Cache-Control and Paragma headers above.
Here is how you can set your custom max-age Header:
public getExampleAction()
{
   $this->response->setMaxAge( 100 );
   return ['message' => 'see you again in more than 100s'];
}
Copied!
Note that you can also set the Cache-Control: max-age header by using an Annotation.
More information can be found in the chapter @ApiMaxAge().
There are two basic ways to register a Class as endpoint so the extension will route
requests to it:
by using the nnrest::Endpoint()->register() method in the
ext_localconf.php of your extension. This is useful to register all Classes in
a certain namespace, e.g. My\Extension\Api\*.
By using the @Api\Endpoint() Annotation in the DocComment of the individual Class as
described in this chapter.
Tip
Only use one of both!
Note, that by registering the Class as an Endpoint using the @Api\Endpoint() annotation, there is no need to
use \nn\rest::Endpoint()->register() in the ext_localconf.php anymore – and vice versa. The nnrestapi
extension will automatically traverse through all classes of the extension folder and find classes with
this annotation in the DocComment.
Marking individual Classes as Endpoint
In the following example we will mark the class Example as an TYPO3 RestApi Endpoint by setting the
@Api\Endpoint() Annotation in the comment block above the class.
Requests sent to https://www.yourwebsite.com/api/example/... will automatically be routed to
this class.
By default, the first path segment after api/.../ is identical with the class name of your endpoint.
If your class is named Example, then you can route the requests to it by calling the URL api/example/.
This can be overridden by setting a value in @Api\Endpoint("name").
In the following example, we would like to route requests to api/apples/... to the class Oranges.
This can be achieved by setting @Api\Endpoint("apples"):
If you are not able to connect to your Endpoint, here is a checklist of things you should try:
Check your Endpoint registration. Make sure you are using one of the methods described
in this chapter
Clear the cache. Not only by clicking on the "red thunderbolt", but also by using the function
"Flush TYPO3 and PHP Cache" in the backend-module "Admin -> Maintainance"
Rebuild the PHP Autoload Information. In a non-composer-installation, this can in the
backend-module "Admin -> Maintainance". In a composer based installation this is done
on the command line with composer dumpautoload.
Check, if your extension has a composer.json in the root folder. Since TYPO3 v11 it is
mandatory to register the path to your classes with a composer.json. Grab one from an
other extension or the nnrestapi Kickstarter.
Check, if your extension has a Service.yaml. Since TYPO3 v12 you will probably also need
a Configuration/Service.yaml that registers the Classes. Again, steal it from an other
extension or the nnrestapi Kickstarter.
@Api\Access
Restricting access to your endpoint
The @Api\Access() annotation can be used to restrict the access to an endpoint to certain ...
Frontend-Users (fe_users)
Frontend-User-Groups (fe_user_groups)
Api-Users (defined in the Extension Manager)
Backend-Users or Admins
IP-adresses
The basic syntax is:
@Api\Access("options")
Copied!
Full example:
<?phpnamespaceMy\Extension\Api;
useNng\Nnrestapi\AnnotationsasApi;
useNng\Nnrestapi\Api\AbstractApi;
/**
* @Api\Endpoint()
*/classExampleextendsAbstractApi{
/**
* Only Frontend-Users will be able to access this endpoint
*
* @Api\Access("fe_users")
* @return array
*/publicfunctiongetIndexAction(){
return ['nice'=>'works!'];
}
}
Disabling automatic merging of JSON data with a Model
The @Api\AutoMerge() annotation can be used to control, if the JSON data automatically gets
merged with the Model you have defined as argument injection in your endpoint.
By default, autoMerge is enabled.
This can be changed by setting the following flag in the TypoScript setup:
The default setting in TypoScript can be overriden for every endpoint individually by using
the following Annotation syntax:
// Merge data with model (same as TRUE)
@Api\AutoMerge()

// Merge data with model
@Api\AutoMerge(TRUE)

// Disable the merging of data
@Api\AutoMerge(FALSE)
Copied!
Full example:
<?phpnamespaceMy\Extension\Api;
useNng\Nnrestapi\AnnotationsasApi;
useNng\Nnrestapi\Api\AbstractApi;
useMy\Extension\Domain\Model\Article;
/**
* @Api\Endpoint()
*/classExampleextendsAbstractApi{
/**
* Disable merging of JSON data with the model
*
* @Api\Route("PUT /news/{article}")
* @Api\Example("{'title':'My new title'}")
* @Api\AutoMerge(FALSE)
* @Api\Access("public")
*
* @param Article $article
* @return array
*/publicfunctiongetIndexAction( Article $article = null ){
return $article;
}
}
Copied!
How autoMerge works (default bevaviour)
To understand the example above, let's have a quick look at what would happen without the
@Api\AutoMerge(FALSE) annotation.
Assume we have an Article with the uid = 1 in the database and make a request to PUT /api/news/1 with the JSON {"title":"My new title"}
The ApiController first checks the endpoint and sees, that it is expecting Article $article as first argument
As we have passed uid = 1 in the PUT /api/news/1 request, it automatically retrieves the Article-Model with uid = 1 from the database
It then checks the JSON body and sees: title was passed
Next it overrides the title from the Model with the new title passed with the JSON body
Now the modified Model gets passed to the endpoint method
Merging the JSON-data with the Model like described above is the default behaviour.
This can be disabled by either using the @Api\AutoMerge(FALSE) annotation – or by disabling it globally using the TypoScript
setting plugin.tx_nnrestapi.settings.autoMerge.enabled = 0.
Quick-Tip: Persisting the Model
Note that the Article-Model will have a modified title, but not be persisted yet in the database.
You will need to do this yourself, e.g. by using this simple oneliner in your endpoint:
\nn\t3::Db()->update( $article )
Copied!
Quick-Tip: A Fast way to set properties in the Model
When merging was disabled, you will need to take care of merging the
data with your Model by yourself. This can be done with the classic getters and setters of the Model – or by using the helper-function:
If the method of an endpoint has the @Api\Cache annotation set, then its result
will be cached. The next time this endpoint is called, the result will be retrieved
from the cache without calling the method.
Useful, if static data should be loaded like settings, dropdown-values or country-lists etc.
The cache will only be cleared and rebuilt, if the "clear cache" button is clicked in the backend.
In case you would like to handle the caching of data yourself, the nnhelpers
Cache-methods are very useful. Here is a basic example – have a look at the
nnhelpers documentation
for more info:
Dehydrate the JSON-result before returning it to the client
By default, any Array, Object, Model or ObjectStorage returned by your endpoint method will
be recursively converted to an array and then sent as JSON response to the client.
In certain cases you might want to remove certain fields from the JSON, e.g. to protect
sensitive data to be passed to the frontend or to reduce the complexity or depth of the returned
JSON.
There are two ways to solve this:
Write a custom Distiller to post-process the array before
it is returned to the frontend.
Define global Distillers on a per-model base using
the TypoScript setup.
Writing a custom Distiller
A Custom Distiller is a method that receives the data array after the Models, ObjectStorages etc.
were converted. It can manipulate the array by removing, converting or adding fields.
It returns the modified array, which is then converted to a JSON and sent to the frontend.
The write your custom distiller. Note that your custom distiller should extend the Nng\Nnrestapi\Distiller\AbstractDistiller.
By default, the method process will be called and the $data passed as reference. The process method can manipulate
the data by setting or removing elements or keys from the array:
If you are removing more keys from the JSON than keeping them, consider simply using the $keysToKeep property
which you can set in your custom Distiller. The Nng\Nnrestapi\Distiller\AbstractDistiller will check, if
a Distiller has this property set and then automatically remove all keys from the JSON that are not defined in the
array.
A nice feature: It is also possible to flatten the JSON-response by using an associative array and deep paths:
// Deep array: Properties of nested array are returned. Key is returned in dot-syntax public $keysToKeep = ['uid', 'images', 'title', 'images.0.publicUrl'];
// Associative array: Get deep nested property and map it to a new keypublic $keysToKeep = ['uid'=>'uid', 'publicUrl'=>'images.0.publicUrl'];
// Mixture is also possiblepublic $keysToKeep = ['uid', 'title', 'publicUrl'=>'images.0.publicUrl'];
Copied!
Defining Global Distillers - by the Model-type
In many cases, you will probably want to define a Distiller based on the Model-type.
An example could be: You want to pass the publicUrl of a SysFileReference, but don't
need the fields crop, uidLocal etc. in your frontend.
This can be accomplished by defining a per-model Distiller in the TypoScript setup for
globalDistillers. Use the class name of the Model as a key and define how the Model
should be parsed:
plugin.tx_nnrestapi.settings {

   # Fields to remove from Model when converting to array
   globalDistillers {

      My\Extension\Extbase\Domain\Model\Example {
         exclude = parent, mktime, crdate
      }

      TYPO3\CMS\Extbase\Domain\Model\FileReference {
         exclude = uidLocal, crop, publicUrl, type
      }
   }
}
Copied!
Here is an overview of the available options for every class
Excluding certain fields
Use exclude to define fields that show be removed from the JSON for the Model:
If you have more fields you want to remove than include, simply use include to define
all fields that show NOT be removed from the JSON. All other fields will be removed
automatically.
When you PUT, POST or PATCH your Model to the TYPO3 RestApi, you don't have to pass the
complete object with all fields. The RestApi will automatically merge the fields passed in the request
with the existing properties of the Model. This is why it is fine, to only include fields that you
really need to edit or modify in your frontend-application.
Example: If you only want to change the title of an existing Model, it would be enough to
only pass the title in the payload. All other properties and relations will stay untouched when
the data from the JSON is merged in the existing Model:
// PUT or PATCH to /api/entry/{uid}
{"title":"New title"}
Copied!
Flattening SysFileReferences (FAL)
By default, a FAL will be converted to an array containing fields like publicUrl, title, description,
crop etc. If you only need the path to the SysFile and not all these fields, you can set flattenFileReferences = 1
on the top level of the distiller configuration for your Model. It will be recursively applied to all child-relations.
By setting flattenFileReferences = 1 it deflates the FileReference and only returns the publicUrl:
{"image":"path/to/file.jpg"}
Copied!
Note: In both cases, if there is no sys_file_reference attached to the Model you will get a NULL
in the JSON:
{"image":NULL}
Copied!
@Api\Example
Add example data to your documentation
The purpose of this annotation is to add example data to the automatically generated documentation
in the TYPO3 backend module of the nnrestapi that can be used for composing requests using
the test bed.
This annotation has no other function in the frontend. It is just to make working
with the backend-module easier: The extension comes shipped with a test bed to send
and test your requests directly in the backend module. The example data
will appear in the documentation and can be used to compose your request.
Don't forget that you can always use Markdown
in your documentation.
Here is an example:
/**
 * ## Example
 *
 * This comment will be visible in the backend-module of
 * the nnrestapi. If you would like to show a code block in
 * your documentation, simple use the markdown-syntax:
 * ```
 * {"some":"example from markdown"}
 * ```
 * The text in the Example-annotation will be used to compose
 * the request from the testbed.
 *
 * @Api\Example("{'some':'example for testbed'}")
 * @return array
 */
Copied!
The above example would automatically create this documentation in the
backend module:
@Api\Label
Add custom label to backend module
This Annotation will override the default label that is used in the collapsible elements
of the RESTApi backend module. By default, the extension generates this label by evaluating
the default or custom routing.
This annotation has no other function in the frontend. It is just for modifying the
view in the backend-module and making the labels of the endpoints better legible or
for handling edge cases.
The @Api\Log() annotation can be used to explicitly enable or disable logging of requests
to a specific endpoint. Logged requests are saved in the database table nnrestapi_log and
can be viewed in the backend module.
For a complete overview of the logging system, see Logging.
This is useful when:
You want to disable logging for endpoints that are called frequently (e.g., health checks, polling)
You want to force enable logging for specific endpoints regardless of global settings
You need to debug specific endpoints by enabling logging temporarily
The syntax is:
@Api\Log(true)    // Enable logging for this endpoint
@Api\Log(false)   // Disable logging for this endpoint
@Api\Log()        // Same as true
Copied!
Full example:
<?phpnamespaceMy\Extension\Api;
useNng\Nnrestapi\AnnotationsasApi;
useNng\Nnrestapi\Api\AbstractApi;
/**
* @Api\Endpoint()
*/classExampleextendsAbstractApi{
/**
* This endpoint will NEVER be logged, unless `loggingMode`
* was set to "force" in the Extension Manager.
*
* Useful for high-frequency endpoints like health checks.
*
* @Api\Log(false)
* @Api\Access("public")
* @return array
*/publicfunctiongetHealthAction(){
return ['status' => 'ok'];
}
/**
* This endpoint will be logged, if:
* - custom logging is enabled in the Extension Manager
* - AND the `loggingMode` was set to "explicit" or "force"
*
* @Api\Log(true)
* @Api\Access("fe_users")
* @return array
*/publicfunctionpostSensitiveAction(){
return ['result' => 'logged'];
}
}
Copied!
Logging behavior overview
Annotation
Description
@Api\Log(false)
Disables logging, except if loggingMode is force
@Api\Log(true)
Enables logging if "Enable custom logging" is enabled in the Extension Manager
@Api\Log()
Same as @Api\Log(true)
(no annotation)
Uses global logging settings from Extension Manager
Global logging settings
The global logging behavior can be configured in the Extension Manager settings:
Logging configuration in the Extension Manager
Logging enabled: Enable/disable logging globally
Logging mode: Controls how the @Api\Log() annotation is interpreted:
all: Log all requests, except those with @Api\Log(false)
explicit: Only log requests that have @Api\Log() or @Api\Log(true)
force: Log all requests, ignoring any @Api\Log() annotations
Error logging: Log errors and exceptions
Auto-clear logs: Automatically remove old log entries after X days
See the Configuration section for more details on global settings.
@Api\MaxAge
Sends Cache-Control headers for a TYPO3 RestAPi endpoint
With the default settings of nnrestapi, the client-side cache will be disabled
by sending the default Cache-Control: no-cache and Paragma headers.
If the data doesn't change very often, it doesn't make sense for the client to
keep requesting the same data from the endpoint. By sending an appropriate
Cache-Control header you can tell the client how many seconds it should
use data stored in the local cache before sending the next request to the Api.
Here is how you can set your custom max-age Header:
Retrieve hidden records and relations from the database.
This makes the TYPO3 Frontend behave like the Typo3 Backend: Hidden records and records with fe_group
or starttime/endtime-restrictions will be returned to the frontend, although they usually would only
be visible in the TYPO3 backend for admins.
The syntax is:
@Api\IncludeHidden("tablename")
Copied!
Tip
If you are using frontend-user authentication, you can also set the option to include hidden records
on a per-user basis by setting the checkbox "Admin-Mode" in the tab "RestApi"
of the frontend user entry.
Overview of options
You can pass the tablename(s) or modelnames to @Api\IncludeHidden(...):
If you would like to handle the access to hidden records yourself, you can use
the \nn\rest::Settings()->setIgnoreEnableFields() helper before retrieving
your data from the repository.
<?phpnamespaceMy\Extension\Api;
useNng\Nnrestapi\AnnotationsasApi;
useNng\Nnrestapi\Api\AbstractApi;
/**
* @Api\Endpoint()
*/classExampleextendsAbstractApi{
/**
* @Api\Access("public")
*
* @return array
*/publicfunctiongetAllAction(){
if ($this->yourOwnCheckMethod()) {
// ignore hidden restrictions for ALL tables
\nn\rest::Settings()->setIgnoreEnableFields( true );
// ignore hidden restrictions for certain tables// \nn\rest::Settings()->setIgnoreEnableFields(['tt_content', 'my_table_name']);
}
return$this->someRepository->findAll();
}
}
Copied!
@Api\Json
Control how your TYPO3 RestAPi renders the JSON result
| Options and settings for converting the response-data to JSON.
Currently, only depth is implemented.
With depth you can control, how deep the returned object will be
parsed when it is converted to the JSON-array.
This is helpful, if you are returning Objects with many nested relations or recursions,
but you only need the first few levels of the data in the frontend.
Use custom routing for your TYPO3 RestAPI endpoint
The @Api\Route annotation allows you to define custom URLs (Routes) to your endpoint
and define the order of arguments passed to your method. It is very similar to the
Symfony Routing syntax.
A basic example would be:
@Api\Route("/your/custom/url")
Copied!
After clearing the cache, the method that has this annotation will be reachable at the URL:
https://www.yourwebsite.com/api/your/custom/url.
By using custom Routing, the method name can be whatever you like – you don't not have to use
the standard method-name {requestMethod}{pathPart}Action()
In case you want to also change the URL prefix /api you can override the default settings in the
YAML configuration by setting a custom value for the basePath in your YAML-site configuration:
nnrestapi:routing:basePath:'/api'
Copied!
Parsing request parameters
If you want to parse request parameters from the URL you can use the following syntax in you @Api\Route definition.
In this example, every URL like https://www.mywebsite.com/api/test/demo/123 will be routed to your endpoint and
123 will be parsed as argument ['uid' => 123]
In the two above examples, the routing will only work, if {uid} or {uid}/{test} is set. Calling an URL
without these path-segments (e.g. https://www.mywebsite.com/api/test/demo) will not route to your method.
To make the parameters optional, you can use the following route patterns:
If not further specified in your @Api\Route annotation, ALL requests matching the Route-pattern will
resolve to your endpoint, no matter if they were sent using GET, POST, PUT or any other HTTP Request
Method.
You can limit the Routing to certain HTTP Request Methods with this pattern:
// listen to ALL requests (GET, POST, PUT, DELETE, PATCH)
@Api\Route("/test/demo/something")

// only listen to GET requests
@Api\Route("GET /test/demo/something")

// listen to GET, POST and PUT requests
@Api\Route("GET|POST|PUT /test/demo/something")

// listen to GET and parse URL parameters
@Api\Route("GET /auth/log_me_out/{uid}/{something}")
Copied!
@Api\Security\CheckInjections
Check incoming request for SQL Injections
The @Api\Security\CheckInjections() annotation allows you perform a very basic check of the incoming
POST and GET variables. It searches for typical SQL-injection patterns like "; SELECT ... and
automatically locks all requests from the current IP for 24 hours.
We know this: checking for typical SQL injection patterns at this level is not very reliable.
There are many sneaky methods and patterns that could be missed by this check. And it should never be
be a substitute for securing your database queries and sanitizing the variables before writing them to
the database.
On the other hand: have you ever had a look in one of your server log files?
You will see tons of requests from bots using patterns that would be successfully blocked by using
this annotation. And keeping bots out of the system as soon as possible is always sensible.
The basic syntax is:
@Api\Security\CheckInjections( $autoLockIp )
Copied!
An example would be:
// Check for typical injection-patterns and lock IP if an attempt was detected
@Api\Security\CheckInjections()

// Check, but don't automatically lock the IP
@Api\Security\CheckInjections( false )
Copied!
Full example:
<?phpnamespaceMy\Extension\Api;
useNng\Nnrestapi\AnnotationsasApi;
useNng\Nnrestapi\Api\AbstractApi;
/**
* @Api\Endpoint()
*/classExampleextendsAbstractApi{
/**
* (!) Note that we also need to add CheckLocked() for this to work
* This could also be done globally in the TypoScript setup
*
* @Api\Security\CheckInjections()
* @Api\Security\CheckLocked()
* @Api\Access("public")
*
* @return array
*/publicfunctiongetSettingsAction(){
return ['nice'=>'result'];
}
}
Copied!
Globally activating an injection test
If you would like to globally check for SQL injections for every endpoint, you do to not need
to add @Api\Security\CheckInjections() to every endpoint manually. Instead you can
set up a global check using this TypoScript setup:
The \nn\rest::Security()-Helper has many useful methods in case you would like
to handle checking for limits and locking users manually.
Have a look at \Nng\Nnrestapi\Utilities\Security for more details.
// manually lock an IP for 5 minutes
\nn\rest::Security( $this->request )->lockIp( 300, 'Reason why...' );

// unlock the IP
\nn\rest::Security( $this->request )->unlockIp();
Copied!
@Api\Security\CheckLocked
Check if IP was locked
This annotation will check, if the current IP was blocked by a previous security check.
Use this annotation like this:
@Api\Security\CheckLocked()
Copied!
(Un)locking an IP manually
The \nn\rest::Security()-Helper has many useful methods in case you would like
to lock the users manually.
Have a look at \Nng\Nnrestapi\Utilities\Security for more details.
// manually lock an IP for 5 minutes
\nn\rest::Security( $this->request )->lockIp( 300, 'Reason why...' );

// unlock the IP
\nn\rest::Security( $this->request )->unlockIp();
Copied!
Important
The @Api\Security\CheckLocked() Annotation is typically used in combination
with other Security-Annotations.
One on them is the ApiSecurityCheckLocked() Annotation
which will automatically lock an IP if an SQL injection was attempted.
In order to not need to add @Api\Security\CheckLocked() to every endpoint manually, you can
set up a global check which will block all requests from locked IPs.
Here is the TypoScript setup that will always first check for SQL-injections and then check
for locked users.
// Limit access to all endpoints with "my_id" to 10 per IP and minute
@Api\Security\MaxRequestsPerMinute( 10, "my_id" )

// Limit overall access to all endpoints using this annotation to 10 per IP and minute
@Api\Security\MaxRequestsPerMinute( 10 )
Copied!
Exceeding the given number will result in an 403 Error response.
The optional argument my_id can be any arbitrary key.
When using the same key in multiple endpoints, all endpoint calls with the same key will be counted
Without an id, all endpoints using the annotation will be counted
The \nn\rest::Security()-Helper has many useful methods in case you would like
to handle checking for limits and locking users manually.
Have a look at \Nng\Nnrestapi\Utilities\Security for more details.
// returns FALSE if IP has exceeded number of requests for `my_key`
$isBelowLimit = \nn\rest::Security( $this->request )->maxRequestsPerMinute(['my_key'=>60]);

// manually lock an IP for 5 minutes
\nn\rest::Security( $this->request )->lockIp( 300, 'Reason why...' );

// unlock the IP
\nn\rest::Security( $this->request )->unlockIp();
Copied!
Reverse Proxy Configuration
If your TYPO3 installation is behind a reverse proxy (e.g., nginx, load balancer, CDN),
the client's real IP address is typically forwarded in headers like X-Forwarded-For
instead of being available in REMOTE_ADDR.
Without proper configuration, all requests would appear to come from the same IP
(the proxy's IP), causing rate limiting to affect all users collectively.
The nnrestapi uses TYPO3's NormalizedParams to determine the client IP, which
respects TYPO3's reverse proxy configuration. To enable this, configure the following
settings in your config/system/settings.php (in composer-based installations) and
typo3conf/LocalConfiguration.php in non-composer-based installations:
// IP address(es) of your reverse proxy
$GLOBALS['TYPO3_CONF_VARS']['SYS']['reverseProxyIP'] = '10.0.0.1';
// For multiple proxies, use comma-separated list
$GLOBALS['TYPO3_CONF_VARS']['SYS']['reverseProxyIP'] = '10.0.0.1,10.0.0.2';
// Which IP to use from X-Forwarded-For header: 'first' or 'last'// 'first' = original client (recommended for most setups)// 'last' = last proxy before TYPO3
$GLOBALS['TYPO3_CONF_VARS']['SYS']['reverseProxyHeaderMultiValue'] = 'first';
Copied!
Tip
You can verify the detected IP by checking $this->request->getRemoteAddr()
in your endpoint or enabling debug logging.
@Api\Upload
Control where files are uploaded to in your TYPO3 RestAPi
With the @Api\Upload(...) annotation you can control, where the file uploads of a multipart/form-data request
are moved to.
The syntax is:
@Api\Upload( option )
Copied!
Where option can have one of the following expressions to either define a direct file path, a custom Class to
return the upload-path or the key to a configuration in the TypoScript setup:
syntax
description
@Api\Upload(FALSE)
Explicitly disables the file-upload. Any file attached to
the request will be discarded and removed from the JSON
without further processing or parsing.
This is the default behavior to prevent unwanted
file-uploads to the fileadmin.
@Api\Upload("1:/path/to/upload/folder")
The file path to the folder in the combined identifier
syntax (by default, 1:/ would be interpreted as
the default storage fileadmin/)
@Api\Upload("config[name]")
Use a predefined configuration defined in the TypoScript
setup at plugin.tx_nnrestapi.settings.fileUploads.[name]
@Api\Upload("config[default]")
Uses the default settings from the TypoScript setup.
If set to default, the files will be uploaded to the path
fileadmin/api/
@Api\Upload(\My\Extname\UploadProcessor::class)
Use a custom class to return the upload-path for the
files. The class must have a method called getUploadPath
and return an array as described
here
Important
Note that @Api\Upload(...)must explicitly be set as an Annotation on the endpoint - otherwise the nnrestapi
will ignore any file upload passed during the request. This is to prevent uncontrolled uploads and misuse of the Api.
The Annotation is placed in the comment block above your method / endpoint:
Let’s have a look at the configuration in TypoScript setup for plugin.tx_nnrestapi.settings.fileUploads:
plugin.tx_nnrestapi.settings.fileUploads {
# Use this key in your endpoint annotation "@api\upload default"
default {
// if nothing else fits, use fileadmin/api/
defaultStoragePath = 1:/api/
// Optional: Use a custom class to return configuration//pathFinderClass = Nng\Nnrestapi\Helper\UploadPathHelper::getUserUidPath// target-path for file, file-0, file-1, ...
file = 1:/api/tests/
}
}
Copied!
Make sure the upload-folder exists and has the correct rights for reading/writing.
Custom method for resolving the upload path
You can define a custom class that resolves the upload-path for each individual file.
This can either be done by ...
Setting the class name in the Annotation itself like this:
// will call \My\Extname\UploadProcessor->getUploadPath()
@Api\Upload( \My\Extname\UploadProcessor::class )
Copied!
In this case, the nnrestapi will automatically try to call the method getUploadPath() of
your class and will expect an array as return value. Refer to the examples below to see, which
values need to be returned in the array.
Creating a configuration in the TypoScript setup at plugin.tx_nnrestapi.settings.fileUploads.[name].pathFinderClass.
In this case, you can also set the method name to call:
Then use the configuration name in your Annotations like this:
@Api\Upload("config[myconf]")
Copied!
Tip
Have a look at the Nng\Nnrestapi\Helper\UploadPathHelper for detailled examples.
Example of custom path resolvers
Let's create an UploadPathHelper that uploads the files to a folder-structure depending
on the current month and date. You probably have seen this structure in WordPress.
The Helper will return a configuration array which has the same keys and structure
that the TypoScript setup uses. You can keep things simple and just return the
key defaultStoragePath which will upload all fileUploads to the same location,
independent of their fileKey/name in the POST-data:
Check out the File uploads(...) section of this documentation for more
information and examples.
Tip
You can also define post-processing operations for uploaded files, such as randomizing
filenames or resizing images on-the-fly. See Post-processing uploads
for details.
@Api\Upload\Encrypt
Encrypt uploaded files on-the-fly
Warning
This annotation is experimental and not fully implemented yet.
The API may change in future versions. Use at your own risk.
The @Api\Upload\Encrypt() annotation allows encrypting uploaded files on-the-fly before
they are stored on the server. This can be useful for sensitive documents that need to be
protected at rest.
The value "default" refers to the default encryption configuration defined in TypoScript.
You can also use "config[keyname]" to reference a custom configuration.
The file is renamed to include a .enc marker (e.g., filename.enc.jpg)
The file content is encrypted using AES encryption with an initialization vector (IV)
The IV is stored at the beginning of the encrypted file
The original file is replaced with the encrypted version
Encrypted files can only be decrypted using the same encryption key.
Configuration
The encryption is configured via TypoScript. The default configuration is:
plugin.tx_nnrestapi.settings.fileUploadEncrypt {
   default {
      # Class with methods for encrypting / decrypting files
      encryptionClass = Nng\Nnrestapi\Helper\UploadEncryptHelper

      # Number of 16-byte blocks to read/write at a time (default: 255)
      fileEncryptionBlocks = 255

      # Cipher algorithm (AES-128-CBC or AES-256-CBC)
      cipher = AES-128-CBC
   }
}
Copied!
Available options
encryptionClass
The PHP class responsible for encryption/decryption. You can create your own class
by extending Nng\Nnrestapi\Helper\AbstractUploadEncryptHelper.
Number of 16-byte blocks to process at a time during encryption. Default is 255.
Higher values use more memory but may be faster for large files.
Encryption key
The encryption key is set in the Extension Manager under basic.fileEncryptionKey.
If no key is set, a random key will be auto-generated on first use
For AES-128-CBC, the key must be 16 bytes (base64 encoded)
For AES-256-CBC, the key must be 32 bytes (base64 encoded)
Important
Keep your encryption key safe! If you lose the key, you will not be able to decrypt
the uploaded files. Consider backing up the key in a secure location.
Custom encryption configurations
You can define multiple encryption configurations in TypoScript:
You can create your own encryption class by extending AbstractUploadEncryptHelper.
This allows you to implement custom encryption algorithms or integrate with external
encryption services.
Step 1: Create your custom encryption class
<?phpnamespaceMy\Extension\Helper;
useNng\Nnrestapi\Helper\AbstractUploadEncryptHelper;
useTYPO3\CMS\Core\Http\UploadedFile;
classMyEncryptHelperextendsAbstractUploadEncryptHelper{
/**
* Rename the file before it is moved to the target folder.
* Use this to add markers like `.enc` to the filename.
*
* @param string $filename Original filename
* @param string $targetPath Target folder path
* @param UploadedFile $file The uploaded file object
* @return string The new filename
*/publicfunctiongetFilename($filename, $targetPath, $file){
$suffix = pathinfo($filename, PATHINFO_EXTENSION);
return uniqid() . '.encrypted.' . $suffix;
}
/**
* Encrypt the file after it has been moved to the target folder.
*
* @param string $filename Path to the file (relative to site root)
* @param string $targetPath Target folder path
* @param UploadedFile $fileObj The uploaded file object
* @return void
*/publicfunctionencrypt($filename, $targetPath, $fileObj){
$absPath = \nn\t3::File()->absPath($filename);
$content = file_get_contents($absPath);
// Your encryption logic here
$encrypted = $this->myEncryptionMethod($content);
file_put_contents($absPath, $encrypted);
}
/**
* Decrypt a file. Writes the decrypted content to a temporary destination file.
* This method is called when serving encrypted files to the user.
*
* Note: Uses file streams to support large files without memory issues.
*
* @param string $sourcePath Path to the encrypted file
* @param string $destPath Path where decrypted file should be written (temp file)
* @return bool
*/publicfunctiondecrypt($sourcePath, $destPath){
$fpIn = $this->openSourceFile($sourcePath);
$fpOut = $this->openDestFile($destPath);
// Read, decrypt and write in chunks for large file supportwhile (!feof($fpIn)) {
$chunk = fread($fpIn, 8192);
$decrypted = $this->myDecryptionMethod($chunk);
fwrite($fpOut, $decrypted);
}
fclose($fpIn);
fclose($fpOut);
returntrue;
}
privatefunctionmyEncryptionMethod($data){
// Implement your encryptionreturn $data;
}
privatefunctionmyDecryptionMethod($data){
// Implement your decryptionreturn $data;
}
}
Copied!
Step 2: Register your class in TypoScript
plugin.tx_nnrestapi.settings.fileUploadEncrypt {
myCustomEncryption {
encryptionClass = My\Extension\Helper\MyEncryptHelper
# You can pass additional configuration options# They will be available in $this->configuration
myCustomOption = someValue
}
}
Any options you define in TypoScript are available in your class via $this->configuration:
publicfunctionencrypt($filename, $targetPath, $fileObj){
// Access your custom TypoScript options
$myOption = $this->configuration['myCustomOption'] ?? 'default';
// Use it in your encryption logic// ...
}
Copied!
@Api\Localize
Enable/disable localization (translation) of data
The @Api\Localize() annotation can be used to force or disable the localization of models and entries retrieved
from the database.
It allows overriding the default settings defined in the TypoScript setup.
By default localization is disabled. This can be changed by setting the following flag in the TypoScript setup:
To enable localization / translation even if the TypoScript settings are set to enabled = 0 you can use:
/**
 * @Api\Localize(TRUE)
 */
Copied!
As the Annotation defaults to TRUE you can also omit the TRUE in the Annotation:
/**
 * @Api\Localize()
 */
Copied!
Disabling localization
To disable localization / translation even if the TypoScript settings are set to enabled = 1 you can use:
/**
 * @Api\Localize(FALSE)
 */
Copied!
Typical use-cases
Two exemplary cases for enabling / disabling the localization settings:
Let's assume, the main focus of your backend is to return a list of news-feed, calendar-events or a list
of the latest movies on Netflix. You have most of these lists stored in multiple languages in the database
using the standard TYPO3 ways of localizing data.
In this case, it would make sense to globally set plugin.tx_nnrestapi.settings.localization.enabled = 1,
so that any query to the database will retrieve the data in the requested language.
If you now need to disable the localization for certain methods, this can be accomplished by passing
FALSE as argument to the Annotation: @Api\Localize(FALSE)
Next, let's imagine you have created a frontend-application which only needs translated data for the labels,
text information and dialog-texts. The rest of the application's main purpose is reading and updating data-rows
that don't need localization.
This would be a typical case for leaving the default setting to "disabled" by setting
plugin.tx_nnrestapi.settings.localization.enabled = 0.
If you now have an endpoint that does need translation handling, you can override these settings by
using @Api\Localize(TRUE) (or simply @Api\Localize()) above your method.
Custom Annotations
Adding custom annotations to your TYPO3 RestApi endpoints
If you would like to add custom annotations that get parsed and passed to the endpoint,
then follow these steps.
Create a class for the annotation
Create a file in your own extension under Classes/Annotations/Example.php.
Important: The class needs to have the @Annotation in the class comment.
<?phpnamespaceMy\Ext\Annotations;
useNng\Nnrestapi\Api\AbstractApi;
/**
* @Annotation
*/classExampleextendsAbstractApi{
public $value;
/**
* Normalize parameter to array.
* Only needed, if you allow single AND multiple arguments in your annotation.
*
*/publicfunction__construct( $arr ){
$this->value = is_array( $arr['value'] ) ? $arr['value'] : [$arr['value']];
}
/**
* This method is called when parsing all classes.
* You must implement it in your own Annotation, if you want the parsed
* data to be cached and accessible later in your endpoint.
*
*/publicfunctionmergeDataForEndpoint( &$data ){
$data['myIdentifer'] = $this->value;
}
}
By using the @Api\Access(...) annotation above your method, you can restrict the access to
your an endpoint. This way you can decide, which Frontend-Users, Frontend-Usergroups,
Backend-Users or Backend-Admins are allowed to call your endpoint.
You can restrict access to...
frontend users (the standard TYPO3 frontend users)
frontend user groups
backend users (the endpoint can only be called, if you are logged in to the backend)
backend admins (you must be logged in to the backend as admin)
global API-users - defined in the Extension Configuration Manager
Note that to use the @Api\Access-annotation, you will need to add the use Nng\Nnrestapi\Annotations as Api;
line at the top of your script.
Overview of options
The following permissions exist for @Api\Access(...):
annotation
permissions: Endpoint can be called by...
@Api\Access("*")
anyone, without authentication (same as public)
@Api\Access("public")
anyone, without authentication (same as *)
@Api\Access("fe_users")
every logged in frontend user
@Api\Access("fe_users[1]")
only logged in frontend user with uid 1
@Api\Access("fe_users[1,2]")
logged in frontend user with uid 1 or 2
@Api\Access("fe_users[david]")
only logged in frontend user with username david
@Api\Access("fe_groups[1,2]")
fe_user in fe_user_group uid 1 or 2
@Api\Access("fe_groups[api]")
fe_user in fe_user_group api
@Api\Access("api_users")
all users defined in the extension configuration
@Api\Access("api_users[david]")
users david defined in the extension configuration
@Api\Access({"fe_users", "be_users"})
all fe_users and be_users
@Api\Access("be_users")
every logged in backend user
@Api\Access("be_admins")
every logged in backend admin
@Api\Access("ip[89.19.*,89.20.*]")
Limit to certain IPs (ADDITIONALLY to fe_user etc.)
@Api\Access("ip_users[89.19.*,89.*]")
Allow certain IPs (ALTERNATIVELY to fe_user etc.)
@Api\Access("config[myconf]")
use myconf in Yaml config for the site/API OR
the TypoScript Setup
Examples
Creating a public endpoint
The following endpoint would be reachable as a GET-request at /test/example.
To call the endpoint, the user does not have to be authenticated. It is a public endpoint without
any restrictions. Unnecessary to mention: Be careful, when exposing public endpoints!
/**
 * Open to public. Can be called by anybody.
 *
 * @Api\Access("public")
 * ...
 */
Copied!
Restrict access to ANY frontend-user
The following endpoint would be reachable as a GET-request at /test/example.
Any logged in frontend users (fe_users) will be able to call it.
If the user is not logged in, a HTTP Error 403 Forbidden will be thrown.
/**
 * This endpoint will be only be accessible by a logged in fe_user.
 *
 * @Api\Access("fe_users")
 * ...
 */
Copied!
Restrict access to SPECIFIC frontend-user(s)
To be more specific about which Frontend-User is allowed to access an endpoint,
you can restrict it in the @Api\Access-annotation by using the square brackets syntax
fe_users[...].
/**
 * Only fe_user with uid 1 can call this endpoint.
 *
 * @Api\Access("fe_users[1]")
 * ...
 */
Copied!
You can also use the username of the frontend-user instead of the uid:
/**
 * Only fe_user 'david' can call this endpoint!
 *
 * @Api\Access("fe_users[david]")
 * ...
 */
Copied!
Multiple users can be defined by using on of the following syntaxes:
/**
 * Only fe_users 'david' and 'marc' can access this endpoint!
 *
 * @Api\Access("fe_users[david,marc]")
 * ...
 */
Copied!
You are allowed to mixusernames and frontend-user uids:
/**
 * Only fe_users 'david' and the fe_user with uid '2' can access this endpoint!
 *
 * @Api\Access("fe_users[david,2]")
 * ...
 */
Copied!
And in case you prefer using the array syntax, that is also possible:
/**
 * Only fe_users 'david' and 'marc' can access this endpoint!
 *
 * @Api\Access({"fe_users[david]", "fe_users[marc]"})
 * ...
 */
Copied!
Restrict to IP-adresses ADDITIONALLY to other authentications
By using the @Api\Access("ip[...]") annotation, you can limit the request to a given
list of IPs.
Contrary to all other @Api\Access() restrictions, the IP-restriction will be handled
like an AND constraint. If you set an IP-restriction, then the request must come from the
given IP, independent of other access-restrictions like Frontend-User Authentication etc.
/**
 * Only REMOTE_ADDR with IP 90.120.10.* may access this endpoint
 *
 * @Api\Access("ip[90.120.10.*]")
 * ...
 */
Copied!
Multiple IPs can be listed the same way usernames or uids are listed in the examples above.
All the following examples are equivalents, choose the syntax you can remember best:
Grant access for IP-adresses ALTERNATIVELY to other authentications
By using the @Api\Access("ip_users[...]") annotation, you grant access to the endpoint from
given IPs without any other limitations.
Other than @Api\Access("ip[...]"), if the IP is correct, there will not be any additional check
of fe_users or be_users.
/**
 * User with IP 90.120.10.* OR any fe_users (with any IP) may access this endpoint
 *
 * @Api\Access("fe_users", "ip_users[90.120.10.*]")
 * ...
 */
Copied!
Using global configurations
Defining centralized access-groups in your site YAML or TypoScript Setup
Of course it might not "feel" very good, to define users and usergroup-restrictions in
your Api by using a static username or uid directly in the annotation.
What if you need to add a user that has access to all endpoints?
You would have to go through all your scripts and add the username or uid to the
@Api\Access() annotation.
The next problem might be: What if you plan to deploy your setup to other environments
or installations. Every installation might have different usernames or uids . Defining
users by their username or uid in the @Api\Access() annotation directly will make it very
difficult to keep all your installation up-to-date with the same code-base.
The good news:
You can also define accessGroups in your site-configuration or
TypoScript Setup and then refer to their identifier in your @Api\Access()-annotation instead
of repeating using usernames or uids above the individual methods.
Let's start by adding this to your site-configuration YAML or TypoScript Setup
How to implement your own method for checking access rights to your endpoint
In most cases using the @Api\Access(...) annotation will be sufficient to
restrict the access to your endpoint to certain frontend-users or user groups.
In case you need to implement your own logic for checking access rights, you can simply
define a checkAccess()-method in the class of your endpoint. This will override the
default checkAccess()-method from \Nng\Nnrestapi\Api\AbstractApi.
The checkAccess() method must return TRUE, if the user is allowed to access the endpoint.
If it returns FALSE, the script will automatically be aborted and the Api will return
a HTTP 403 Forbidden header.
Here is an example:
<?phpnamespaceMy\Extension\Api;
useNng\Nnrestapi\Api\AbstractApi;
/**
* @Api\Endpoint()
*/classTestextendsAbstractApi{
/**
* Completely senseless, but nice demo:
* Decide randomly, if the user may access your endpoint.
*
* @param array $endpoint information about the endpoint that was supposed to be called
* @return boolean
*/publicfunctioncheckAccess( $endpoint = [] ){
return rand(0, 2) == 1;
}
/**
* This method will only be accessible if the checkAccess-method
* above returned true as value.
*
* @return array
*/publicfunctiongetExampleAction(){
return ['result'=>'welcome!'];
}
}
Copied!
The above example can be reached with a GET request to:
https://www.mysite.com/api/test/example
Copied!
Example: Restricting access to certain IP-adresses
In this example, we will use the checkAccess() method to check, if the user has a certain IP.
The script will only allow access to the methods in this class, if the $remoteAddr matches
one of the patterns defined in $allowedIpList:
<?phpnamespaceMy\Extension\Api;
useNng\Nnrestapi\Api\AbstractApi;
/**
* @Api\Endpoint()
*/classTestextendsAbstractApi{
/**
* Checks, if the IP of the user matches a given adress or pattern.
*
* @param array $endpoint
* @return boolean
*/publicfunctioncheckAccess( $endpoint = [] ){
$remoteAddr = $_SERVER['REMOTE_ADDR'];
$allowedIpList = '109.251.*, 109.252.17.2';
return \TYPO3\CMS\Core\Utility\GeneralUtility::cmpIP( $remoteAddr, $allowedIpList );
}
//... your endpoint-methods come here
}
Copied!
Example: Check for IP-adresses AND certain fe_user
If you would like to combine the above example with the check for certain authenticated
Frontend-Users like described in @Api\Access(...) you can always call
the parent::checkAccess() method in your custom checkAccess() method.
This will process the login in \Nng\Nnrestapi\Api\AbstractApi::checkAccess() that
handles restrictions made in the annotations.
<?phpnamespaceMy\Extension\Api;
useNng\Nnrestapi\Api\AbstractApi;
/**
* @Api\Endpoint()
*/classTestextendsAbstractApi{
/**
* Checks, if the IP of the user matches a given adress or pattern.
*
* @param array $endpoint
* @return boolean
*/publicfunctioncheckAccess( $endpoint = [] ){
$remoteAddr = $_SERVER['REMOTE_ADDR'];
$allowedIpList = '109.251.*, 109.252.17.2';
// First let's check, if the IP is allowedif (!\TYPO3\CMS\Core\Utility\GeneralUtility::cmpIP( $remoteAddr, $allowedIpList )) {
returnfalse;
}
// if yes, then let the AbstractApi take care of checking the fe_users etc.returnparent::checkAccess( $endpoint );
}
//... your endpoint-methods come here
}
Copied!
Restricting access by sending a 403 response
How to respond with a 403 - Forbidden from inside your method
If for some reason using the @Api\Access(...) annotation or implementing a custom
checkAccess(...)-method are not sufficient, you can always use
return $this->response->unauthorized() to abort the further processing inside your
endpoint and send a HTTP 403 Forbidden response to the frontend.
Here is an example:
<?phpnamespaceMy\Extension\Api;
useNng\Nnrestapi\AnnotationsasApi;
useNng\Nnrestapi\Api\AbstractApi;
/**
* @Api\Endpoint()
*/classTestextendsAbstractApi{
/**
* @Api\Access("public")
* @return array
*/publicfunctiongetExampleAction(){
// Only allow access on Fridaysif (date('w') != 4) {
return$this->response->unauthorized("Not today, my dear. I've got a headache.");
}
return ['result'=>'welcome!'];
}
}
Copied!
Authentication
Logging in as a Frontend-User with the TYPO3 RestApi
The EXT:nnrestapi ships with an endpoint for logging in as a frontend-user (fe_user) and for checking the login-status
of the current user.
nnrestapi offers three different options for authenticating:
How to set username and password for individual users and as a global
api-key for multiple users. The authentication will work using
the HTTP Basic Authentication.
Example fe_user-auth using nothing but pure JavaScript ("VanillaJS").
Requires a modern browser that support ES6+ (anything but Internet
Explorer 11 and below)
Example fe_user-auth using nothing but pure JavaScript ("VanillaJS").
Same like above, but for older browsers that can't use fetch()
(e.g. Internet Explorer 11 and below)
How to authenticate a request to your TYPO3 RestApi using HTTP Basic Auth
Your choice!
HTTP Basic Auth is one of the three ways you can authenticate when making a request to the backend.
The alternative methods are using JWT (JSON Web Tokens) or the standard
TYPO3 fe_user-cookie.
Basic access authentication (or "HTTP Basic Auth") is a very simple method for an HTTP user agent (browser) to provide user
credentials (username and password) when making a request. In basic HTTP authentication, a request contains
a header field in the form of Authorization: Basic <credentials> where "credentials" is the Base64 encoding of ID and password
joined by a single colon.
You can define the credentials either...
on a per-user base by setting an API-key for the frontend user or
as "global" API-keys that can be used by multiple users and don't depend on a frontend user
Setting HTTP Basic Auth credentials for a single frontend-users
Follow these steps to set up a username and password for a frontend user that can be used for HTTP basic access authentication.
| Create a frontend user
In the TYPO3-backend: Create a SysFolder for your frontend users, switch to the list view and add a frontend user
to the folder. Depending on your TYPO3 version, you will need to first create a frontend user group.
| Set the username
In the tab "General" of the new frontend user, enter a Username and Password.
The Username will be used for the HTTP Basic Auth. The password you set in the tab "General" is not relevant
for the HTTP Basic Auth, it will only be used for the standard TYPO3 login form.
| Set the Rest-Api Key
Switch to the tab "RestAPI". Enter a password in the field "Rest-Api Key". This will be the password
that must be used when sending requests with HTTP Basic Authentication.
| Check your @Api\Access()-annotations
Make sure, the endpoints that should be accessible by the user have the correct rights set using the @Api\Access()
annotation. Examples could be:
// Expose this endpoint to ALL fe_users that have an apiKey
@Api\Access("api_users")

// ... or only to the fe_user "john"
@Api\Access("api_users[john]")

// ... or to the users defined in the TypoScript setup
@Api\Access("config[myUsers]")
Copied!
You can find detailed configuration options in this section of the documentation.
See the examples below on how to create a request in JavaScript using Basic
HTTP Authorization.
Hint
The frontend user is logged in!
Note that a frontend user authenticating via HTTP basic auth with his username and the apiKey will also be logged in
as a normal frontend user. Consequently, you could also use the Annotation @Api\Access("fe_users") or
@Api\Access("fe_users[john]") as an alternative to api_users.
The advantage of using @Api\Access("api_users") is, that you can have separate passwords for the "normal" frontend
user login and the API usage. This way, in case you allow frontend users to reset their password, they will not
automatically have access to the api!
Setting global HTTP Basic Auth credentials
Follow these steps, if you would like to create a global API Key that is not bound to a certain TYPO3 frontend user.
| Edit extension settings in the backend
Switch to the backend module "Settings", then click on the "Configure Extensions" tile.
| Set credentials in the extension configuration
In the field "API-Keys for BasicAuth" (basic.apiKeys): Enter one user and key per line. In every line,
separate the user and key with a colon. The list of users will look like this:
| Check your @Api\Access()-annotations
Make sure, the endpoints that should be accessible by the user have the correct rights set using the @Api\Access()
annotation. Examples could be:
// Expose this endpoint to ALL api_users
@Api\Access("api_users")

// ... or only to the user "john"
@Api\Access("api_users[john]")

// ... or to the users defined in the TypoScript setup
@Api\Access("config[myUsers]")
Copied!
| Clear the TYPO3 cache
Click the "clear cache" button (red lightning-icon to "clear all caches")
Hint
Global users are not frontend-users!
If you are defining usernames and apiKeys in the extension configuration manager, these users will not be logged in
as a frontend-user.
To avoid conflicts, make sure, the usernames you are using in the extension configuration manager are unique and
don't already exist as a username for a TYPO3 frontend user!
Sending request using HTTP Basic Auth
Here are some basic examples of how to send requests to your API using HTTP basic authentication:
Hint
Testing in the browser
Modern browsers have disabled passing username:password directly in the URL
(e.g., http://user:pass@example.com/api/endpoint) for security reasons.
To quickly test your Basic Auth setup, use curl from the command line:
<!doctype html><htmllang="en"><head><metacharset="utf-8"><metaname="viewport"content="width=device-width, initial-scale=1"><title>nnrestapi Demo with HTTP basic authentication</title><linkhref="https://cdn.jsdelivr.net/npm/bootstrap@5.0.2/dist/css/bootstrap.min.css"rel="stylesheet"integrity="sha384-EVSTQN3/azprG1Anm3QDgpJLIm9Nao0Yz1ztcQTwFspd3yD65VohhpuuCOmLASjC"crossorigin="anonymous"><style>#json-data {
min-height: 100px;
}
#result {
min-height: 100px;
white-space: pre-wrap;
border: 1px dashed #aaa;
background: #eee;
padding: 0.75rem;
}
</style></head><body><divclass="container my-5"id="test-form"><divclass="form-floating mb-4"><selectclass="form-select"id="request-method"><option>GET</option><option>POST</option><option>PUT</option><option>PATCH</option><option>DELETE</option></select><labelfor="request-method">Request method</label></div><divclass="form-floating mb-4"><inputclass="form-control"id="url-request"value="https://www.mywebsite.com/api/endpoint" /><labelfor="url">URL to endpoint</label></div><divclass="row"><divclass="col"><divclass="form-floating mb-4"><inputclass="form-control"id="username"value="" /><labelfor="username">Username</label></div></div><divclass="col"><divclass="form-floating mb-4"><inputtype="password"class="form-control"id="password"value="" /><labelfor="password">Password</label></div></div></div><divclass="form-floating mb-4"><textareaclass="form-control"id="json-data">{"title":"Test"}</textarea><labelfor="json-data">JSON data</label></div><divclass="form-floating mb-4"><buttonid="btn-request"class="btn btn-primary">Send to API</button></div><preid="result"></pre></div><scriptsrc="https://cdn.jsdelivr.net/npm/bootstrap@5.0.2/dist/js/bootstrap.bundle.min.js"integrity="sha384-MrcW6ZMFYlzcLA8Nl+NtUVF0sA7MsXsP1UyJoMp4YLEuNSfAP+JcXn/tWtIaxVXM"crossorigin="anonymous"></script><script>/**
* Helper-function for older
* browsers not supporting fetch()
*
*/functionsendRequest( url, payload, method, auth, done, fail ) {
if (typeof payload == 'object') {
payload = JSON.stringify(payload);
}
var xhr = new XMLHttpRequest();
xhr.overrideMimeType('application/json');
xhr.open(method, url);
if (auth.username) {
xhr.setRequestHeader('Authorization', 'Basic ' + btoa(auth.username + ':' + auth.password));
}
xhr.onload = function () {
var data = JSON.parse( xhr.responseText );
if (xhr.status != 200) {
if (fail) fail( data );
returnfalse;
}
if (done) done( data );
};
xhr.onerror = function () {
fail({
status: 0,
error: 'Some other error... probably wrong url?'
});
};
if (['GET', 'DELETE'].indexOf(method) == -1) {
xhr.send( payload );
} else {
xhr.send();
}
}
/**
* Test form
*
*/document.getElementById('btn-request').addEventListener('click', function () {
var requestUrl = document.getElementById('url-request').value;
var method = document.getElementById('request-method').value;
var json = document.getElementById('json-data').value;
var auth = {
username: document.getElementById('username').value,
password: document.getElementById('password').value
};
sendRequest( requestUrl, json, method, auth, requestSuccessful, requestFailed );
functionrequestSuccessful( data ) {
document.getElementById('result').innerText = JSON.stringify( data );
}
functionrequestFailed( data ) {
alert( 'Error ' + data.status + ': ' + data.error );
}
});
</script></body></html>
Copied!
JSON Web Token (JWT)
How to authenticate a user with your TYPO3 RestApi using a JSON Web Token
Tip
Examples, examples, examples!
We have spent many hours putting together nice recipes and CodePens that will help you get started on the topic
"retrieving, storing and authenticating with a JWT" in no time at all. Look at the examples for your favorite
framework: axios, jQuery, Pure JS
or older browsers.
To keep the frontend user logged in, TYPO3 usually sets a cookie. This cookie (fe_typo_user) serves fine in most contexts -
but relying on the TYPO3 cookie has a few limitations:
Cookies are domain-bound. Out of the box, TYPO3 only allows cookies from the same domain.
Although there are ways to let TYPO3 accept cross domain (or subdomain) cookies, the main focus in TYPO3 was not
to have authenticated users sending requests from other origins than the server that hosts the TYPO3 backend.
The session-ID of the cookie might change. Depending on your configuration, TYPO3 will do a great job on
keeping your session safe by changing the session-ID stored in the fe_typo_user-cookie and invalidating
the old session-ID. While this is great in some contexts, in a SPA (Single Page Application) with a JS-frontend
this can be a little "stressful". You will need to keep track of expiring cookies and sessions.
Many applications nowadays have decided to replace the session-cookie with a new way of authenticating: The JSON Web Token (JWT).
The nnrestapi extension comes equipped with everything you need to log in as a frontend-user, retrieve a JWT and send
authenticated requests using the Authentication: Bearer header.
| Create a frontend user
In the TYPO3-backend: Create a SysFolder for your frontend users, switch to the list view and add a frontend user
to the folder. Depending on your TYPO3 version, you will need to first create a frontend user group.
| Set username and password
In the tab "General" of the new frontend user, enter a Username and Password.
| Check your @Api\Access()-annotations
Make sure, the endpoints that should be accessible by the user have the correct rights set using the @Api\Access()
annotation. Examples could be:
// Expose this endpoint to ALL fe_users that have an apiKey
@Api\Access("fe_users")

// ... or only to the fe_user "john"
@Api\Access("fe_users[john]")

// ... or only to the fe_users with uid 2 or 3
@Api\Access("fe_users[2,3]")

// ... or to the users defined in the TypoScript setup
@Api\Access("config[myUsers]")
Copied!
You can find detailed configuration options in this section of the documentation.
| Authenticate the user
From your frontend application: Send your credentials in a POST-request to the endpoint
https://www.mywebsite.com/api/auth. This endpoint is part of the nnrestap-extension.
// POST this to https://www.mywebsite.com/api/auth

{"username":"john", "password":"xxxx"}
Copied!
| Get the JWT from the response
If the username and password were correct, you will get a response with information about the
frontend user. The JSON also contains the JWT in the field "token":
| Save the token
Remember the token for the next requests by setting a variable or by storing it in the localStorage.
| Send requests with token
On every request you subsequently make: Pass the token in the authorization-header:
Authorization: Bearer some_damn_long_token
Copied!
Checking, if the JSON Web Tokens (JWT) is still valid:
In order to check if the JWT is still valid or the frontend user session has expired, you can send a GET
request to the endpoint
// Send a GET request to this endpoint ...
https://www.mywebsite.com/api/user// ... and add the header:
Authorization: Bearer some_damn_long_token
Copied!
This endpoint is part of the nnrestapi extension. Again, include the token in the header of the request using
Authorization: Bearer token_string. If the token is still valid, you will get a JSON with the current
user information like above.
How to authenticate a user using the TYPO3 frontend user cookie
When you log in as a frontend user, TYPO3 will automatically set a cookie named fe_typo_user containing
a session ID to identify the user. In a standard TYPO3 website, this cookie is sent with every subsequent request.
The same applies to AJAX-requests you make from JavaScript. As long as your frontend application and your REST Api are
hosted on the same domain, things should run pretty smooth.
Using the fe_typo_user-cookie on same domain
If your frontend application is running under the same domain that the Api is located on, there is really
not much to pay attention to.
Simply send your credentials in a POST-request to the endpoint
https://www.mywebsite.com/api/auth. This endpoint is part of the nnrestapi extension.
// POST this to https://www.mywebsite.com/api/auth

{"username":"john", "password":"xxxx"}
Copied!
TYPO3 will respond with information about the user. TYPO3 will also send a cookie named fe_typo_user containing
a session ID. This cookie will automatically be set in the browser and passed back to the server in your next request.
Here is a full script to test cookie based authentication. Please upload it to the same domain that your
application is located on.
<!doctype html><htmllang="en"><head><metacharset="utf-8"><metaname="viewport"content="width=device-width, initial-scale=1"><title>nnrestapi Demo with cookie based authentication</title><linkhref="https://cdn.jsdelivr.net/npm/bootstrap@5.0.2/dist/css/bootstrap.min.css"rel="stylesheet"integrity="sha384-EVSTQN3/azprG1Anm3QDgpJLIm9Nao0Yz1ztcQTwFspd3yD65VohhpuuCOmLASjC"crossorigin="anonymous"><style>#json-data {
min-height: 100px;
}
#result {
min-height: 100px;
white-space: pre-wrap;
border: 1px dashed #aaa;
background: #eee;
padding: 0.75rem;
}
</style></head><body><divclass="container my-5"id="login-form"><divclass="form-floating mb-4"><inputclass="form-control"id="url-auth"value="https://www.mysite.com/api/auth" /><labelfor="url-auth">URL to auth-endpoint</label></div><divclass="form-floating mb-4"><inputclass="form-control"id="username"value="" /><labelfor="username">Username</label></div><divclass="form-floating mb-4"><inputtype="password"class="form-control"id="password"value="" /><labelfor="password">password</label></div><divclass="form-floating mb-4"><buttonid="btn-login"class="btn btn-primary">Login</button></div></div><divclass="container my-5 d-none"id="test-form"><divclass="form-floating mb-4"><selectclass="form-select"id="request-method"><option>GET</option><option>POST</option><option>PUT</option><option>PATCH</option><option>DELETE</option></select><labelfor="request-method">Request method</label></div><divclass="form-floating mb-4"><inputclass="form-control"id="url-request"value="https://www.mysite.com/api/user" /><labelfor="url">URL to endpoint</label></div><divclass="form-floating mb-4"><textareaclass="form-control"id="json-data">{"title":"Test"}</textarea><labelfor="json-data">JSON data</label></div><divclass="form-floating mb-4"><buttonid="btn-request"class="btn btn-primary">Send to API</button></div><preid="result"></pre></div><scriptsrc="https://cdn.jsdelivr.net/npm/bootstrap@5.0.2/dist/js/bootstrap.bundle.min.js"integrity="sha384-MrcW6ZMFYlzcLA8Nl+NtUVF0sA7MsXsP1UyJoMp4YLEuNSfAP+JcXn/tWtIaxVXM"crossorigin="anonymous"></script><script>/**
* Login form
*
*/document.getElementById('btn-login').addEventListener('click', () => {
const authUrl = document.getElementById('url-auth').value;
const credentials = {
username: document.getElementById('username').value,
password: document.getElementById('password').value
};
const xhrConfig = {
method: 'POST',
headers: {
'Content-Type': 'application/json',
},
body: JSON.stringify(credentials)
};
fetch( authUrl, xhrConfig )
.then( async response => {
// convert the result to a JavaScript-objectlet data = await response.json()
if ( !response.ok ) {
// reponse was not 200
alert( `Error ${response.status}: ${data.error}` );
} else {
// show the request-formdocument.getElementById('login-form').classList.add('d-none');
document.getElementById('test-form').classList.remove('d-none');
}
});
});
/**
* Test form
*
*/document.getElementById('btn-request').addEventListener('click', () => {
const requestUrl = document.getElementById('url-request').value;
const method = document.getElementById('request-method').value;
const json = document.getElementById('json-data').value;
const xhrConfig = {
method: method,
credentials: 'include',
headers: {
'Content-Type': 'application/json',
}
};
if (['GET', 'DELETE'].indexOf(method) == -1) {
xhrConfig.body = JSON.stringify(json);
}
fetch( requestUrl, xhrConfig )
.then( async response => {
// convert the result to a JavaScript-objectlet data = await response.json()
if ( !response.ok ) {
// reponse was not 200
alert( `Error ${response.status}: ${data.error}` );
} else {
document.getElementById('result').innerText = JSON.stringify( data );
}
});
});
</script></body></html>
Copied!
Cross domain fe_typo_user-cookie
For cross domain requests, e.g. if your backend is running on a different server than your application or
you are connection from a localhost environment to a remote server, using cookies will get complicated.
The most important security measure is controlling who can access your endpoints.
Always use the @Api\Access() annotation to restrict access to your endpoints.
Think twice before making an endpoint public and double-check that no sensitive data
is becoming publicly visible. An unprotected endpoint can expose user data, internal
information, or allow unauthorized modifications to your database.
The nnrestapi extension provides several security features to protect your API from
common attacks and abuse. These can be applied:
Globally via TypoScript for all endpoints
Per endpoint via annotations
Global security checks
You can define security checks that are executed before every API request by configuring
them in TypoScript. This is useful for applying consistent security policies across your entire API.
The checks are executed in order of their numeric keys. If any check returns FALSE,
the API will respond with a 403 Forbidden status code.
Built-in security checks
checkInjections
Scans the request body and GET parameters for typical SQL injection patterns. If a
potential injection is detected, the IP is automatically blacklisted for 24 hours.
You can create your own security checks by defining a class with a method that returns
TRUE (allow) or FALSE (deny):
<?phpnamespaceMy\Extension\Utilities;
classSecurity{
/**
* Check for honeypot fields in the request.
*
* @param \Nng\Nnrestapi\Mvc\Request $request
* @return bool
*/publicfunctioncheckHoneypots($request){
$body = $request->getBody();
// If honeypot field is filled, it's a botif (!empty($body['hp_field'])) {
// Optionally lock the IP
\nn\rest::Security($request)->lockIp(86400);
returnfalse;
}
returntrue;
}
}
Limit the number of requests from a single IP to prevent brute-force attacks and abuse:
/**
* Limit to 60 requests per minute (default)
* @Api\Security\MaxRequestsPerMinute()
*/publicfunctiongetDataAction(){
}
/**
* Limit to 5 requests per minute
* @Api\Security\MaxRequestsPerMinute(5)
*/publicfunctionpostLoginAction($credentials){
}
/**
* Limit to 10 requests per minute for this specific endpoint ID
* @Api\Security\MaxRequestsPerMinute(10, "login")
*/publicfunctionpostLoginAction($credentials){
}
The extension provides methods to manually lock and unlock IPs or frontend users.
Locking an IP
// Lock current IP for 24 hours (default)
\nn\rest::Security()->lockIp();

// Lock current IP for 1 hour
\nn\rest::Security()->lockIp(3600);

// Lock with additional data for logging
\nn\rest::Security()->lockIp(86400, 'Suspicious activity detected');
Copied!
Unlocking an IP
\nn\rest::Security()->unlockIp();
Copied!
Locking a frontend user
// Lock current frontend user for 24 hours
\nn\rest::Security()->lockFeUser();

// Lock specific user for 1 hour
\nn\rest::Security()->lockFeUser(123, 3600);
Copied!
Unlocking a frontend user
// Unlock current frontend user
\nn\rest::Security()->unlockFeUser();

// Unlock specific user
\nn\rest::Security()->unlockFeUser(123);
Copied!
Privacy considerations
Important
The security system never stores legible IP addresses in the database. All IPs are
hashed before storage, making it impossible to reconstruct the original IP from the
database records.
This ensures compliance with privacy regulations like GDPR while still allowing
effective rate limiting and IP-based blocking.
Database table
Security data is stored in the nnrestapi_security table. Expired entries are
automatically cleaned up when new security checks are performed.
The table stores:
iphash - Hashed IP address
feuser - Frontend user UID (if logged in)
identifier - Type of entry (e.g., "lock", "all", custom IDs)
expires - Timestamp when the entry expires
data - Additional data (e.g., the suspicious request content)
Logging
The nnrestapi extension provides comprehensive logging capabilities to help you monitor, debug, and audit
API requests. Logs are stored in the database table nnrestapi_log and can be backed up before they
are deleted from the database in a CSV file in /var/log/ and can be viewed in the backend module.
Overview
The logging system allows you to:
Monitor API usage: Track all requests to your API endpoints
Debug issues: Identify problems by reviewing request details, payloads, and responses
Audit access: Keep records of who accessed which endpoints and when
Analyze performance: Review response times and error rates
Logging of requests
There are two ways to activate logging of API requests:
Temporary logging (via backend module)
In the backend module, navigate to the "Logs" tab and check "Enable logging". This will
enable logging of all requests for a limited time (default: 30 minutes) and then disable
it automatically. The duration can be configured in the Extension Manager under
loggingTempDuration.
This is perfect for debugging and short-term monitoring of API usage.
Permanent logging (via Extension Manager)
If you want permanently log requests, enable "Enable custom logging" in the Extension Manager.
You can then use the loggingMode setting to control which requests are logged:
all: Log all requests, except those with @Api\Log(false)
explicit: Only log requests that have @Api\Log() or @Api\Log(true)
force: Log all requests, ignoring any @Api\Log() annotations
Auto-cleaning logs
To keep the database table small and clean, you can configure automatic deletion of old log entries.
Remove log entries older than X days
Set the number of days after which log entries should be automatically deleted. The default is
7 days. This requires the nnrestapi:run scheduler task to be configured in your crontab.
Save logs as CSV backup
If you need to keep a backup of the logs before they are deleted, enable "Save logs in logfile"
in the Extension Manager. This will export the log entries as CSV files to /var/log/ before
removing them from the database. This is useful for compliance, auditing, or long-term analysis.
Logging of errors
To log errors without logging all requests, enable "Enable error logging" in the Extension Manager.
There are two types of errors that can be logged:
Exceptions and fatal errors
Unexpected errors caused by PHP scripts that are caught by the extension. These include
exceptions, fatal errors, and other critical issues that occur during request processing.
Controlled API errors
Errors thrown intentionally using the \nn\rest::ApiError() helper. These are used to
return meaningful error responses to the client. See Error Responses
for details on how to use this helper.
The Extension Manager setting "Error logging - what to log" allows you to select which type
of errors should be logged:
all: Log all errors
exception: Only log critical errors like PHP exceptions
api: Only log errors called by \nn\rest::ApiError()
Privacy concerns (GDPR/DSGVO)
Important
IP address anonymization:
By default, IP addresses are anonymized before being stored in the logs. This means an IP like
12.345.67.89 will be shortened to 12.345.0.0. While this is generally considered compliant
with GDPR/DSGVO regulations, you may want to disable IP logging entirely by setting
"How to anonymize IP addresses" to none.
Payload logging:
By default, the request payload (POST body) is logged for debugging purposes. In production
environments, you should consider disabling this by unchecking "Log payload" to prevent
sensitive user data from being stored in the logs.
Enabling logging
Logging can be enabled globally in the Extension Manager under the "logging" tab:
Logging configuration in the Extension Manager
The following settings are available:
Enable custom logging
Enables or disables logging globally. When disabled, no requests will be logged
(unless error logging is enabled separately).
Custom logging - what to log
Controls which requests are logged based on the @Api\Log() annotation:
all: Log all requests, except those with @Api\Log(false)
explicit: Only log requests that have @Api\Log() or @Api\Log(true)
force: Log all requests, ignoring any @Api\Log() annotations
Enable error logging
When enabled, errors and exceptions will be logged separately.
Error logging - what to log
Controls which types of errors are logged:
all: Log all errors
exception: Only log critical errors like PHP exceptions
api: Only log errors called by \nn\rest::ApiError()
Remove log entries older than X days
Automatically removes old log entries. Requires the scheduler task to be configured.
Duration of temporary logging in minutes
How long logging stays active when enabled via the backend module toggle.
Save logs in logfile
When enabled, logs are saved as CSV files in /var/log/ before being deleted from the database.
How to anonymize IP addresses
Controls how IP addresses are stored in logs:
none: Do not save IP addresses
anonymized: Save anonymized IP (last octets removed)
hashed: Save hashed & salted IP (for grouping without revealing actual IP)
ip: Save full IP address
Log payload
Whether to log the request payload (body content).
Per-endpoint logging
You can control logging on a per-endpoint basis using the @Api\Log() annotation.
See @Api\Log annotation for details.
Viewing logs
Logs can be viewed in the TYPO3 backend module. The module provides:
Filterable list of all logged requests
Details view for each request including headers, payload, and response
Export functionality for further analysis
Quick actions to clear logs
Scheduler task
To automatically clear old log entries, add the nnrestapi:run command to your scheduler.
This command will:
Remove log entries older than the configured number of days
Optionally save logs to CSV files before deletion (if "Save logs in logfile" is enabled)
File Uploads
Handling fileupload in your TYPO3 RestApi
The EXT:nnrestapi makes uploading files and attaching them as SysFileReferences to Models as easy as possible.
To learn how to manage file-uploads, dive in to one of the following recipes:
Example of a Model with a FileReference. Show how to add and
remove SysFileReferences with the API by passing the file path or the
special placeholder UPLOAD:/identifier
Full upload-example using nothing but pure JavaScript ("VanillaJS").
Requires a modern browser that support ES6+ (anything but Internet
Explorer 11 and below)
Full upload-example using nothing but pure JavaScript ("VanillaJS").
Same like above, but for older browsers that can't use fetch()
(e.g. Internet Explorer 11 and below)
If you still like jQuery although the world is moving somewhere
else, here is an example for the file upload using jQuery.
Tip
Did you know? You can automatically resize images, randomize filenames, or convert
file formats on-the-fly when files are uploaded. See Post-processing uploads
for details.
Full examples on CodePen
Test your API and play with the code in our CodePens:
The filename will be converted to a format like: 1734567890123abc456def.jpg
imageMaxWidth
Resizes images to a maximum width while maintaining aspect ratio. Also allows converting
to a different format and setting compression quality. Requires ImageMagick to be installed.
postProcess {
   20 {
      userFunc = Nng\Nnrestapi\Helper\UploadPostProcessHelper::imageMaxWidth

      # Maximum width in pixels (required)
      maxWidth = 3000

      # Convert to this format (optional, e.g., jpg, png, webp)
      filetype = jpg

      # JPEG compression quality 0-100 (optional, default: 80)
      quality = 70
   }
}
Copied!
Features:
Automatically corrects image orientation (EXIF)
Strips metadata for smaller file size
Only resizes if image is larger than maxWidth
Skips non-image files automatically
Custom post-processors
You can create your own post-processor by defining a static method:
<?phpnamespaceMy\Extension\Helper;
useTYPO3\CMS\Core\Http\UploadedFile;
classMyUploadPostProcessor{
/**
* @param string &$targetFileName Path to the uploaded file (pass by reference!)
* @param string $targetPath Target folder path
* @param array $processingConfig Configuration from TypoScript
* @param UploadedFile $fileObj The uploaded file object
*/publicstaticfunctionmyProcessor(&$targetFileName, $targetPath, $processingConfig, $fileObj){
// Access your TypoScript configuration
$myOption = $processingConfig['myOption'] ?? 'default';
// Do something with the file// ...// If you rename/move the file, update $targetFileName!// $targetFileName = $newPath;
}
}
translated labels from the TCA to be used in forms in your frontend application
...
Step-by-step
Prerequisites
In the following example we are assuming that you plan to use the standard TYPO3 procedure
to create localized records in the backend:
You have defined your languages in your site-configuration, either using the backend module "Sites" or by editing the site's config.yaml
Important: Add a page translation to the root-page of your site (the page that will be resolved when opening https://www.yoursite.com/) for every localization you have configured in the config.yaml
You have translated your content-elements or records in the backend and all records are in "connected" mode
You have created an Endpoint that returns data or content elements like described in this example
Enable localization in the TYPO3 RestAPI:
By default, localization is disabled for the TYPO3 RestApi.
There are two ways to get it up and running. Depending on your use-case, choose one
of the following options:
| Enable global localization
Allow localization for ALL records by setting enabled = 1 in your TypoScript setup:
| Enable localization on a per-endpoint base
Use this Annotation at your method to enable localization only for individual methods:
@Api\Localize()
Copied!
Request the language
Once you have localization enabled you can retrieve the translated records by sending a requests
using one of the following options:
Add a Accept-Language header to the request, e.g Accept-Language: en-US
Use the ?L= parameter in the URL with the languageId, e.g. ?L=1
Use the language path in the URL when sending requests to the api, e.g. /en/api/endpoint/
Frontend examples
<?php
$url = 'https://www.mysite.com/api/endpoint';
$language = 'en-EN';
$headers = [
'Accept: application/json',
'Accept-Language: ' . $language
];
$curl = curl_init();
curl_setopt($curl, CURLOPT_URL, $url);
curl_setopt($curl, CURLOPT_RETURNTRANSFER, true);
curl_setopt($curl, CURLOPT_HTTPHEADER, $headers);
// only include if you are having problems with SSL certificate
curl_setopt($curl, CURLOPT_SSL_VERIFYPEER, 0);
$json = curl_exec($curl);
curl_close($curl);
$data = json_decode( $json, true );
$dump = htmlspecialchars( print_r( $data, true ) );
echo"<pre>{$dump}";
Copied!
const url = 'https://www.mysite.com/api/endpoint';
const language = 'de-DE';

const xhrConfig = {
   method: 'GET',
   headers: {
      'Content-Type': 'application/json',
      'Accept-Language': language
   },
};

fetch( url, xhrConfig )
      .then( async response => {

      let data = await response.json()

      if ( !response.ok ) {
         alert( `Error ${response.status}: ${data.error}` );
      } else {
         console.log( data );
         document.getElementById('result').innerText = data.html;
      }
   });
Copied!
var url = 'https://www.mysite.com/api/endpoint';
var language = 'en-EN';

var xhr = new XMLHttpRequest();
xhr.overrideMimeType('application/json');

xhr.open('get', url);
xhr.setRequestHeader('Accept-Language', language);

xhr.onload = function () {
   var data = JSON.parse( xhr.responseText );
   if (xhr.status != 200) {
      alert('Error!');
   }
   console.log( data );
};

xhr.onerror = function () {
   alert('Some other error... probably wrong url?');
};

xhr.send();
If you are interested to find out more about localization in TYPO3 and the reason why it is not
a trivial topic, head on to this chapter.
Background infos
Understanding how TYPO3 handles localization
Let's first have a short look at how TYPO3 handles translation in the backend. If you are not familiar
with the basics, you should first have a look at a very good
documentation and tutorial.
In the backend module "sites" you can add as many languages to your installation as you like.
You can add optional fallback languages, so the user sees content in a selected language, if his
preferred language is not available.
The languages' configuration will be stored in the file config.yaml. The array languages will have
an entry for every language. In the following example, two languages Deutsch and English were
defined:
To view a page in a certain language, you add the language path to the URL as the first part after the
domain-name: https://www.mysite.com/en/path-to-page - the /en is defined in the base-property
of the configuration above.
TYPO3 offers many possibilities
When TYPO3 receives a request for a different language than the standard-language (languageId = 0) it will
run through a complex procedure. What TYPO3 exactly does, depends on your individual configuration. In the
"connected mode", every localized content-element has a direct connection to the content-element in the
base-language. Depending on your settings, TYPO3 will override or merge data-fields from the base-language with
fields from the localized data.
In the "free mode" every translation can be individual, meaning: Not every translated element
needs a content-element in the base-language. Also, the order of the elements can vary between the languages.
In other words: There is no real "connection" between the languages.
In the context of your application the "connected mode" will probably be the most common use-case.
To make this clear, let's think of an endpoint that you can address to get information about a certain.
This could be the title, description and director of the movie.
Let's think of every movie being located in a unique "shelf-number" of our movie-wall. To get information
about a certain movie, we will need to know its number - or speaking in terms of endpoints:
We need to know its unique URL or URI.
Our Api could offer an endpoint in this style:
https://www.mymediadatabase.com/api/movie/123
Copied!
A GET-Request to this "shelf" will provide us with information about the movie located in shelf number 123.
The response could look something like this:
{
   "uid": 123,
   "title": "Revenge of the Killer Tomatoes",
   "description": "A great movie for vegetarians.",
   "director": "John de Bello"
}
Copied!
So far, so good. But what about handling translations / localizations?
The problem with localized data
Looking at the example above, we are currently looking at shelf number 123 and getting a result in English.
But what if we want to get information about the same movie - but in German?
There are many solutions you could come up with to solve this task:
You could use a different ID for the German version of the Killer Tomatoes.
This would be a separate "shelf-number" for every language. The English version is located in shelf 123.
The German in shelf 124 and so on.
The idea is ok - but actually could get a little confusing: We are not really talking about a different movie –
we just want the information about the same movie in a different language.
Your conclusion probably will be: "No, doesn't really feel good". You might lose the overview and have to
pay a lot of attention in creating "mapping-tables" that keep track of the shelves for every language-variation
of every movie.
You could keep the same bookshelf ID for the movie, but prefix or suffix the URL with a path that indicates,
which language you are aiming for.
The English version could be accessible at /api/movie/123 and the German version at
/de/api/movie/123 or /api/movie/123/de or some other variation.
This idea is OK as the shelf-number of the movie stays the same, and we are only modifying the "language-part"
of the URI. This seems stringent and logical – and once you've understood the principle and know the languages-
abbreviations you can easily get the translations for every movie without any stress.
An alternative to the above approach: You could add another URL-parameter to the request.
If you've been working for a longer time with TYPO3, you should recognize the "famous" L-parameter that
could be used up until version 8 of TYPO3.
Without URL-rewriting ("realurl") the language variants of a page would have looked like this:
https://www.mymediadatabase.com/api/movie/123?L=1
Copied!
A little ugly - and not really the aspired way of creating a "beautiful Rest Api". But otherwise is rather
comprehensible, like the solution discussed above.
Last idea: Send the preferred language "hidden" to the API - as a kind of "metadata".
This is actually a very nice idea: In this case, the URI is not modified in any way. No path-prefixes. No
additional GET-parameters. The movie ID stays the same. All we are telling the API during the request is:
"I accept German. So please give me the information in German!"
Here is where the "Request Header"-magic kicks in. You can accompany every request you send to the server, with
a battalion of "hidden" headers. This can be: The format you would like to receive the answer in (JSON, HTML or
XML?) and of course the language you want (en-US? de-DE? klingon-Klingon?)
The header commonly used to tell the server "I want a certain language" is the Accept-Language header.
To make it clear in an example: When using the language-header you will physically always be sending
a request to the same URI:
GET https://www.mymediadatabase.com/api/movie/123
Copied!
But depending on the language, you will be sending different headers with the request.
So it could be one of the following:
// Ick sprecke Deutsch!
Accept-Language: de-DE

// Je parle Baguette
Accept-Language: fr-FR

// Il pablo Parmegano
Accept-Language: it-IT
Copied!
Beautiful solution! Well, then all we need to do is send the right Accept-Language-header to get the localized
data, correct? Well, almost.
So where is the problem?
The difficulty is, the way TYPO3 stores localized data in the database: Under the hood TYPO3 always creates unique
UIDs for every localized entry and content. This is because TYPO3 uses only one field as unique identifier in
the database (the field uid) - not two fields (e.g. uid and sys_language_uid).
The English database-row of the "Killer Tomatoes" might have uid = 123, but the German translation will definitely
have some other uid - maybe 281 or something else. In the "connected mode" Typo3 will link these two rows
to each other using the field l10n_parent. The field l10n_parent of the German translation will be set
to 123 which is the uid of the movie in the base-language (English).
Now things get really confusing:
If you do a query to the database and want to get the German (= localized) version of the movie number 123, then
at a first glance, the result will look like this:
{
   "uid": 123,
   "title": "Rache der Killer Tomaten",
   "description": "Ein toller Film für Vegetarier.",
   "director": "John de Bello",
   ...
}
Copied!
The query-result is actually returning the UID of the base-language (English), but "invisibly" overlaying fields from the
translated database-row (281). In other words: We are actually looking at data from the database-row with the uid 281 (German)
but get the uid of the base-language in the result.
Invisibly?
Well not completely. TYPO3 actually passes two more "pseudo"-fields. These fields are _localizedUid and _languageUid
and they indicate, that the data we are receiving is the merged result of two rows in the database:
Here is where the frontend needs a certain amount of "intelligence": It might be GETTING data using the identical URI in the request:
GET https://www.mymediadatabase.com/api/movie/123
Copied!
But depending on the Accept-Language-header will be retrieving data with the same uid, but needs to be stored in different
shelves. If the user can edit the title, then - depending on the language he is currently editing - the data must be PUT back
in the UID 123 (for the English version) but 281 for the German version.
This is something you will have to implement yourself – either in the front- or backend. The nnrestapi doesn't take care of
automatically "changing" the UID of the data to be persisted. It simply ignores the field "_localizedUid" - to not produce
uncontrolled results.
Get hidden records
How to retrieve hidden records
Imagine you are developing a frontend based on JavaScript (VueJS or React) to administrate
news records. Of course, as an admin, you want to be able to edit records that were not published
yet.
If you were logged in to the backend, you would simply set the "hidden" flag on the record and
happily edit the news until things look fine. This is possible, because you are logged in to the
backend which allows you to view records that are hidden or have a start- and end-date set.
With a normal TYPO3-extension we would be facing a problem. We are sending all requests to the API from
a frontend context. And frontend means: Hidden is hidden!
Yes, you can.
The good news: Retrieving hidden records in the frontend context is possible with nnrestapi.
You have two options:
Use the @Api\IncludeHidden() Annotation
To make TYPO3 include hidden records, you can add the following annotation to your method.
TYPO3 will now also return hidden data, including hidden, nested FileReferences or other
relations.
@Api\IncludeHidden()
Copied!
More information and examples can be found on this page
Set the "Admin Mode" for a Frontend User
If you are using authenticated frontend user you can define access rights to hidden records
on a per-user base.
Edit the frontend-user in the backend, switch to the "RestAPI" tab and set the checkbox
"Admin-Mode: Show hidden records":
Kickstarter
The fastest way to start your TYPO3 RestApi project
The backend-module of nnrestapi offers "Kickstarter" templates, which you can customize and download with a single click.
The idea was to create a helper similar to the TYPO3 "Extension Builder": You can define the vendor- and extension-name,
click "export" to download the customized extension and then install it as a starting point for your own
extension development.
Creating own kickstarter templates
You can add your own "Kickstarter"-templates to the backend module.
It would be great to add as many examples and templates as possible in the future, e.g. for a frontend in VueJS, React or Angular.
So: Please, please... if you are developing an application that connects to a backend and are using technologies
like Swift, Kotlin, VueJS, React, Angular or other frameworks: Consider sharing your knowledge and contribute a "Kickstarter"-template
for the community to reduce development time and get started faster.
Creating your own kickstarter-templates is extremely simple:
Build something
Create a web app, app, plugin, extension, pwa or whatever - in the language and framework you prefer working in.
Make it connect to your Api.
Make your code customizable
If necessary, replace keywords like the vendor name, extension name etc. with the following placeholders. The kickstarter
will automatically replace the placeholders with the custom variable set kickstarter form of the backend module:
You can use the placeholders in the code and your filenames:
placeholder
example
description
[#ext-ucc#]
MyExtension
The UpperCamelCase version von the extension name
[#ext-lower#]
my_extension
The lower_underscore version of the extension name
[#vendor-ucc#]
Company
The UpperCamelCase version of the vendor name
[#vendor-lower#]
company
The lower_underscore version of the vendor name
You can use these placeholders in your PHP, JavaScript or any other code – and even the filename.
Let's imagine, the user enters Acme as a vendor-name and Foobar as extension-name.
If the user exports an kickstarter-template and your PHP code looks like this:
If you don't want to modify your code, but still want certain parts of the code to be customizable,
you can also define a list of replacements in the TypoScript settings. Here is an example for the "VeryBasic"
kickstarter template:
plugin.tx_nnrestapi.settings.kickstarts {
verybasic {
...
replace {
nng/apitest = [#vendor-lower#]/[#ext-lower#]
Nng\\Apitest\\ = [#vendor-ucc#]\\[#ext-ucc#]\\
Nng\Apitest\ = [#vendor-ucc#]\[#ext-ucc#]\# Special characters in the key can be encoded with \x-syntax and the hexcode
\x22apitest\x22 = "[#ext-lower#]"
}
}
}
Copied!
ZIP it
Create a zip-archive of your project that has all folders and files needed to get started. Don't include libraries that get loaded
during the installation-process, e.g. the node_modules folder if you are working in VueJS.
Register your kickstarter template
| To make the template available in the backend module, register the path to your zip or folder.
Note: The zip must be somewhere inside the an extension folder - or the fileadmin.
plugin.tx_nnrestapi.settings.kickstarts {
    mytemplate {
        title = The title
        icon = fas fa-box
        description = The description goes here
        path = EXT:yourext/Resources/Private/Kickstarts/yourpackage.zip
        replace {
            some_custom_placeholder = [#vendor-lower#]_[#ext-lower#]_sometext
        }
    }
}
Copied!
Installing an TYPO3 extension locally when in composer-mode
If you have installed TYPO3 in composer mode and try to activate an extension which you have installed locally you probably will
get the following error message on the command line:
Warning
Could not find a matching version of package vendorname/extname. Check the package spelling, your version constraint and that the package is available in a stability which matches your minimum-stability (stable).
The reason for this error is that by default composer will always try to find extensions marked as stable. Because your extension is only
installed locally and has no git / version / tag, composer can not determine the state of the extension.
To solve this problem, you can modify your composer.json and also allow extensions that are in dev state.
Simply add this line to the root of the composer.json:
"minimum-stability": "dev"
Next, make sure that IF a stable version exists, the stable version will be prefered. Without this line, running
composer update the next time will load all TYPO3-extensions in dev-state which can result in many other problems.
Add this line to the composer.json:
"prefer-stable" : true
Step-by-step:
Here are the steps to install an extension locally without needing to create a repository and registering the extension on packagist:
Navigate to the root-level of your TYPO3 installation (the place where the composer.json and public-folder are)
Create a new folder named extensions
Copy your TYPO3-extension in to the folder extensions
Install your extension using composer req vendorname/extname
Documenting your Api
Use comments to create your documentation on-the-fly
Creating a beautiful documentation of your TYPO3 RestApi is simple: No need to use
an external editor! Anything you write as a comment above your method will be
parsed and converted in a documentation that can be accessed in the TYPO3 backend.
In the comment, you can even use Markdown to
format your text, add headings or example code blocks.
Here is an example:
/**
 * ## Example
 *
 * This comment will be visible in the backend-module of
 * the nnrestapi. If you would like to show a code block in
 * your documentation, simple use the markdown-syntax:
 * ```
 * {"some":"example from markdown"}
 * ```
 * The text in the Example-annotation will be used to compose
 * the request from the testbed.
 *
 * @Api\Example("{'some':'example for testbed'}")
 * @return array
 */
Copied!
The above example would automatically create this documentation in the
backend module:
Examples & Recipes
Cheat sheets that help you get started
In this section you can find examples and tutorials:
In the following example we would like to create an endpoint that can read, update, insert and
delete articles in a news-system.
All operations can be executed by calling the endpoint located at
https://www.mysite.com/api/article. Here is an overview of what we are planning to do:
Method
URL
Request body / payload
operation
GET
/api/article/1
(none)
Get entry with uid [1] from database
PUT
/api/article/1
{"title":"News", "text":"nice"}
Update full entry with uid [1] in database
DELETE
/api/article/1
(none)
Delete entry with uid [1] in database
POST
/api/article
{"title":"News", "text":"read it"}
Insert a new entry in database
The URLs above have 3 parts:
every URL is prefixed with api as first part of the path. This is the default setting for
every Api. It can be changed in the configuration YAML.
the second part of the URL is article. This is the name of your custom Api-Class in lowercase.
the third part is the uid of the entry to get, update or delete. It is not set in the POST
request, because here we want to insert a new article
Let's start by creating the Article class. Your Api classes can be located anywhere inside of
the Classes folder of your extension. We would recommend placing them in a folder named
Classes/Api/....
Every Api Class should extend Nng\Nnrestapi\Api\AbstractApi. You can also reference the
Nng\Nnrestapi\Annotations as Api. You will be using these Annotations to define
access-rights and other things later.
The first method we want in our class should take care of retrieving a Article-Model by its
uid from the database and returning it to the frontend.
We want to be able to access this endpoint by sending a GET-Request to the following URL.
As a last part of the URL we want to be able to pass the uid of the Article to retrieve.
https://www.mysite.com/api/article/1
Copied!
Remember: If no Routing by custom Routes is defined for the method, the first part of the URL-path
after api/ will be interpreted as the controller-name of your Rest Api. In this case article
automatically will route to methods in your class Article.
If the next part of the URL is an integer, the extension automatically maps this to the request
argument $uid and will call the indexAction of your class.
Depending on the HTTP Request method, the getIndexAction(), postIndexAction(), putIndexAction()
etc. is called.
Another way of accessing the $uid is by using Dependeny Injection. All you need
to do is define an argument with the variable name $uid. The uid will
automatically be passed to your method:
Here we are going to use a even nice way: We'll inject the Model directly using
Depency Injection. And to round it up, we are also going to return a 404-error, if
the Article could not be found.
/**
* @param My\Extension\Domain\Model\Article $article
*/publicfunctiongetIndexAction( $article = null ){
if (!$article) {
return$this->response->notFound('Requested Article was not found.');
}
return $article;
}
Copied!
That was it!
Hint
To find out more about error handling, refer to this section: Error Responses.
4. Updating an existing Model
Next, lets write the method to handle the PUT request. PUT will update an existing
model, so we will not only need to pass an uid, but also a JSON with the data to update.
To compose and test this request, you can use Postman or the
backend testbed that the nnrestapi comes with.
We will be PUTing the data to this URL:
https://www.mysite.com/api/article/1
Copied!
and sending this JSON-data to update the title of the Article:
{"title":"updated title", "uid":1}
Copied!
Next we need an endpoint to handle the request and update the model in the database:
/**
* @param My\Extension\Domain\Model\Article $article
*/publicfunctionputIndexAction( $article = null ){
if (!$article) {
return$this->response->notFound('Requested Article was not found.');
}
\nn\t3::Db()->update( $article );
return $article;
}
Copied!
The actual magic is: The nnrestapi took care of retrieving the existing model from
the database and merging the JSON-data in to the model. The $model in this method
will have the updated $title from the request, but will not be persisted yet.
To save changes to the Model you will have to persist it.
You can use the standard $repository->update() and $persistenceManager->persistAll() methods,
but here we are using one of our favourite one-lines from the TYPO3 nnhelpers-extension.
5. Creating / inserting a new Model
Let's use the POST method to create a new Article and persist it in the database.
The precedure is almost identical to the PUT-Request. Only difference: We are NOT
sending an $uid.
https://www.mysite.com/api/article
Copied!
{"title":"new article"}
Copied!
Here is the corresponding method in your Article-class:
Now we are only missing a way to delete a Model from the database. We will be sending a
DELETE request to this endpoint and pass the $uid of the Article we would like
to delete:
/**
* @param My\Extension\Domain\Model\Article $article
*/publicfunctiondeleteIndexAction( $article = null ){
if (!$article) {
return$this->response->notFound('Requested Article was not found.');
}
\nn\t3::Db()->delete( $article );
return $article;
}
Copied!
Full example
Attention
DON'T DO IT!
You probably will not want to expose all your read and write endpoints to the public using @Api\Access("public").
We have only used public access here to provide you with an "instant feeling of success".
<?phpnamespaceMy\Extension\Api;
useNng\Nnrestapi\AnnotationsasApi;
useNng\Nnrestapi\Api\AbstractApi;
/**
* @Api\Endpoint()
*/classArticleextendsAbstractApi{
/**
* GET an article via: /api/article/{uid}
*
* @Api\Access("public")
* @param My\Extension\Domain\Model\Article $article
*/publicfunctiongetIndexAction( $article = null ){
if (!$article) {
return$this->response->notFound('Requested Article was not found.');
}
return $article;
}
/**
* UPDATE an article via: /api/article/{uid}
*
* @Api\Access("public")
* @param My\Extension\Domain\Model\Article $article
*/publicfunctionputIndexAction( $article = null ){
if (!$article) {
return$this->response->notFound('Requested Article was not found.');
}
\nn\t3::Db()->update( $article );
return $article;
}
/**
* INSERT a new article via: /api/article
*
* @Api\Access("public")
* @Api\Upload("default")
* @param My\Extension\Domain\Model\Article $article
*/publicfunctionpostIndexAction( $article = null ){
$insertedArticle = \nn\t3::Db()->insert( $article );
return $insertedArticle;
}
/**
* DELETE an article via: /api/article/{uid}
*
* @Api\Access("public")
* @param My\Extension\Domain\Model\Article $article
*/publicfunctiondeleteIndexAction( $article = null ){
if (!$article) {
return$this->response->notFound('Requested Article was not found.');
}
\nn\t3::Db()->delete( $article );
return $article;
}
}
Copied!
Creating Content-Elements (tt_content)
How to create or modify a TYPO3 content-element with your RESTful Api
You might have the crazy idea to replace parts of the TYPO3 backend with a custom interface so your user
can create or modify the standard TYPO3 content-elements using your own frontend application.
Everything you need for retrieving and modifying the fields of the tt_content-table including FAL (FileReferences)
for the fields image, media and assets are implemented and ready to use.
The only thing that might be new and confusing: You will need a Domain-Model and Repository to create an object that
can be modified with getters and setters. For some reason, TYPO3 has not implemented a Model for ContentElements from
the tt_content-table yet (or we couldn't find it ;) - so we will need to do it ourselves:
Step-by-step
Creating the Content-Model
Inside of your own extension, let's start by defining the Content model.
Create a file inside of your extension: Classes/Domain/Model/TtContent.php and add the following
code. Make sure to replace the namespace with your vendor- and extension-name.
In the TypoScript-setup of your extension, define a defaultStoragePath to use for file-uploads.
This setting will be referred to in the endpoint to create new content-elements
using the Annotation @Api\Upload("config[apidemo]")
plugin.tx_nnrestapi {
   settings {

      # where to upload new files. Use @Api\Upload("config[apidemo]")
      fileUploads {
         apidemo {
            defaultStoragePath = 1:/apidemo/
         }
      }

   }
}
Copied!
Create an endpoint
Next we will need to define an REST-Api endpoint to handle the GET and POST requests.
Here is the file located at Classes/Api/Content.php
<?php// Classes/Api/Content.phpnamespaceMy\Extension\Api;
useMy\Extension\Domain\Repository\TtContentRepository;
useMy\Extension\Domain\Model\TtContentasTtContent;
useNng\Nnrestapi\AnnotationsasApi;
/**
* This annotation registers this class as an Endpoint!
*
* @Api\Endpoint()
*/classContentextends \Nng\Nnrestapi\Api\AbstractApi{
/**
* @var TtContentRepository
*/private $ttContentRepository = null;
/**
* Constructor
* Inject the TtContentRepository.
* Ignore storagePid.
*
* @return void
*/publicfunction__construct(){
$this->ttContentRepository = \nn\t3::injectClass( TtContentRepository::class );
\nn\t3::Db()->ignoreEnableFields( $this->ttContentRepository );
}
/**
* # Retrieve an existing Content-Element
*
* Send a simple GET request to retrieve a content-element by its uid from the database.
*
* Replace `{uid}` with the uid of the Entry:
* ```
* https://www.mysite.com/api/content/{uid}
* ```
*
* @Api\Access("public")
* @Api\Localize()
* @Api\Label("/api/content/{uid}")
*
* @param TtContent $entry
* @param int $uid
* @return array
*/publicfunctiongetIndexAction( TtContent $ttContent = null, int $uid = null ){
if (!$uid) {
return$this->response->notFound("No uid passed in URL. Send the request with `api/content/{uid}`");
}
if (!$ttContent) {
return$this->response->notFound("Content-Element with uid [{$uid}] was not found.");
}
return $ttContent;
}
/**
* # Create a new Content-Element
*
* Send a POST request to this endpoint including a JSON to create a
* new ContentElement in the tt_content-table. You can also upload file(s).
*
* You __must be logged in__ as a frontend OR backend user to access
* this endpoint.
*
* @Api\Access("be_users,fe_users")
* @Api\Upload("config[apidemo]")
* @Api\Example("{'pid':1, 'colPos':0, 'header':'Test', 'assets':['UPLOAD:/file-0']}");
*
* @param TtContent $ttContentElement
* @return array
*/publicfunctionpostIndexAction( TtContent $ttContentElement = null ){
\nn\t3::Db()->save( $ttContentElement );
return $ttContentElement;
}
}
Copied!
Test it!
Clear the TYPO3 cache (lightning-button) and use the RestApi backend module to test it!
Let's imagine you are creating a SPA / frontend-application in VueJS, React or Angular and are using
TYPO3 as a backend.
In your application you have various texts and labels, for example in dialog-modals, on the onboarding
screen, the privacy policy, imprint and so on. Of course, all of these texts are translated in to
multiple languages.
Wouldn't it be great to keep these texts editable in the TYPO3 backend and load them dynamically
in the language the user has his browser set to?
The following example illustrates, how easy it is to get pre-rendered and localized content-elements
from an endpoint.
After installing the nnrestapi extension, let's start by creating the Content class.
Your Api classes can be located anywhere inside the Classes folder of your extension.
We would recommend placing them in a folder named Classes/Api/....
The idea is to be able to get any content-element by its uid by sending a GET-request to
the endpoint:
https://www.mysite.com/api/content/{uid}
Copied!
Reminder: If no Routing by custom Routes is defined for the method, the first part of the URL-path
after api/ will be interpreted as the controller-name of your endpoint. In this case content
automatically will route to methods in your class Content.
If the next part of the URL is an integer. This will automatically be mapped to the request
argument $uid and will call the indexAction of your class.
As we want a GET request here, all we need to do is define a method called getIndexAction().
This says, that anybody can access this endpoint. No authentication required.
No need to be logged in. You probably will want to change this.
@Api\Localize()
Copied!
Defines, that the nnrestapi will "pay attention" to the requested language and translate
the content-element (if a translation exists for it in the backend).
Test it!
Create a content-element in the backend, translate it and then enter the URL in the browser
to see the result. Replace 123 in the example with the uid of your content-element
in the default language:
https://www.mysite.com/api/content/123
Copied!
This should give you a JSON with the rendered content element in your default language.
To get the localized version you have 3 possibilities:
| 1. Send the "Accept-Language" header
Send a Accept-Language header with your request as described in this chapter.
The nnrestapi will automatically "listen" to this header and make sure that the data returned will be localized.
Accept-Language: en-US
Copied!
| 2. Use the language path in the URL
Call the endpoint, but add the language prefix to the URL like you would when doing standard requests to TYPO3
pages.
https://www.mysite.com/en/api/content/123
Copied!
Getting translations, even with no language path set? Simple explanation: You are currently testing things
by entering the URL in the browser. Your browser might automatically be sending an Accept-Language-header,
e.g. en-DE. The nnrestapi falls back to the Accept-Language header, if no other language path is set in the URL.
This can be changed by removing Accept-Language as a field to check in the TypoScript setup.
| 3. Use the "L"-parameter in the URL
Last option: add the famous "L"-parameter with the language-uid to the URL. This option was actually removed in
one of the last TYPO3 versions - but we are "reintroducing" it because it might make life a
little easier:
https://www.mysite.com/api/content/123?L=1
Copied!
Tip
Test it in the backend!
Testing the localization can also be done using the "RestApi" backend module:
Use the tab "Language" below the input field for the URL to modify the "Accept-Language" header that is sent
when making the request.
Rendering a page
Render all content-elements from a page
As a variation of the example how to render a single content element, we will
now render all content-elements that were placed in a certain column ("colPos") of a page.
Here are some examples of how to retrieve the rendered content for a given page-uid and colPos:
// GET all content-elements from page 123 and column 0
https://www.mysite.com/api/content/column/123/0// GET all content-elements from page 99 and column 110
https://www.mysite.com/api/content/column/99/110
Copied!
Raw Content data
Retrieving the raw, unrendered data of content-elements
In contrast to the example of how to retrieve rendered content elements
let's create an endpoint that returns the "raw" data from the table tt_content
for a given uid:
<?phpnamespaceMy\Extension\Api;
useNng\Nnrestapi\AnnotationsasApi;
useNng\Nnrestapi\Api\AbstractApi;
/**
* @Api\Endpoint()
*/classContentextendsAbstractApi{
/**
* @Api\Access("public")
* @Api\Localize()
*
* @param int $uid
* @return array
*/publicfunctiongetRawAction( int $uid = null ){
// Get raw data from table tt_content and include FAL-relations
$data = \nn\t3::Content()->get( $uid, true );
return $data;
}
}
Copied!
To see the results, send a GET request to:
https://www.mysite.com/api/content/raw/{uid}
Copied!
Example result of what you get:
{
"uid": 1,
"pid": 2,
"header": "My title",
"bodytext": "<p>This is <a href=\"t3://page?uid=6\">link to a page</a></p>",
"assets": [
"uid": 14,
"publicUrl": "fileadmin/path/to/image.jpg"
],
...
}
Copied!
Parsing t3://page TypoLinks in the bodytext
If you take a close look at the field bodytext you will notice, that the typolink was not rendered.
This usually happens in the fluid template when using the f:format.html-ViewHelper.
To parse the links and convert the t3://page?uid=... syntax in to "real" URLs you can add this to
your method. You will have to repeat this for every field using the RTE (Rich Text Editor / ckeditor):
// Get raw data from table tt_content and include FAL-relations
$data = \nn\t3::Content()->get( $uid, true );
// Parse links in bodytext, convert t3://page to normal link
$data['bodytext'] = \nn\t3::Tsfe()->cObj()->parseFunc($data['bodytext'], [], '< lib.parseFunc_RTE');
Copied!
Now the result will look like this:
{
"bodytext": "<p>This is <a href=\"/thepage">linked to a page</a></p>",
...
}
Copied!
Creating absolute links for TypoLinks in the bodytext
Let's guess: Probably the next thing you want to do is create absolute URLs in the bodytext, right?
This is especially helpful, when you are developing a cross-domain application that needs to link to
content on an external server.
To get this done, the nnrestapi comes with a special lib.parseFunc_nnrestapi configuration. Simply
replace lib.parseFunc_RTE with lib.parseFunc_nnrestapi:
// Get raw data from table tt_content and include FAL-relations
$data = \nn\t3::Content()->get( $uid, true );
// Parse links in bodytext, create absolute links
$data['bodytext'] = \nn\t3::Tsfe()->cObj()->parseFunc($data['bodytext'], [], '< lib.parseFunc_nnrestapi');
Copied!
Now the result will have absolute URLs instead of relative paths and look like this:
{
"bodytext": "<p>This is <a href=\"https://www.mysite.com/thepage">linked to a page</a></p>",
...
}
Copied!
Hint
There is no real magic to this. Here is a peek at the TypoScript behind lib.parseFunc_nnrestapi.
We are simply inheriting all settings from lib.parseFunc_RTE and modifying it to force absolute URLs
in links and typolinks.
The first thing most Single Page Applications (SPAs) do when they are booting is: Load settings, configurations and
other static data from the server. This could be:
Static URLs to media-folders
TypoScript settings that are needed in the frontend
A list of countries or languages that should be selectable in the frontend
This example illustrates how you could create an public endpoint that returns various
settings and configurations to the frontend application.
Almost all the values are retrieved using oneliners from the extension nnhelpers
which is installed as a dependency for EXT:nnrestapi. In other words: They are there and ready to be used.
<?phpnamespaceMy\Extension\Api;
useNng\Nnrestapi\AnnotationsasApi;
useNng\Nnrestapi\Api\AbstractApi;
/**
* @Api\Endpoint()
*/classSettingsextendsAbstractApi{
/**
* @Api\Access("public")
*
* @return array
*/publicfunctiongetIndexAction(){
$settings = [];
// Get baseUrl of current website
$settings['baseUrl'] = \nn\t3::Environment()->getBaseUrl();
// Get all languages from site config.yaml (e.g. for a language switcher)
$languages = \nn\t3::Settings()->getSiteConfig()['languages'] ?? [];
$settings['languages'] = \nn\t3::Arrays($languages)->key('hreflang')->pluck('title')->toArray();
// Get full TypoScript settings for plugin.tx_myextension.settings
$settings['settings'] = \nn\t3::Settings()->get('myextension');
// Get TypoScript setup from plugin.tx_myextension.settings.somedeep.path
$settings['paths'] = \nn\t3::Settings()->get('myextension', 'somedeep.path');
// Get list of countries (EXT:static_info_tables needs to be installed)
$settings['countries'] = \nn\t3::Environment()->getCountries();
// Get configuration for an extension from the extension manager
$settings['extConf'] = \nn\t3::Settings()->getExtConf( 'myextension' );
// Get an absolute link to a page in the frontend
$settings['imprintUrl'] = \nn\t3::Page()->getLink( 2, true );
return $settings;
}
}
Find out, how to create GET, POST, PUT, PATCH and DELETE requests,
with and without authentication and file-uploads using jQuery in in the following chapters:
All exemples on this page will only work, if the methods have @Api\Access("public") set in the annotation.
If you need to find out, how to do that please refer to this section or find out, how to create
request with authentication in this section
Sending a GET-Request
A very basic example of how to send a GET request using
jQuery's $.get() command.
// By default this will be routed to Index->getIndexAction()const url = 'https://www.mywebsite.com/api/index';
$.get(url).done((result) => {
alert( result.message );
}).fail((error) => {
alert( `Error ${error.status}: ${error.responseJSON.error}` );
});
Copied!
Sending a POST-Request
Here is a example of how to send a POST request using
jQuery's $.post() command.
Note that the object-data is converted to a JSON-string using JSON.stringify().
This makes sure the data can be parsed by the backend.
// By default this will be routed to Index->postIndexAction()const url = 'https://www.mywebsite.com/api/index';
const data = {title:'Test'};
const jsonData = JSON.stringify(data);
$.post(url, jsonData).done((result) => {
console.log( result );
}).fail((error) => {
alert( `Error ${error.status}: ${error.responseJSON.error}` );
});
Copied!
Sending a PUT, PATCH or DELETE request
If you would like to send a PUT, PATCH or DELETE request, you will need to use
jQuery's $.ajax() method with the appropriate type in the
request settings.
// By default this will be routed to Index->putIndexAction()const url = 'https://www.mywebsite.com/api/index';
const data = {title:'Test'};
const jsonData = JSON.stringify(data);
$.ajax({
url: url,
type: 'PUT', // 'PATCH' or 'DELETE'data: jsonData
}).done((result) => {
console.log( result );
}).fail((error) => {
alert( `Error ${error.status}: ${error.responseJSON.error}` );
});
Copied!
jQuery Starter Template
Here is a full example you can copy and paste to get you started.
You can also test and play with it on this codepen
How to login as a Frontend-User using jQuery and send requests
In most cases you will want to restrict access to your an endpoint to certain users or usergroups.
The basic way to do this in your classes and methods, is to use the @ApiAccess() Annotation.
The nnrestapi-extension comes with a default endpoint to authenticate as a Frontend User using the
credentials set in the standard fe_user-record.
To keep the frontend user logged in, TYPO3 usually sets a cookie. Cookies tend to get rather ugly when you
are sending cross-domain requests, e.g. from your Single Page Application (SPA) or from a localhost
environment.
The nnrestapi solves this by also allowing authentication via JWT (Json Web Token).
Let's have a look, how to authenticate, retrieve a JWT with jQuery and pass it to the server when making follow-up
request to your TYPO3 Rest Api.
Authentication with jQuery
Use a simple POST-request to the endpoint /api/auth and pass your credentials wrapped in a JSON to
authenticate as a TYPO3 Frontend-User. If you were successfully logged in, you will get an array with
information about the frontend-user and the JSON Web Token (JWT).
In the following script we are simply "memorizing" the JWT by storing it in the
localStorage for later requests.
// This endpoint is part of the nnrestapiconst authUrl = 'https://www.mywebsite.com/api/auth';
const credentials = JSON.stringify({
username: 'john',
password: 'xxxx'
});
$.post(authUrl, credentials).done((result) => {
alert( `Welcome ${result.username}!` );
localStorage.setItem('token', result.token);
}).fail((error) => {
alert( `Error ${error.status}: ${error.responseJSON.error}` );
});
Copied!
If you were john and we guessed your password right, the response of the above example will look something like this:
The most important part of the response is the token. You will need to store the value of the token in a variable
or localStorage like we did in the example above.
Sending authenticated requests
After you retrieved your JSON Web Token (JWT) you can compose requests with the Authentication Bearer header.
Let's send a request to an endpoint that has an restricted access and only allows requests from fe_users.
This can be done, by setting @Api\Access("fe_users") as Annotation in the endpoints method.
// Your endpoint. Only fe_users may access it.const url = 'https://www.mywebsite.com/api/test/something';
// The JWT we stored above after authenticatingconst token = localStorage.getItem('token');
$.ajax({
url: url,
type: 'GET',
headers: {
Authorization: `Bearer ${token}`
}
}).done((result) => {
console.log( result );
}).fail((error) => {
alert( `Error ${error.status}: ${error.responseJSON.error}` );
});
Copied!
Checking the login status
The nnrestapi comes with an endpoint to check, if the JWT is still valid. Or, another words, If the frontend-user
is still logged in and has a valid session.
Hint
The session lifetime (the time the frontend-user session is valid) can be set in the backend.
Have a look at the extension configuration for nnrestapi in the Extension Manager.
Simply send a GET-request to the endpoint /api/user and pass the Authentication Bearer header.
If the session is stil valid, the API will return information about the current frontend-user.
// This endpoint is part of the nnrestapi const checkUserUrl = 'https://www.mywebsite.com/api/user';
// The JWT we stored above after authenticatingconst token = localStorage.getItem('token');
$.ajax({
url: checkUserUrl,
type: 'GET',
headers: {
Authorization: `Bearer ${token}`
}
}).done((result) => {
console.log( result );
}).fail((error) => {
alert( `Error ${error.status}: ${error.responseJSON.error}` );
});
Copied!
The result will be very similar to the object returned during authentication, but the response
will not contain the token:
If you have tried other extensions you might know
this is the part where things tend to get complicated. With nnrestapi we have tried to keep file uploads
as simple as possible.
There are two possible ways of uploading files and attaching SysFileReferences (FAL) to your model.
Tip
You can find a full example with fileuploads in jQuery here:
play on CodePen
Do-it-yourself (no fun)
The first possibility: Take care of uploading the file yourself and add the file path to your model.
We are not going to explain this solution in depth, but the basic principle is:
Upload a file using some custom made upload form
Move the uploaded file to its destination in the fileadmin
Return the path to the file (e.g. fileadmin/myuploads/file.jpg) to your frontend app
set the filepath in the JSON. This can be done for single FAL FileReferences but also for ObjectStorages, e.g.
POST, PUT or PATCH the JSON to your endpoint. Persist it.
The nnrestapi will automatically determine, of the field image is an ObjectStorage containing SysFileReferences.
It will convert the file on the server to a SysFile, create the SysFileReference and attach it to the Model.
Hint
This is the way most other extensions handle file-uploads. Works fine – but there are some downsides to
this solution:
You need a seperate logic or form for the fileupload
The file is uploaded before the model is persisted: If the user aborts editing the record or closes
the browser before saving, the file might be orphanded and never used as a FileReference. You will
need some other solution to keep your server "clean".
Using mutipart form-data (fun)
The recommended way to upload files to your endpoint is by using multipart/form-data.
All you need is a normal file-upload field in your form. Then, before sending the POST, PUT or PATCH request:
Create the JSON-object you want to send by getting the values from the input-fields.
Just the way you would always do, e.g.
{"title":"Test", "text":"nice!"}
Copied!
Set the special placeholder UPLOAD:/identifier for every fileupload at the place you want to have the FileReference, e.g.
Compose a multipart/form-data request using plain JavaScript, jQuery or axios.
Attach the stringified JSON to the variable json of your multilpart form-data.
Get the FileData from the fileupload-field using JavaScript and push it to multipart form-data using the
same variable-name you chose as a placeholder (myfile in the example above)
Send the request and let nnhelpers take care of the rest.
Hint
Don't forget to set the Authentication Bearer-header if you are adressing an endpoint that
requires Frontend-User Authentication... which is probably a good idea, when uploading
files to your server ;) Read more here Authentication
Example without Model-mapping
Here is s step-by-step example:
Create an endpoint to debug the result
We will keep things simple and just debug the data that was uploaded.
Create an endpoint with an postIndexAction.
Please note that we are granting public access to this endpoint for test purposes only.
You definitely don't want to do this in a production environment!
In the following example we are using $this->request->getUploadedSysFiles() to get
a list of all files uploaded. They are returned as an associative array.
Then we use some of the EXT:nnhelpers methods to set them to our Model.
You can find other examples for setting the fields in the section getUploadedSysFiles()on this page.
<?phpnamespaceMy\Extname\Api;
useNng\Nnrestapi\AnnotationsasApi;
useNng\Nnrestapi\Api\AbstractApi;
/**
* @Api\Endpoint()
*/classIndexextendsAbstractApi{
/**
* @Api\Access("*")
* @Api\Upload("default")
* @return array
*/publicfunctionpostIndexAction(){
// create a new Entry-model
$entry = new \My\Extension\Domain\Model\Entry;
// get the uploaded files as \TYPO3\CMS\Core\Resource\File
$files = $this->request->getUploadedSysFiles();
// add uploaded files to the ObjectStorage of the model. // nice: They will automatically be converted to \TYPO3\CMS\Extbase\Domain\Model\FileReference
\nn\t3::Fal()->setInModel( $entry, 'files', $files );
// persist the Entry
\nn\t3::Db()->save($entry);
return ['result' => $entry];
}
}
Copied!
Create your input fields in HTML
Create a simple HTML document that has a file-input and some textfields.
We are going to "grab" the values from the fields manually later, so you don't need to wrap the
inputs in a <form> element. If you have been working with reactive data in Angular, VueJS or React,
you will know, why we are approaching things here this way ...
Create the JavaScript to send the multipart/form-data.
The important part is using the special UPLOAD:/varname placeholder in your JSON:
By default, the nnrestapi will recursively iterate through the JSON you have passed and look for
all UPLOAD:/varname strings. If it finds a fileupload corresponding to the varname in
the placeholder, it will automatically move the file to its destination and replace the
UPLOAD:/varname with the path to the file, e.g. fileadmin/api/image.jpg.
// put your url hereconst url = 'https://www.mywebsite.com/api/index';
$('button').click(() => {
// grab the fields. Use placeholder for "image" const data = {
title: $('#title').val(),
text: $('#text').val(),
image: 'UPLOAD:/myfile'
};
// Create FormData for sending multipart/form-dataconst formData = new FormData();
// Append JSON-string, use variable "json"
formData.append('json', JSON.stringify(data));
// Append filedata of first file, use "myfile" from placeholder
formData.append('myfile', $('#file')[0].files[0]);
// Send request and degub result in textfield
$.ajax({
url: $('#url').val(),
type: $('#request-method').val(),
cache: false,
contentType: false,
processData: false,
data: formData
}).done((result) => {
$('#result').text( JSON.stringify(result) );
}).fail((error) => {
$('#result').text( 'ERROR: ' + JSON.stringify(error) );
});
});
Copied!
The backend will automatically detect, that you have filedata attached to your request.
It will move the file to the destination defined in @Api\Upload and replace
the placeholder in the payload.
The result of the above example will look something like this:
{
"title": "This is the title",
"text": "This is the bodytext",
"image": "fileadmin/api/filename.jpg"
}
Copied!
Hint
The automatic upload only allows file-extensions and -types defined in $GLOBALS['TYPO3_CONF_VARS']['GFX']['imagefile_ext'].
To add additional types like SVGs you can put this line in ext_localconf.php of your extension - or change the value in
the TYPO3 Install-Tool:
Let's use the above example and modify the scripts to automatically create a Model with a FAL (SysFileReference):
Create a Model
Do what you always do to create a Model. Nothing special to the ext_tables.sql, Configuration/TCA/... settings.
And nothing special to the Domain Model.
Hint
If you like, extend your model from Nng\Nnrestapi\Domain\Model\AbstractRestApiModel.
This is not mandatory – but the AbstractRestApiModel comes equipped with getters and setters to access tstamp and crdate etc.
Modify you postIndexAction so it will automatically create a MyModel from the JSON you passed.
We will use Dependency Injection to accomplish this. If you want to do it manually, have a look at this nice TYPO3 helper:
\nn\t3::Convert( $arr )->toModel()
The recipe above with using multipart form-data and the UPLOAD:/varname placeholder in your JSON will work in any context,
even if you are using ObjectStorages to attach an array of multiple FileReferences to your model.
All you need to do is pass an array of paths and/or placeholders in your JSON request.
Here we are keeping two existing FileReferences that have already been attached to the Model in a previous request and
are adding an additional, new file-upload to the Model:
{
"title": "My Title",
"text: "My Text",
"images": [
"fileadmin/path/existing/file-1.jpg",
"UPLOAD:/newfile",
"fileadmin/path/existing/file-2.jpg"
]
}
Copied!
Of course you will have to modify the above JavaScript to handle multiple files and create an Array of paths and placeholders.
And you need to modify the MyModel-Class to use an ObjectStorage instead of a single FileReference.
Removing FileReferences from a Model or ObjectStorage
To remove a FileReference from a Model or ObjectStorage, simple remove it from the JSON-Object or Array and send it
to the Api. Let's look at an example.
To remove file-1.jpg from the ObjectStorage of the following Model, all we need to do is remove it from the Array:
{
"title": "My Title",
"text: "My Text",
"images": [
"fileadmin/path/existing/file-1.jpg",
"fileadmin/path/existing/file-2.jpg"
]
}
Copied!
... and send the resulting JSON to the server:
{
"title": "My Title",
"text: "My Text",
"images": [
"fileadmin/path/existing/file-2.jpg"
]
}
Copied!
The same can be done, if you only have a single FileReference property in your Model (instead of an ObjectStorage).
Let's remove file.jpg from the Model:
{
"title": "My Title",
"text: "My Text",
"image": "fileadmin/path/existing/file.jpg"
}
Copied!
... by simply setting the field image to null, false or an empty string:
{
"title": "My Title",
"text: "My Text",
"image": ""
}
If you look at the response of our Index->postIndexAction() above, you may have noticed, that the
nnrestapi is actually not only returning the path to the publicUrl of the FileReferences, but an object
containing all relevant information about the FileReference, including fields like title, alternative,
description and crop.
This is, because sending the FileReference information in this form:
{
"image": "fileadmin/path/existing/file.jpg"
}
Copied!
... is actually just a "convenient" and shorthand way of sending it like this:
If you are not planning to modify anything aside of the FileReference itself, the above syntax is fine.
But the fact, that you can also define the FileReference in the latter way makes it possible to
manipulate and persist other fields of the FileReference:
{
"image": {
"publicUrl": "fileadmin/path/existing/file.jpg",
"title": "My image title",
"description": "A nice picture"
}
}
Find out, how to create GET, POST, PUT, PATCH and DELETE requests,
with and without authentication and file-uploads using axios in the following chapters:
AXIOS offers a great Promise based syntax which makes requests very easy.
Let's create a GET request to the nnrestapi backend:
// By default this will be routed to Index->getIndexAction()const url = 'https://www.mywebsite.com/api/index';
axios.get( url ).then(({data}) => {
console.log( data );
}).catch(({response}) => {
alert( `Error ${response.data.status}: ${response.data.error}` );
});
Copied!
Sending a payload / JSON data with the POST, PUT or PATCH request
is also very easy: Axios takes a javascript object as second argument and will automatically serialize
it to a string. No need to JSON.stringify before sending the request:
// By default this will be routed to Index->postIndexAction()const url = 'https://www.mywebsite.com/api/index';
const json = {
title: 'Test',
};
axios.post( url, json ).then(({data}) => {
console.log( data );
}).catch(({response}) => {
alert( `Error ${response.data.status}: ${response.data.error}` );
});
Copied!
AXIOS also has methods ready for all other request-types:
If you are looking for more options – or would like to switch between request methods
dynamically, then axios() offers a very generic method to create your request:
How to login as a Frontend-User using axios and send requests
In most cases you will want to restrict the access to your endpoint to certain users or usergroups.
The basic way to do this in your classes and methods, is to use the @ApiAccess() Annotation.
The nnrestapi-extension comes with a default endpoint to authenticate as a Frontend User using the
credentials set in the standard fe_user-record.
To keep the frontend user logged in, TYPO3 usually sets a cookie. Cookies tend to get rather ugly when you
are sending cross-domain requests, e.g. from your Single Page Application (SPA) or from a localhost
environment.
The nnrestapi solves this by also allowing authentication via JWT (Json Web Token).
Let's have a look, how to authenticate, retrieve a JWT with axios and pass it to the server when making
follow-up request to your Rest Api.
Tip
Play with this chapter on codepen
Want to play, not read? Then head on to Codepen and learn by playing with the example.
Authentication with axios
Use a simple POST-request to the endpoint /api/auth and pass your credentials wrapped in a JSON to
authenticate as a TYPO3 Frontend-User. If you were successfully logged in, you will get an array with
information about the frontend-user and the JSON Web Token (JWT).
In the following script we are simply "memorizing" the JWT by storing it in the
localStorage for later requests.
// This endpoint is part of the nnrestapiconst authUrl = 'https://www.mywebsite.com/api/auth';
const credentials = {
username: 'john',
password: 'xxxx'
};
axios.post(authUrl, credentials).then(({data}) => {
alert( `Welcome ${data.username}!` );
localStorage.setItem('token', data.token);
}).catch(({response}) => {
alert( `Error ${response.status}: ${response.data.error}` );
});
Copied!
If you were john and we guessed your password right, the response of the above example will look something like this:
The most important part of the response is the token. You will need to store the value of the token in a variable
or localStorage like we did in the example above.
Sending authenticated requests
After you retrieved your JSON Web Token (JWT) you can compose requests with the Authentication Bearer header.
Let's send a request to an endpoint that has an restricted access and only allows requests from fe_users.
This can be done, by setting @Api\Access("fe_users") as Annotation in the endpoints method.
// Your endpoint. Only fe_users may access it.const url = 'https://www.mywebsite.com/api/test/something';
// The JWT we stored above after authenticatingconst token = localStorage.getItem('token');
const xhrOptions = {
withCredentials: true,
headers: {
Authorization: `Bearer ${token}`
}
};
axios.get( url, xhrOptions ).then(({data}) => {
console.log( data );
}).catch(({response}) => {
alert( `Error ${response.status}: ${response.data.error}` );
});
Copied!
Setting the credentials globally for future requests in axios
Nice feature in axios: You can store the credentials / Bearer token globally for every follow-up request
you make with axios. So, after successfully authenticating, you could have all subsequential calls to
the Api automatically send the Authentication Bearer:
// This endpoint is part of the nnrestapiconst authUrl = 'https://www.mysite.com/api/auth';
// This is your endpoint that is only accessible by frontend-usersconst restrictedUrl = 'https://www.mysite.com/api/some/endpoint';
const credentials = {
username: 'john',
password: 'xxxx'
};
// Authenticate frontend user
axios.post(authUrl, credentials).then(({data}) => {
// set default headers for all future requests
axios.defaults.withCredentials = true;
axios.defaults.headers.common.Authorization = `Bearer ${data.token}`;
// now send test request
sendTestRequest();
}).catch(({response}) => {
alert( `Error ${response.status}: ${response.data.error}` );
});
// test to endpoint that requires authenticationfunctionsendTestRequest() {
// Authorization headers are automatically sent now!
axios.get( restrictedUrl ).then((result) => {
console.log( result );
}).catch(({response}) => {
alert( `Error ${response.status}: ${response.data.error}` );
});
}
Copied!
Checking the login status
The nnrestapi comes with an endpoint to check, if the JWT is still valid. Or, another words, If the frontend-user
is still logged in and has a valid session.
Hint
The session lifetime (the time the frontend-user session is valid) can be set in the backend.
Have a look at the extension configuration for nnrestapi in the Extension Manager.
Simply send a GET-request to the endpoint /api/user and pass the Authentication Bearer header.
If the session is stil valid, the API will return information about the current frontend-user.
// This endpoint is part of the nnrestapi const checkUserUrl = 'https://www.mywebsite.com/api/user';
// The JWT we stored above after authenticating. const token = localStorage.getItem('token');
// Not needed if you used axios.defaults.headers.common, see aboveconst xhrOptions = {
withCredentials: true,
headers: {
Authorization: `Bearer ${token}`
}
};
axios.get( checkUserUrl, xhrOptions ).then(({data}) => {
console.log( data );
}).catch(({response}) => {
alert( `Error ${response.status}: ${response.data.error}` );
});
Copied!
The result will be very similar to the object returned during authentication, but the response
will not contain the token:
Here is a template with login-form and testbed to get you started. It will show a login-form and - after successful authentication -
a testform to send JSON-requests with GET, POST, PUT, DELETE and PATCH requests.
This chapter explains how to upload files to the nnrestapi using the JavaScript library axios.
If you are interested in finding out, how to create an endpoint that processes the fileupload, attaches the SysFileReference
to a model and then persists the model in the database, please refer to the examples in this section
How to upload files using the axios library
Tip
You can find a full example with fileuploads and axios here:
play on CodePen
Using mutipart form-data
Please refer to this section for detailled information on implementing
the backend part of the file-upload.
By default, the nnrestapi will recursively iterate through the JSON from your request and look for
the special placeholder UPLOAD:/varname.
If it finds a fileupload in the multipart/form-data corresponding to the varname of the placeholder,
it will automatically move the file to its destination and replace the UPLOAD:/varname in the JSON
with the path to the file, e.g. fileadmin/api/image.jpg.
Here is a basic example on creating a multipart/form-data request using axios.
First, let's create a simple form in HTML. As we are retrieving the input-values manually, there is no need to
wrap the inputs in a <form> element:
And here is the JavaScript example using axios and FormData:
// put your url hereconst url = 'https://www.mywebsite.com/api/index';
document.getElementById('submit').addEventListener('click', () => {
// grab all fields from the formconst json = {
title: document.getElementById('title').value,
text: document.getElementById('text').value,
image: 'UPLOAD:/myfile'
};
// create a FormData let formData = new FormData();
// append the stringified version of the JS-Object in the variable "json"
formData.append('json', JSON.stringify(json));
// append the selected file
formData.append('myfile', document.getElementById('file').files[0]);
// send the request
axios({
url: url,
method: 'post',
data: formData
}).then(({data}) => {
document.getElementById('result').innerText = JSON.stringify( data );
}).catch(({response}) => {
alert( `Error ${response.status}: ${response.data.error}` );
});
});
Copied!
If you select The result of the above example will look something like this:
{
"title": "This is the title",
"text": "This is the bodytext",
"image": "fileadmin/api/filename.jpg"
}
Copied!
Tip
The nnrestapi can automatically create a Model from your JSON-data and attach SysFileReferences (FAL) relations.
Please refer to this example for in-depth information.
Modern JavaScript (ES6+)
Creating requests using pure JavaScript ("VanillaJS") in modern browsers that support
ES6+ and the Promise-based fetch() command.
Find out, how to create GET, POST, PUT, PATCH and DELETE requests,
with and without authentication and file-uploads using nothing but pure JavaScript in the following chapters:
If you can drop support for IE11 and below, the easiest way to send a request is using the promise-based fetch()
command that comes with ES6+.
Let's create a GET request to the nnrestapi backend:
// By default this will be routed to Index->getIndexAction()const url = 'https://www.mywebsite.com/api/index';
fetch( url )
.then( async response => {
// convert the result to a JavaScript-objectlet data = await response.json()
if ( !response.ok ) {
// reponse was not 200
alert( `Error ${response.status}: ${data.error}` );
} else {
// everything ok!console.log( data );
}
});
Copied!
Without further configuration, fetch() will send a GET-request. Of course you can also send a payload / JSON data
to the backend using a POST, PUT or PATCH request:
// By default this will be routed to Index->postIndexAction()const url = 'https://www.mywebsite.com/api/index';
const json = {
title: 'Title',
text: 'Text to send',
};
const xhrConfig = {
method: 'POST', // or: 'PUT', 'PATCH', 'DELETE' ...headers: {
'Content-Type': 'application/json',
},
body: JSON.stringify(json)
};
fetch( url, xhrConfig )
.then( async response => {
let data = await response.json()
if ( !response.ok ) {
alert( `Error ${response.status}: ${data.error}` );
} else {
console.log( data );
}
});
Copied!
VanillaJS Starter Template
Here is a full example you can copy and paste to get you started.
You can also test and play with it on this codepen
How to login as a Frontend-User using pure JS and send requests to the backend
In most cases you will want to restrict access to certain users or usergroups.
The basic way to do this in your classes and methods, is to use the @ApiAccess() Annotation.
The nnrestapi-extension comes with a default endpoint to authenticate as a Frontend User using the
credentials set in the standard fe_user-record.
To keep the frontend user logged in, TYPO3 usually sets a cookie. Cookies tend to get rather ugly when you
are sending cross-domain requests, e.g. from your Single Page Application (SPA) or from a localhost
environment.
The nnrestapi solves this by also allowing authentication via JWT (Json Web Token).
Let's have a look, how to authenticate, retrieve a JWT with pure JavaScript ("VanillaJS") and pass it to the
server when making follow-up request.
Tip
Play with this chapter on codepen
Want to play, not read? Then head on to Codepen and learn by playing with the example.
Authentication with pure JavaScript
Use a simple POST-request to the endpoint /api/auth and pass your credentials wrapped in a JSON to
authenticate as a TYPO3 Frontend-User. If you were successfully logged in, you will get an array with
information about the frontend-user and the JSON Web Token (JWT).
In the following script we are simply "memorizing" the JWT by storing it in the
localStorage for later requests.
// This endpoint is part of the nnrestapiconst authUrl = 'https://www.mywebsite.com/api/auth';
const credentials = {
username: 'john',
password: 'xxxx'
};
const xhrConfig = {
method: 'POST',
headers: {
'Content-Type': 'application/json',
},
body: JSON.stringify(credentials)
};
fetch( authUrl, xhrConfig )
.then( async response => {
// convert the result to a JavaScript-objectlet data = await response.json()
if ( !response.ok ) {
// reponse was not 200
alert( `Error ${response.status}: ${data.error}` );
} else {
// everything ok!console.log( data );
localStorage.setItem('token', data.token);
}
});
Copied!
If you were john and we guessed your password right, the response of the above example will look something like this:
The most important part of the response is the token. You will need to store the value of the token in a variable
or localStorage like we did in the example above.
Sending authenticated requests
After you retrieved your JSON Web Token (JWT) you can compose requests with the Authentication Bearer header.
Let's send a request to an endpoint that has an restricted access and only allows requests from fe_users.
This can be done, by setting @Api\Access("fe_users") as Annotation in the endpoints method.
// Your endpoint. Only fe_users may access it.const url = 'https://www.mywebsite.com/api/test/something';
// The JWT we stored above after authenticatingconst token = localStorage.getItem('token');
const xhrConfig = {
credentials: 'include',
headers: {
Authorization: `Bearer ${token}`
}
};
fetch( url, xhrConfig )
.then( async response => {
// convert the result to a JavaScript-objectlet data = await response.json()
if ( !response.ok ) {
alert( `Error ${response.status}: ${data.error}` );
} else {
console.log( data );
}
});
Copied!
Checking the login status
The nnrestapi comes with an endpoint to check, if the JWT is still valid. Or, another words, If the frontend-user
is still logged in and has a valid session.
Hint
The session lifetime (the time the frontend-user session is valid) can be set in the backend.
Have a look at the extension configuration for nnrestapi in the Extension Manager.
Simply send a GET-request to the endpoint /api/user and pass the Authentication Bearer header.
If the session is stil valid, the API will return information about the current frontend-user.
// This endpoint is part of the nnrestapi const checkUserUrl = 'https://www.mywebsite.com/api/user';
// The JWT we stored above after authenticatingconst token = localStorage.getItem('token');
const xhrConfig = {
credentials: 'include',
headers: {
Authorization: `Bearer ${token}`
}
};
fetch( checkUserUrl, xhrConfig )
.then( async response => {
// convert the result to a JavaScript-objectlet data = await response.json()
if ( !response.ok ) {
alert( `Error ${response.status}: ${data.error}` );
} else {
console.log( data );
}
});
Copied!
The result will be very similar to the object returned during authentication, but the response
will not contain the token:
Full plain JavaScript ("VanillaJS") Starter Template with login-form
Here is a template with login-form and testbed to get you started. It will show a login-form and - after successful authentication -
a testform to send JSON-requests with GET, POST, PUT, DELETE and PATCH requests:
<!doctype html><htmllang="en"><head><metacharset="utf-8"><metaname="viewport"content="width=device-width, initial-scale=1"><title>nnrestapi axios Demo with authentication</title><linkhref="https://cdn.jsdelivr.net/npm/bootstrap@5.0.2/dist/css/bootstrap.min.css"rel="stylesheet"integrity="sha384-EVSTQN3/azprG1Anm3QDgpJLIm9Nao0Yz1ztcQTwFspd3yD65VohhpuuCOmLASjC"crossorigin="anonymous"><style>#json-data {
min-height: 100px;
}
#result {
min-height: 100px;
white-space: pre-wrap;
border: 1px dashed #aaa;
background: #eee;
padding: 0.75rem;
}
</style></head><body><divclass="container my-5"id="login-form"><divclass="form-floating mb-4"><inputclass="form-control"id="url-auth"value="https://www.mysite.com/api/auth" /><labelfor="url-auth">URL to auth-endpoint</label></div><divclass="form-floating mb-4"><inputclass="form-control"id="username"value="" /><labelfor="username">Username</label></div><divclass="form-floating mb-4"><inputtype="password"class="form-control"id="password"value="" /><labelfor="password">password</label></div><divclass="form-floating mb-4"><buttonid="btn-login"class="btn btn-primary">Login</button></div></div><divclass="container my-5 d-none"id="test-form"><divclass="form-floating mb-4"><selectclass="form-select"id="request-method"><option>GET</option><option>POST</option><option>PUT</option><option>PATCH</option><option>DELETE</option></select><labelfor="request-method">Request method</label></div><divclass="form-floating mb-4"><inputclass="form-control"id="url-request"value="https://www.mysite.com/api/user" /><labelfor="url">URL to endpoint</label></div><divclass="form-floating mb-4"><textareaclass="form-control"id="json-data">{"title":"Test"}</textarea><labelfor="json-data">JSON data</label></div><divclass="form-floating mb-4"><buttonid="btn-request"class="btn btn-primary">Send to API</button></div><preid="result"></pre></div><scriptsrc="https://cdn.jsdelivr.net/npm/bootstrap@5.0.2/dist/js/bootstrap.bundle.min.js"integrity="sha384-MrcW6ZMFYlzcLA8Nl+NtUVF0sA7MsXsP1UyJoMp4YLEuNSfAP+JcXn/tWtIaxVXM"crossorigin="anonymous"></script><script>/**
* Login form
*
*/document.getElementById('btn-login').addEventListener('click', () => {
const authUrl = document.getElementById('url-auth').value;
const credentials = {
username: document.getElementById('username').value,
password: document.getElementById('password').value
};
const xhrConfig = {
method: 'POST',
headers: {
'Content-Type': 'application/json',
},
body: JSON.stringify(credentials)
};
fetch( authUrl, xhrConfig )
.then( async response => {
// convert the result to a JavaScript-objectlet data = await response.json()
if ( !response.ok ) {
// reponse was not 200
alert( `Error ${response.status}: ${data.error}` );
} else {
// everything ok. Store the token.
localStorage.setItem('token', data.token);
// show the request-formdocument.getElementById('login-form').classList.add('d-none');
document.getElementById('test-form').classList.remove('d-none');
}
});
});
/**
* Test form
*
*/document.getElementById('btn-request').addEventListener('click', () => {
const requestUrl = document.getElementById('url-request').value;
const method = document.getElementById('request-method').value;
const json = document.getElementById('json-data').value;
// The JWT we stored above after authenticatingconst token = localStorage.getItem('token');
const xhrConfig = {
method: method,
headers: {
'Content-Type': 'application/json',
Authorization: `Bearer ${token}`
}
};
if (['GET', 'DELETE'].indexOf(method) == -1) {
xhrConfig.body = JSON.stringify(json);
}
fetch( requestUrl, xhrConfig )
.then( async response => {
// convert the result to a JavaScript-objectlet data = await response.json()
if ( !response.ok ) {
// reponse was not 200
alert( `Error ${response.status}: ${data.error}` );
} else {
document.getElementById('result').innerText = JSON.stringify( data );
}
});
});
</script></body></html>
Copied!
Uploading Files
Hint
This chapter explains how to upload files to the nnrestapi using pure JavaScript without any libraries.
If you are interested in finding out, how to create an endpoint that processes the fileupload, attaches the SysFileReference
to a model and then persists the model in the database, please refer to the examples in this section
How to upload files with pure JavaScript
Tip
You can find a full example with fileuploads and JavaScript here:
play on CodePen
Using mutipart form-data
Please refer to this section for detailled information on implementing
the backend part of the file-upload.
By default, the nnrestapi will recursively iterate through the JSON from your request and look for
the special placeholder UPLOAD:/varname.
If it finds a fileupload in the multipart/form-data corresponding to the varname of the placeholder,
it will automatically move the file to its destination and replace the UPLOAD:/varname in the JSON
with the path to the file, e.g. fileadmin/api/image.jpg.
Here is a basic example on creating a multipart/form-data request using pure JavaScript.
First, let's create a simple form in HTML. As we are retrieving the input-values manually, there is no need to
wrap the inputs in a <form> element:
If you select The result of the above example will look something like this:
{
"title": "This is the title",
"text": "This is the bodytext",
"image": "fileadmin/api/filename.jpg"
}
Copied!
Tip
The nnrestapi can automatically create a Model from your JSON-data and attach SysFileReferences (FAL) relations.
Please refer to this example for in-depth information.
Legacy JavaScript (IE)
Creating requests using pure JavaScript ("VanillaJS") in older browsers that do not support
ES6+ or the Promise-based fetch() command. This is the case with all versions of Internet Explorer 11 and below.
Check Can I Use for all browsers that do not support fetch().
Find out, how to create GET, POST, PUT, PATCH and DELETE requests,
with and without authentication and file-uploads using nothing but pure JavaScript in the following chapters:
This example uses an JavaScript with a very "old" way of creating and sending XHR-requests.
You will only need this, if you are still forced to optimize for Internet Explorer 11 and below.
For a more modern approach we would recommend using the promise-based fetch() or
a library that saves a lot of headaches like Axios
How to make a request with pure JavaScript (no libraries) that supports older browsers (like Internet Explorer 11 and below).
Tip
Want to play, not read?
Here is a ready-to-go codepen that demonstrates how to use VanillaJS to make requests. Run and have fun!
If you can drop support for IE11 and below, the easiest way to send a request is using the promise-based fetch()
command that comes with ES6+.
Let's create a GET request to the nnrestapi backend:
// By default this will be routed to Index->getIndexAction()var url = 'https://www.mywebsite.com/api/index';
var xhr = new XMLHttpRequest();
xhr.open('GET', url);
xhr.onload = function () {
var data = JSON.parse( xhr.responseText );
if (xhr.status != 200) {
alert("Error " + xhr.status + ": " + data.error );
returnfalse;
}
console.log( data );
};
xhr.onerror = function () {
alert('Some other error... probably wrong url?');
};
xhr.send();
Copied!
Of course you can also send a payload / JSON data using a POST, PUT or PATCH request:
// By default this will be routed to Index->postIndexAction()var url = 'https://www.mywebsite.com/api/index';
var json = {
title: 'My Title',
text: 'And some text'
};
var xhr = new XMLHttpRequest();
xhr.overrideMimeType('application/json');
xhr.open('POST', url);
xhr.onload = function () {
var data = JSON.parse( xhr.responseText );
if (xhr.status != 200) {
alert("Error " + xhr.status + ": " + data.error );
returnfalse;
}
console.log( data );
};
xhr.onerror = function () {
alert('Some other error... probably wrong url?');
};
xhr.send(JSON.stringify(json));
Copied!
VanillaJS Starter Template
Here is a full example you can copy and paste to get you started.
You can also test and play with it on this codepen
<!doctype html><htmllang="en"><head><metacharset="utf-8"><metaname="viewport"content="width=device-width, initial-scale=1"><title>nnrestapi VanillaJS Demo</title><linkhref="https://cdn.jsdelivr.net/npm/bootstrap@5.0.2/dist/css/bootstrap.min.css"rel="stylesheet"integrity="sha384-EVSTQN3/azprG1Anm3QDgpJLIm9Nao0Yz1ztcQTwFspd3yD65VohhpuuCOmLASjC"crossorigin="anonymous"><style>#json-data {
min-height: 100px;
}
#result {
min-height: 100px;
white-space: pre-wrap;
border: 1px dashed #aaa;
background: #eee;
padding: 0.75rem;
}
</style></head><body><divclass="container my-5"><divclass="form-floating mb-4"><selectclass="form-select"id="request-method"><option>GET</option><option>POST</option><option>PUT</option><option>PATCH</option></select><labelfor="request-method">Request method</label></div><divclass="form-floating mb-4"><inputclass="form-control"id="url"value="https://www.mysite.com/api/index/" /><labelfor="url">URL to endpoint</label></div><divclass="form-floating mb-4"><inputclass="form-control"id="title"value="This is the title" /><labelfor="json-data">Title</label></div><divclass="form-floating mb-4"><textareaclass="form-control"id="text">This is the bodytext</textarea><labelfor="json-data">Text</label></div><divclass="form-floating mb-4"><buttonid="submit"class="btn btn-primary">Send to API</button></div><preid="result">Result</pre></div><scriptsrc="https://cdn.jsdelivr.net/npm/bootstrap@5.0.2/dist/js/bootstrap.bundle.min.js"integrity="sha384-MrcW6ZMFYlzcLA8Nl+NtUVF0sA7MsXsP1UyJoMp4YLEuNSfAP+JcXn/tWtIaxVXM"crossorigin="anonymous"></script><script>var $method = document.getElementById('request-method');
var $url = document.getElementById('url');
var $title = document.getElementById('title');
var $text = document.getElementById('text');
var $button = document.getElementById('submit');
var $result = document.getElementById('result');
/**
* Helper-function to requests for older
* browsers not supporting fetch()
*
*/functionsendRequest( url, payload, method, done, fail ) {
if (typeof payload == 'object') {
payload = JSON.stringify(payload);
}
var xhr = new XMLHttpRequest();
xhr.overrideMimeType('application/json');
xhr.open(method, url);
// The JWT we stored after authenticatingvar token = localStorage.getItem('token');
if (token) {
xhr.setRequestHeader('Authorization', 'Bearer ' + token);
}
xhr.onload = function () {
var data = JSON.parse( xhr.responseText );
if (xhr.status != 200) {
if (fail) fail( data );
returnfalse;
}
if (done) done( data );
};
xhr.onerror = function () {
fail({
status: 0,
error: 'Some other error... probably wrong url?'
});
};
if (['GET', 'DELETE'].indexOf(method) == -1) {
xhr.send( payload );
} else {
xhr.send();
}
}
$button.addEventListener('click', submitData);
functionsubmitData() {
var url = $url.value;
var method = $method.value;
var json = {
title: $title.value,
text: $text.value
};
sendRequest( url, json, method, onResponse, onError );
functiononResponse( data ) {
$result.innerText = JSON.stringify( data );
}
functiononError( error ) {
alert( `Error ${response.status}: ${data.error}` );
}
}
</script></body></html>
Copied!
Authentication
Warning
This example uses an JavaScript with a very "old" way of creating and sending XHR-requests.
You will only need this, if you are still forced to optimize for Internet Explorer 11 and below.
For a more modern approach we would recommend using the promise-based fetch() or
a library that saves a lot of headaches like Axios
How to login as a Frontend-User using pure JavaScript (no libraries) for IE11 and post data to an endpoint
In most cases you will want to restrict access to certain users or usergroups.
The basic way to do this in your classes and methods, is to use the @ApiAccess() Annotation.
The nnrestapi-extension comes with a default endpoint to authenticate as a Frontend User using the
credentials set in the standard fe_user-record.
To keep the frontend user logged in, TYPO3 usually sets a cookie. Cookies tend to get rather ugly when you
are sending cross-domain requests, e.g. from your Single Page Application (SPA) or from a localhost
environment.
The nnrestapi solves this by also allowing authentication via JWT (Json Web Token).
Let's have a look, how to authenticate, retrieve a JWT with pure JavaScript ("VanillaJS") and pass it to the
server when making follow-up request.
Tip
Play with this chapter on codepen
Want to play, not read? Then head on to Codepen and learn by playing with the example.
Authentication with pure JavaScript (IE11, no libraries)
Use a simple POST-request to the endpoint /api/auth and pass your credentials wrapped in a JSON to
authenticate as a TYPO3 Frontend-User. If you were successfully logged in, you will get an array with
information about the frontend-user and the JSON Web Token (JWT).
In the following script we are simply "memorizing" the JWT by storing it in the
localStorage for later requests.
// This endpoint is part of the nnrestapivar authUrl = 'https://www.mywebsite.com/api/auth';
var credentials = {
username: 'john',
password: 'xxxx'
};
var xhr = new XMLHttpRequest();
xhr.overrideMimeType('application/json');
xhr.open('POST', authUrl);
xhr.onload = function () {
var data = JSON.parse( xhr.responseText );
if (xhr.status != 200) {
alert( 'Error ' + xhr.status + ': ' + data.error );
returnfalse;
}
console.log( data );
localStorage.setItem('token', data.token);
};
xhr.onerror = function () {
alert( 'Some other error... probably wrong url?' );
};
xhr.send( JSON.stringify(credentials) );
Copied!
If you were john and we guessed your password right, the response of the above example will look something like this:
The most important part of the response is the token. You will need to store the value of the token in a variable
or localStorage like we did in the example above.
Sending authenticated requests
After you retrieved your JSON Web Token (JWT) you can compose requests with the Authentication Bearer header.
Let's send a request to an endpoint that has an restricted access and only allows requests from fe_users.
This can be done, by setting @Api\Access("fe_users") as Annotation in the endpoints method.
// Your endpoint. Only fe_users may access it.var url = 'https://www.mywebsite.com/api/test/something';
var xhr = new XMLHttpRequest();
xhr.overrideMimeType('application/json');
xhr.open('GET', url);
// The JWT we stored after authenticatingvar token = localStorage.getItem('token');
xhr.setRequestHeader('Authorization', 'Bearer ' + token);
xhr.onload = function () {
var data = JSON.parse( xhr.responseText );
if (xhr.status != 200) {
alert( 'Error ' + xhr.status + ': ' + data.error );
returnfalse;
}
console.log( data );
};
xhr.onerror = function () {
alert( 'Some other error... probably wrong url?' );
};
xhr.send();
Copied!
Checking the login status
The nnrestapi comes with an endpoint to check, if the JWT is still valid. Or, another words, If the frontend-user
is still logged in and has a valid session.
Hint
The session lifetime (the time the frontend-user session is valid) can be set in the backend.
Have a look at the extension configuration for nnrestapi in the Extension Manager.
Simply send a GET-request to the endpoint /api/user and pass the Authentication Bearer header.
If the session is stil valid, the API will return information about the current frontend-user.
// This endpoint is part of the nnrestapi var checkUserUrl = 'https://www.mywebsite.com/api/user';
var xhr = new XMLHttpRequest();
xhr.overrideMimeType('application/json');
xhr.open('GET', checkUserUrl);
// The JWT we stored after authenticatingvar token = localStorage.getItem('token');
xhr.setRequestHeader('Authorization', 'Bearer ' + token);
xhr.onload = function () {
var data = JSON.parse( xhr.responseText );
if (xhr.status != 200) {
alert( 'Error ' + xhr.status + ': ' + data.error );
returnfalse;
}
console.log( data );
};
xhr.onerror = function () {
alert( 'Some other error... probably wrong url?' );
};
xhr.send();
Copied!
The result will be very similar to the object returned during authentication, but the response
will not contain the token:
Full plain JavaScript ("VanillaJS") Starter Template with login-form
Here is a template with login-form and testbed to get you started. It will show a login-form and - after successful authentication -
a testform to send JSON-requests with GET, POST, PUT, DELETE and PATCH requests:
<!doctype html><htmllang="en"><head><metacharset="utf-8"><metaname="viewport"content="width=device-width, initial-scale=1"><title>nnrestapi axios Demo with pure JavaScript for older browser</title><linkhref="https://cdn.jsdelivr.net/npm/bootstrap@5.0.2/dist/css/bootstrap.min.css"rel="stylesheet"integrity="sha384-EVSTQN3/azprG1Anm3QDgpJLIm9Nao0Yz1ztcQTwFspd3yD65VohhpuuCOmLASjC"crossorigin="anonymous"><style>#json-data {
min-height: 100px;
}
#result {
min-height: 100px;
white-space: pre-wrap;
border: 1px dashed #aaa;
background: #eee;
padding: 0.75rem;
}
</style></head><body><divclass="container my-5"id="login-form"><divclass="form-floating mb-4"><inputclass="form-control"id="url-auth"value="https://www.mysite.com/api/auth" /><labelfor="url-auth">URL to auth-endpoint</label></div><divclass="form-floating mb-4"><inputclass="form-control"id="username"value="" /><labelfor="username">Username</label></div><divclass="form-floating mb-4"><inputtype="password"class="form-control"id="password"value="" /><labelfor="password">password</label></div><divclass="form-floating mb-4"><buttonid="btn-login"class="btn btn-primary">Login</button></div></div><divclass="container my-5 d-none"id="test-form"><divclass="form-floating mb-4"><selectclass="form-select"id="request-method"><option>GET</option><option>POST</option><option>PUT</option><option>PATCH</option><option>DELETE</option></select><labelfor="request-method">Request method</label></div><divclass="form-floating mb-4"><inputclass="form-control"id="url-request"value="https://www.mysite.com/api/endpoint/somewhere" /><labelfor="url">URL to endpoint</label></div><divclass="form-floating mb-4"><textareaclass="form-control"id="json-data">{"title":"Test"}</textarea><labelfor="json-data">JSON data</label></div><divclass="form-floating mb-4"><buttonid="btn-request"class="btn btn-primary">Send to API</button></div><preid="result"></pre></div><scriptsrc="https://cdn.jsdelivr.net/npm/bootstrap@5.0.2/dist/js/bootstrap.bundle.min.js"integrity="sha384-MrcW6ZMFYlzcLA8Nl+NtUVF0sA7MsXsP1UyJoMp4YLEuNSfAP+JcXn/tWtIaxVXM"crossorigin="anonymous"></script><script>/**
* Helper-function to send requests for older
* browsers not supporting fetch()
*
*/functionsendRequest( url, payload, method, done, fail ) {
if (typeof payload == 'object') {
payload = JSON.stringify(payload);
}
var xhr = new XMLHttpRequest();
xhr.overrideMimeType('application/json');
xhr.open(method, url);
// The JWT we stored after authenticatingvar token = localStorage.getItem('token');
if (token) {
xhr.setRequestHeader('Authorization', 'Bearer ' + token);
}
xhr.onload = function () {
var data = JSON.parse( xhr.responseText );
if (xhr.status != 200) {
if (fail) fail( data );
returnfalse;
}
if (done) done( data );
};
xhr.onerror = function () {
fail({
status: 0,
error: 'Some other error... probably wrong url?'
});
};
if (['GET', 'DELETE'].indexOf(method) == -1) {
xhr.send( payload );
} else {
xhr.send();
}
}
/**
* Login form
*
*/document.getElementById('btn-login').addEventListener('click', function () {
var authUrl = document.getElementById('url-auth').value;
var credentials = {
username: document.getElementById('username').value,
password: document.getElementById('password').value
};
sendRequest( authUrl, credentials, 'POST', authSuccessful, authFailed );
functionauthSuccessful( data ) {
// everything ok. Store the token.
localStorage.setItem('token', data.token);
// show the request-formdocument.getElementById('login-form').classList.add('d-none');
document.getElementById('test-form').classList.remove('d-none');
}
functionauthFailed( data ) {
alert( `Error ${data.status}: ${data.error}` );
}
});
/**
* Test form
*
*/document.getElementById('btn-request').addEventListener('click', function () {
var requestUrl = document.getElementById('url-request').value;
var method = document.getElementById('request-method').value;
var json = document.getElementById('json-data').value;
sendRequest( requestUrl, json, method, requestSuccessful, requestFailed );
functionrequestSuccessful( data ) {
document.getElementById('result').innerText = JSON.stringify( data );
}
functionrequestFailed( data ) {
alert( `Error ${data.status}: ${data.error}` );
}
});
</script></body></html>
Copied!
Uploading Files
Warning
This example uses an JavaScript with a very "old" way of creating and sending XHR-requests.
You will only need this, if you are still forced to optimize for Internet Explorer 11 and below.
For a more modern approach we would recommend using the promise-based fetch() or
a library that saves a lot of headaches like Axios
Hint
This chapter explains how to upload files to the nnrestapi using pure JavaScript without any libraries and
shows a solution that is compatible with browser not supporting ES6+ and fetch() like Internet Explorer Version 11 and below.
If you are interested in finding out, how to create end endpoint that processes the fileupload, attaches the SysFileReference
to a model and then persists the model in the database, please refer to the examples in this section
How to upload files with pure JavaScript for older browsers
Tip
You can find a full example with fileuploads and JavaScript here:
play on CodePen
Using mutipart form-data
Please refer to this section for detailled information on implementing
the backend part of the file-upload.
By default, the nnrestapi will recursively iterate through the JSON from your request and look for
the special placeholder UPLOAD:/varname.
If it finds a fileupload in the multipart/form-data corresponding to the varname of the placeholder,
it will automatically move the file to its destination and replace the UPLOAD:/varname in the JSON
with the path to the file, e.g. fileadmin/api/image.jpg.
Here is a basic example on creating a multipart/form-data request using pure JavaScript.
First, let's create a simple form in HTML. As we are retrieving the input-values manually, there is no need to
wrap the inputs in a <form> element:
And here is the JavaScript example using "VanillaJS" (nothing else but pure JavaScript) and FormData:
// put your url herevar url = 'https://www.mywebsite.com/api/index';
document.getElementById('submit').addEventListener('click', function() {
var json = {
title: document.getElementById('title').value,
text: document.getElementById('text').value,
image: 'UPLOAD:/myfile'
};
var formData = new FormData();
formData.append('json', JSON.stringify(json));
formData.append('myfile', document.getElementById('file').files[0]);
var xhr = new XMLHttpRequest();
xhr.overrideMimeType('application/json');
xhr.open('POST', url);
xhr.onload = function () {
var data = JSON.parse( xhr.responseText );
if (xhr.status != 200) {
alert("Error " + xhr.status + ": " + data.error );
returnfalse;
}
document.getElementById('result').innerText = JSON.stringify( data );
};
xhr.onerror = function () {
alert('Some other error... probably wrong url?');
};
xhr.send(formData);
});
Copied!
If you select The result of the above example will look something like this:
{
"title": "This is the title",
"text": "This is the bodytext",
"image": "fileadmin/api/filename.jpg"
}
Copied!
Tip
The nnrestapi can automatically create a Model from your JSON-data and attach SysFileReferences (FAL) relations.
Please refer to this example for in-depth information.
Configuration
The following chapters describe how to configure your application with TypoScript, YAML and in the extension manager.
In this section, you can find examples and tutorials:
Allows the centralized definition of access groups to be used with the @Api\Access("config[name]") annotation.
Can be a comma separated list of users, see this section for more examples.
plugin.tx_nnrestapi.settings.accessGroups {
// use @Api\Access("config[example1]")
example1 = fe_users[3,2]
// use @Api\Access("config[example2]")
example1 = fe_users[david], fe_groups[1], ip_users[5.10]
}
Copied!
Default
no groups defined
apiController
Property
apiController
Data type
string
Description
Defines which Controller takes care of resolving the class and method that should be called.
If you want to take complete control of the delegation logic, dependency injection etc.,
replace the default class with your own class.
Your class should extend the Nng\Nnrestapi\Controller\AbstractApiController. It will be instanciated
by the PageResolver-MiddleWare Nng\Nnrestapi\Middleware\PageResolver which will call the
indexAction in your class.
Defines which suffixes are allowed for the file-upload.
If nothing is set, it will fallback to the "safe" suffixes defined in
EXT:nnhelpers
// define it globally for all configurations ...
plugin.tx_nnrestapi.settings {
allowedFileUploadSuffix = jpg, png, svg
}
// or individually for a single configuration
plugin.tx_nnrestapi.settings.fileUploads {
myUploadConfig {
allowedFileUploadSuffix = jpg, bmp
}
}
Copied!
Default
NngNnrestapiControllerApiController
fileUploads
Property
fileUploads
Data type
array
Description
Define upload-paths that can be used in the @Api\Upload("config[key]") annotation.
plugin.tx_nnrestapi.settings.fileUploads {
// use @Api\Upload("config[myUploadConfig]") at your method
myUploadConfig {
// the path to use, if no other criteria below meet
defaultStoragePath = 1:/myfolder/
// optional: custom method to resolve the upload-path
pathFinderClass = My\Extension\Helper\UploadPathHelper::getUploadPath
// target-path for file, file-0, file-1, ... from multipart/form-data
file = 1:/myfolder/files/
// target-path for image, image-0, image-1, ... from multipart/form-data
image = 1:/myfolder/images/
}
}
Copied!
Default
NngNnrestapiControllerApiController
globalDistillers
Property
globalDistillers
Data type
array
Description
The main purpose of a "Distiller" is to reduce the amount of data returned to the frontend
by removing certain field from a model after it is converted to a JSON.
This can be done on a per-method basis or globally for
a certain Model type by setting the globalDistillers in the TypoScript.
plugin.tx_nnrestapi.settings.globalDistillers {
// use the model class name as a key here
My\Extension\Domain\Model\Name {
// "exclude" will keep all fields EXCEPT the ones listed here
exclude = pid, other_field
// "include" will remove ALL fields EXCEPT the ones listed hereinclude = uid, title, bodytext
// "flattenFileReferences" will reduce the FALs to their publicUrl
flattenFileReferences = 1
}
}
Copied!
Default
parent is excluded for TYPO3CMSExtbaseDomainModelCategory
insertDefaultValues
Property
insertDefaultValues
Data type
array
Description
Define default values to be set when a new model is created and passed to your endpoint.
This is very useful, when you are using dependency injection (DI) to automatically create
a new Model in your POST-method as described in this section
Use-case would be: Every new entry created in the frontend should be inserted in a given
SysFolder in the backend. This can be accomplished by setting a default pid for the
model in the TypoScript:
These values will be overridden, if the frontend sets a value for the field.
plugin.tx_nnrestapi.settings.insertDefaultValues {
// use the model-name as a key
My\Extension\Domain\Model\Name {
// define default value for a new model
pid = 6// you can even set default SysCategories
categories {
0 = 11 = 2
}
}
}
Copied!
Default
none defined
kickstarts
Property
kickstarts
Data type
array
Description
Allows adding templates to the kickstarter-examples.
These can be accessed in the "RestApi" backend module by clicking on the tab "Kickstarter".
Find out how to create your own templates for the Kickstarter and
replace / customize variables in the templates during the download.
plugin.tx_nnrestapi.settings.kickstarts {
myexample {
// title and description for the list view
title = A frontend in React
description = Example React frontend application
// icon-class (FontAwesome/Free supported)
icon = fas fa-box
// path can be a zip or a folder. Must be inside an EXT-folder or fileadmin!
path = EXT:myextension/Resources/Private/Kickstarts/react.zip
// list of texts to replace in source-codes
replace {
my/extname = [#vendor-lower#]/[#ext-lower#]
}
}
}
Copied!
Default
see TypoScript
localization
Property
localization
Data type
array
Description
Controls how to handle translations when retrieving data from the database.
By default, localization is NOT enabled. This can be changed by setting
enabled = 1.
While checking, which language was requested, the nnrestapi will evaluate the
URL path (e.g. ../en/api/endpoint), the ?L=... parameter in the URL and
the header sent by the frontend-application. Use languageHeader to define
which headers of the request to take into consideration.
plugin.tx_nnrestapi.settings.localization {
// enable the localization (default is 0 / off)
enabled = 1// which headers to check for language requested by frontend
languageHeader = x-locale, accept-language
}
Allows you to add, modify or remove the default headers sent to the frontend.
You can define simple key/value pairs here that will be sent with every response.
All headers are sent without parsing or modification, with one exception: The
header for Access-Control-Allow-Origin:
As the Access-Control-Allow-Origin sent by PHP usually can not handle wildcards in
parts of the URL (e.g. *.mysite.com), the list of URLs for this header are parsed
by the nnrestapi.
If one of the given patterns matches the HTTP_ORIGIN or HTTP_REFERER, the header
will be set to the exact domain that the request was sent from. This allows setting
Access-Control-Allow-Credentials: true which can be useful in cross-domain requests.
plugin.tx_nnrestapi.settings.response.headers {
// Restrict CORS to certain domains
Access-Control-Allow-Origin = localhost:8090, *.mysite.com, https://www.otherdomain.de
}
Adds global hooks to perform security checks before accessing an endpoint.
You can add your custom hooks here. Your hook should return TRUE or
FALSE depending on the result of the check. If it returns FALSE the Api
will respond with a 403 status code.
To include these default settings, you must import the YAML from nnrestapi in your site configuration
like described in the installation guide:
# Insert this at the end of your site config.yaml imports:-resource:'EXT:nnrestapi/Configuration/Yaml/default.yaml'
Copied!
The following section describes the individual options:
nnrestapi.payloadKey
Property
nnrestapi.payloadKey
Data type
string
Description
If you are using multipart/form-data to pass file-attachments and JSON-data simultaneously, you will need
to move the JSON-data to a own variable like described in this chapter.
If you would like to use a different variable than json for this, you can override the payloadKey in
the settings:
nnrestapi:
# use variable 'payload' instead of 'json'
payloadKey: 'payload'
Copied!
Default
'json'
routing.basePath
Property
nnrestapi.basePath
Data type
string
Description
Defines, which base-path is used for the api.
Everything behind this path will be routed to an endpoint and method of the api.
Make sure, this path is unique and doesn't conflict with page paths defined in the backend.
nnrestapi:
# use path '/rest' instead of '/api'
basePath: '/rest'
Copied!
Default
'/api'
routeEnhancers.Nnrestapi.type
Property
routeEnhancers.Nnrestapi.type
Data type
string
Description
Under the hood, nnrestapi uses a standard TYPO3 Route Enhancer to map the request to an endpoint.
Nothing special about this line - and nothing you need to modify.
Default
'NnrestapiEnhancer'
Extension Manager Configuration
Configurations in the Extension Manager
Use the backend module "Settings -> Extension Configuration" to modify the following settings:
basic.apiKeys
Property
basic.apiKeys
Data type
text
Description
List of global api users that can access the endpoint.
One user per line. Username and ApiKey separated by a single colon (:)
All usernames will work, except for the default "examplefeUserName".
::
user1:theApiKeyOfUser1
user2:theApiKeyOfUser2
Default
examplefeUserName:exampleApiKey
basic.maxSessionLifetime
Property
basic.maxSessionLifetime
Data type
number
Description
Defines how long an inactive user stays logged in (seconds).
Default
3600
basic.disableDefaultEndpoints
Property
basic.disableDefaultEndpoints
Data type
boolean
Description
Disables (removes) all endpoints shipped by default with nnrestapi.
If disabled, you will need to implement your own endpoints for authenticating
users and checking their status.
Default
FALSE
basic.disablePreCheck
Property
basic.disablePreCheck
Data type
boolean
Description
Disables all warnings and checks during installation.
Default
FALSE
basic.disableDonationWarning
Property
basic.disableDonationWarning
Data type
boolean
Description
Disables donation information.
Warning
Please make sure you have actually donated before checking this box.
Otherwise, ancient voodoo magic will be unleashed upon your codebase,
causing random semicolons to disappear and your CSS to mysteriously
break at 3am. You have been warned. 🐔
Default
FALSE
basic.fileEncryptionKey
Property
basic.fileEncryptionKey
Data type
text
Description
Key for file encryption.
Default
(empty)
Logging Settings
The following settings control the logging behavior of the extension.
See Logging for more details.
logging.loggingEnabled
Property
logging.loggingEnabled
Data type
boolean
Description
Enable custom logging. Allows logging of requests to the API based on
the @Api\Log() annotation.
Default
FALSE
logging.loggingMode
Property
logging.loggingMode
Data type
options
Description
Decides what to log based on the @Api\Log() annotation:
all: Log all requests, except those with @Api\Log(false)
explicit: Only log requests that have @Api\Log() or @Api\Log(true)
force: Log all requests, ignoring any @Api\Log() annotations
Default
all
logging.errorLoggingEnabled
Property
logging.errorLoggingEnabled
Data type
boolean
Description
Enable error logging. Logs errors to the API.
Default
FALSE
logging.errorLoggingMode
Property
logging.errorLoggingMode
Data type
options
Description
Decides what type of errors to log:
all: Log all errors
exception: Only log critical errors like PHP exceptions
api: Only log errors called by \nn\rest::ApiError()
Default
all
logging.loggingAutoClear
Property
logging.loggingAutoClear
Data type
number
Description
Remove log entries older than X days. The logs will be deleted by a
scheduler task - make sure you include this task in your crontab.
Default
7
logging.loggingTempDuration
Property
logging.loggingTempDuration
Data type
number
Description
Duration of temporary logging in minutes. How long the logging will
stay active when enabled in the RestApi backend module.
Default
30
logging.logfiles
Property
logging.logfiles
Data type
boolean
Description
Save logs in logfile. Will keep a backup of the logfiles as CSV in
/var/log/ after deleting them from the database.
Default
FALSE
logging.logIpMode
Property
logging.logIpMode
Data type
options
Description
How to anonymize IP addresses in logs. Important to protect privacy of the users:
none: Do not save IP addresses
anonymized: Save anonymized IP (last octets removed)
hashed: Save hashed & salted IP
ip: Save full IP address
Default
anonymized
logging.logPayload
Property
logging.logPayload
Data type
boolean
Description
Whether to log the payload of the request.
Default
TRUE
Frontend-user configuration
Settings for individual frontend users
In the tab "RestAPI" of the individual frontend-users you can edit these settings:
Rest-Api Key
Property
Rest-Api Key
Data type
string
Description
This is the API key (password) the user can use when authenticating using
The backend module does not support Internet Explorer. It would be relatively easy do get it to work.
But we simply don't think anybody should be using Internet Explorer anymore.
Alexander was nice enough to describe a workaround by moving the Api-Code to a folder that is not scanned by EXT:autoloader:
[Creation Error] An error occurred while instantiating the annotation @Api\Access declared on method
I moved the api code from Vendor/Ext/Controller/ItemsController.php to Vendor/Ext/Api/Items.php
This way, EXT:autoloader do not scan it anymore, because it is only looking inside Controller Folder/NS
Copied!
Change log
Version 1.1.0
added @ApiEndpoint() Annotation for registering an Endpoint on a per-class base
added button for peeking in the README.md of the kickstarter packages before downloading them
improved caching of parsed classes in nn\rest::Endpoint()
improved error message, if URL could not be routed to endpoint