Slide-Potentiometer
This chapter will show you how to connect a potentiometer to your Arduino board read the current value of the potentiometer from JavaScript.
What is a slide potentiometer?
A slider potentiometer works the same way a knob potentiometer does, but instead of changing the resistance by turning a knob, you change it by sliding.
There are different types of slide potentiometers:
Linear slide potentiometers changes the resistance evenly (linear). Sliding 25% will increase / reduce the resistane by 25%.
Logarithmic slide potentiometers will change the resistance in a curve. This means, that you might have slided 50%, but the resistance is already up to 75%.
While logarithmic sliders are usually recommended when builing audio-faders, I would recommend buying a linear slide potentiometer for your project. If you accidently got a logarithmic one, you can compensate this with a little math.
If you are sure you bought a linear poti, but the damn thing keeps bevahing like a logarithmic one, double check your wiring! Usally you accidently
switched the +5V with the A0 connection.
Connecting the potentiometer with p5js
The basic syntax is:
let poti = connectSensor( SENSOR_POTENTIOMETER, pin, minValue, maxValue );
In the follwing example we will setup a potentionmeter which was connected to the A0 (Analog 0) pin.
If you don’t define a minValue and maxValue, the values returned by calling poti.vale() will range
from 0 to 1024:
let poti = connectSensor( SENSOR_POTENTIOMETER, 'A0' );
Here we would like the potentiometer to be mapped to values 0 and 100:
let poti = connectSensor( SENSOR_POTENTIOMETER, 'A0', 0, 100 );
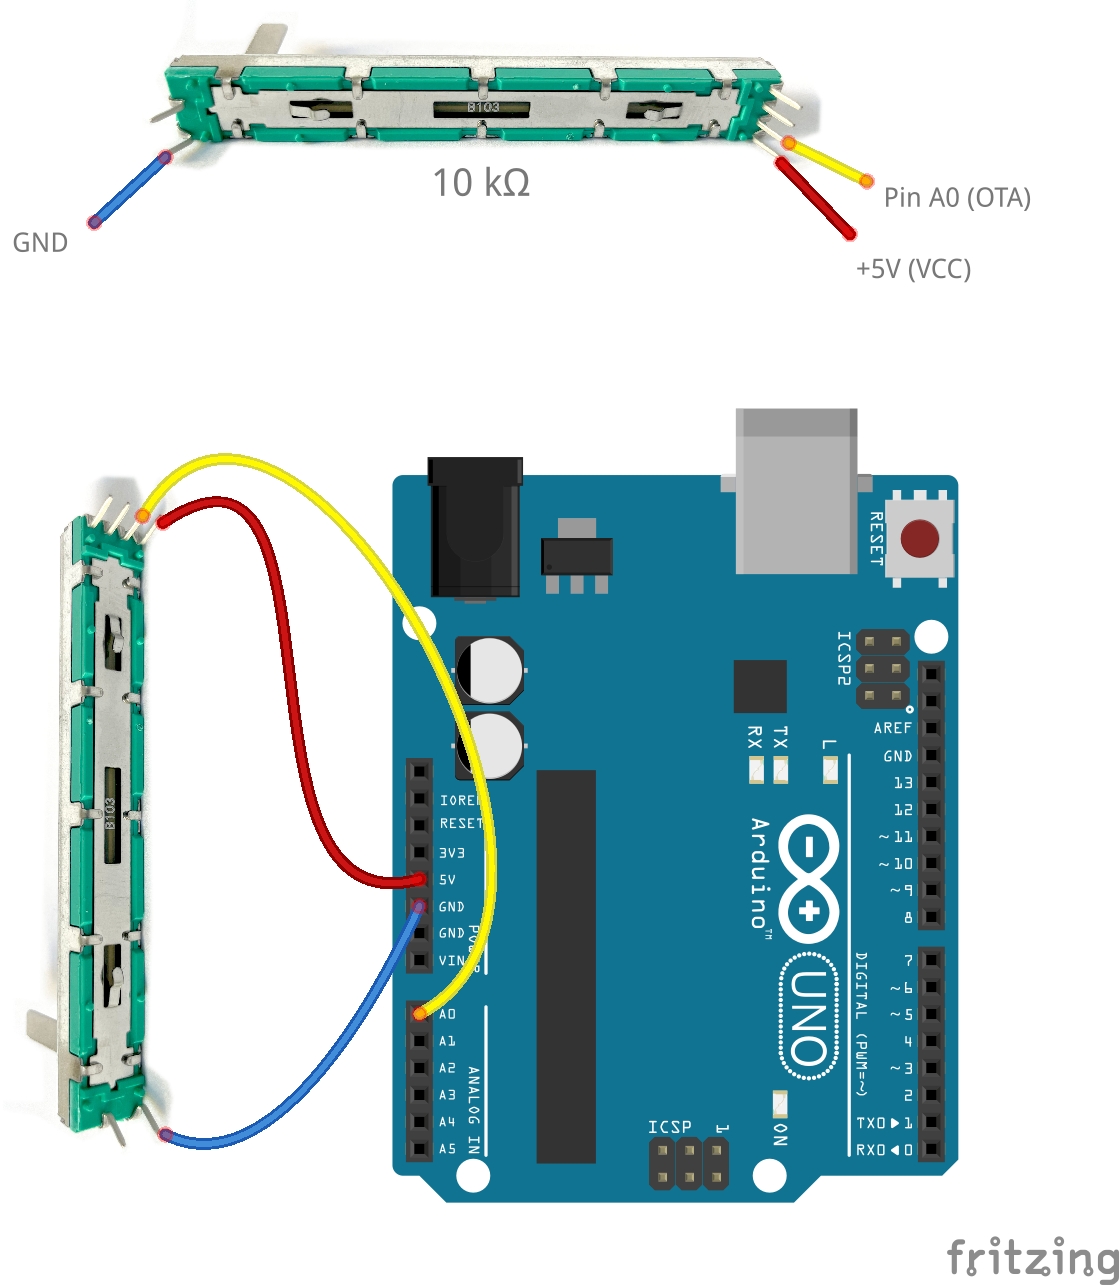
Hardware
1x 10 kΩ slide potentiometer or this one <https://amzn.to/3ys1vPz> and many more…
Wiring
There are many types of slide potentiometers. Some come with 3 pins, some with 5 or 6 pins.
Sliders with more than 3 pins usually have 2 separate / parallel wiring options (OTA and OTB).
What you will need to find out, is which of the pins needs to be connected to GND, +5V and your
analog pin (i.e. A0). Usually you will find a wiring scheme in the internet or on the manufacturer’s
website.
You will find several synonyms for the pins:
Pin on slide poti |
Synonyms |
Connects to Arduino |
|---|---|---|
OUT |
OTA / OTB, SIG, S, OUT |
Analog IN, i.e. pin |
VCC |
VCA / VCB, V, + |
+5V |
GND |
G, - |
GND |
Code
let poti;

function setup () {
   createCanvas(400, 400);
   poti = connectSensor( SENSOR_POTENTIOMETER, 'A0', 0, width );
}

function draw () {
   background( 255 );
   circle( 200, 200, poti.value() );
}